In This Topic
- Brisket Defined
- Choosing A Brisket For Barbecue
- Prepping A Brisket
- Seasoning The Brisket
- Temperature Of Brisket Before Cooking
- Converting Collagen To Gelatin Is Key To Tender Brisket
- Internal Temperature Of Finished Brisket
- Estimated Cooking Time
- Where To Measure Internal Temperature
- Cook Fat-Side Up Or Fat-Side Down?
- Turning, Basting & Crust Formation
- Foiling During Cooking
- Wrapping With Butcher Paper During Cooking
- Temperature Plateau—The Stall
- Foiling & Resting After Cooking
- Slicing & Chopping Brisket
- Burnt Ends
- Brisket Yield
- Brisket Servings Calculator
- Leftovers
- More Brisket Links On TVWB
Brisket Defined
Brisket is cut from the breast section of a side of beef. Each beef carcass renders only two whole briskets.
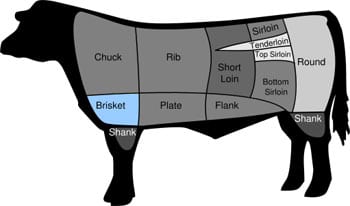
Diagram indicating brisket location
According to the USDA Institutional Meat Purchasing Standard (IMPS), a beef brisket as it’s cut from a side of beef “includes the anterior end of the sternum bones, the deep pectoral, and the supraspinatus muscle. Evidence of the cartilaginous juncture of the 1st rib and the sternum and the cross section of 4 rib bones shall be present.” You’ll never find this bone-in brisket in the meat department of a U.S. supermarket.
The whole brisket you’ll buy for barbecue is what the IMPS calls “120 Beef Brisket, Deckle-Off, Boneless.” The IMPS defines it as follows: “All bones and cartilage shall be removed. The deckle (hard fat and intercostal meat on the inside surface) shall be removed at the natural seam exposing the lean surface of the deep pectoral muscle. The inside lean surface shall be trimmed practically free of fat.” The word “intercostal” refers to meat between the rib bones.
The deep pectoral muscle (the “inside lean surface”) is known as the pectoralis profundi but is more commonly referred to as the brisket flat. The supraspinatus muscle is known as the pectoralis superficialis but is more commonly referred to as the brisket point.
What Is The Deckle?
Did you notice that the IMPS name for a whole brisket is “120 Beef Brisket, Deckle-Off, Boneless”? The deckle is not the brisket point, and it’s not the layer of fat between the flat and point section. The deckle is the fat and muscle that attaches the brisket flat to the rib cage. The deckle is always removed from the briskets you buy in the supermarket.
The flat is just that: Sort of a flat, rectangular piece of meat that makes up the majority of the whole brisket. This is the portion that is sliced across the grain and served on a plate or in a sandwich. You’ve probably seen the flat in the meat case at the supermarket, separated from the point and with most fat removed, ready for braising in the oven.
The point is a lump of meat that partially overlaps one end of the flat. It is quite fatty on its surface as well as within the meat. It also contains a lot of connective tissue between the meat fibers. It can be sliced, but its loose texture after cooking makes it a better choice for chopped brisket sandwiches or burnt ends.
The flat and point are separated by a very thick vein of fat running between them. This fat extends over the entire surface of the flat, becoming thinner at the end opposite the point. This layer of fat is sometimes referred to as the “fat cap”. Thick fat may also wrap around one edge of the brisket flat, especially near the point.
From an anatomical perspective, the brisket flat is the “deepest” portion of meat and is attached to the rib cage, while the brisket point sits on top of the flat and is nearest the surface.
Still confused about what’s the flat and what’s the point? Here’s an easy way to orient yourself to a whole brisket: One side of the brisket has a large area with essentially no fat on it. With the fat-free side facing down, the flat is on the bottom and the point is facing up at the high end of the brisket.
The grain of the meat in the flat and point run almost perpendicular to each another. As a result, the two sections should be separated after cooking and dealt with separately.
This very informative beef carcass fabrication video from the University of Kentucky College of Agriculture, Food and Environment shows how brisket is cut from the chuck primal. Watch the portion from 12:15 to 17:45.
Choosing A Brisket For Barbecue
There are several considerations when selecting a brisket for barbecuing.
Quality Grade: Buy USDA Choice Or Higher
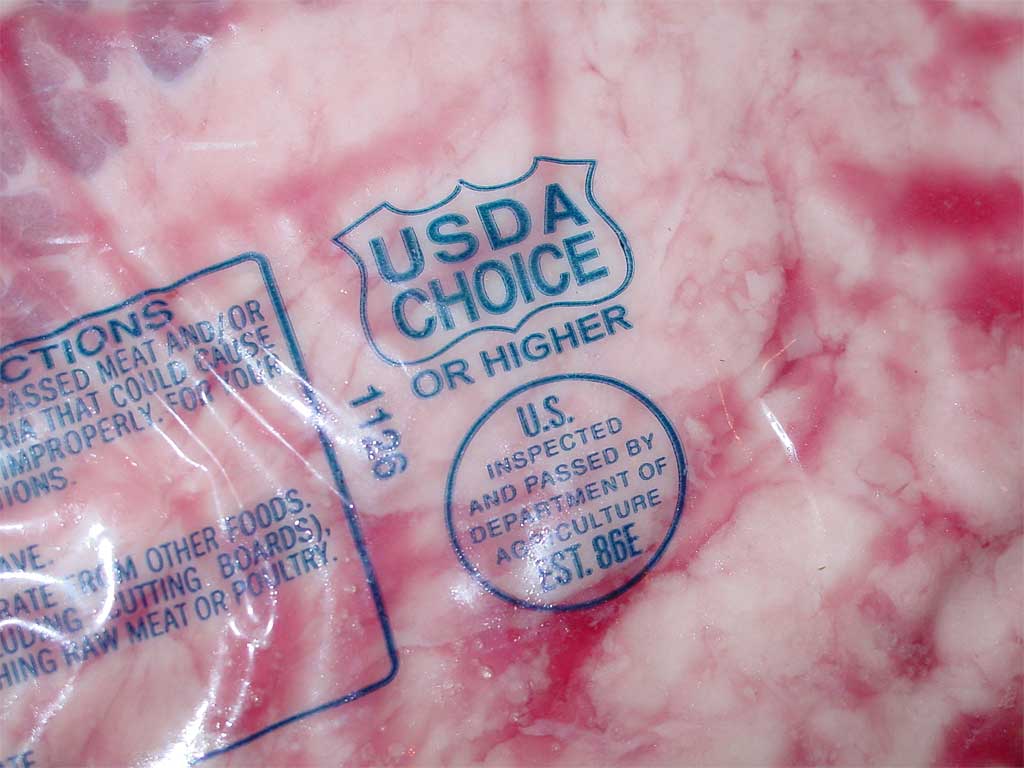
Choose a USDA Choice grade brisket, if available. Look for the USDA Choice shield on the package, as shown above. A Choice grade brisket should have slightly more marbling (intramuscular fat) than a USDA Select grade brisket. Having said that, I have cooked several USDA Select grade briskets with success, but I prefer USDA Choice when I can get it.

Some backyard barbecuers and competition barbecue teams seek out USDA Prime grade briskets, the highest quality grade available, and report excellent results due to the additional fat marbling within the meat. Prime briskets used to be hard to find, but today can be purchased at membership warehouse stores like Costco or ordered online.
I’ve cooked several USDA Prime briskets and really liked the results, but a USDA Choice or higher Certified Angus Beef brisket is a very close runner-up and will save you a few bucks.
Branded Beef
Some beef producers “brand” their beef products—not with a red-hot branding iron, but with fancy marketing names. Examples of successful branded beef include Certified Angus Beef (CAB), Meyer Natural Angus Beef, and IBP Chairman’s Reserve Certified Premium Beef. Pretty much any meat that has a fancy name attached to it is a branded beef product.
Producers say that branded products meet higher standards than non-branded beef, are of higher quality, and taste better. Some brands claim to choose younger cattle with more marbling that straddle the line between USDA Choice and USDA Prime grades. Meyer Natural says that its beef is produced without hormones or antibiotics.
I’ve cooked both branded and non-branded briskets, and I can’t tell them apart. If you have a choice between branded and non-branded briskets at roughly the same price, consider going with the branded product, as long as it has that all-important USDA Prime or USDA Choice grade shield on the package. Without that shield, you have no guarantee of quality, no matter what the butcher tries to tell you.
American Wagyu Beef
Wagyu is a Japanese cattle breed (Wa means “Japanese”, gyu means “cow”) that is prized for its extreme fat marbling and tenderness. Wagyu cattle were imported to the United States in 1975 and over the years production has increased in the US and Canada to satisfy gourmet cooks and fine restaurants throughout North America.
Some barbecue competitors will use American Wagyu brisket in competition, believing it gives them an edge over other teams using lesser briskets. At the time of this writing (1/5/2016), a Snake River Farms American Gold Grade Wagyu brisket weighing 17-20 pounds sells for $229 plus shipping.
Despite the high price, American Wagyu beef is downright affordable when compared to authentic Japanese Wagyu. It’s difficult to pin-down the price of an authentic Japanese Wagyu brisket because so few are available, but the highest A5 grade Japanese Wagyu New York strip steaks sell for $160 per pound. You can only imagine the price of a 17-20 pound competition-sized Japanese Wagyu brisket.
Our friend Harry Soo of Slap Yo’ Daddy BBQ had the rare privilege of barbecuing a real Japanese Wagyu brisket, and you can read about it on his blog.
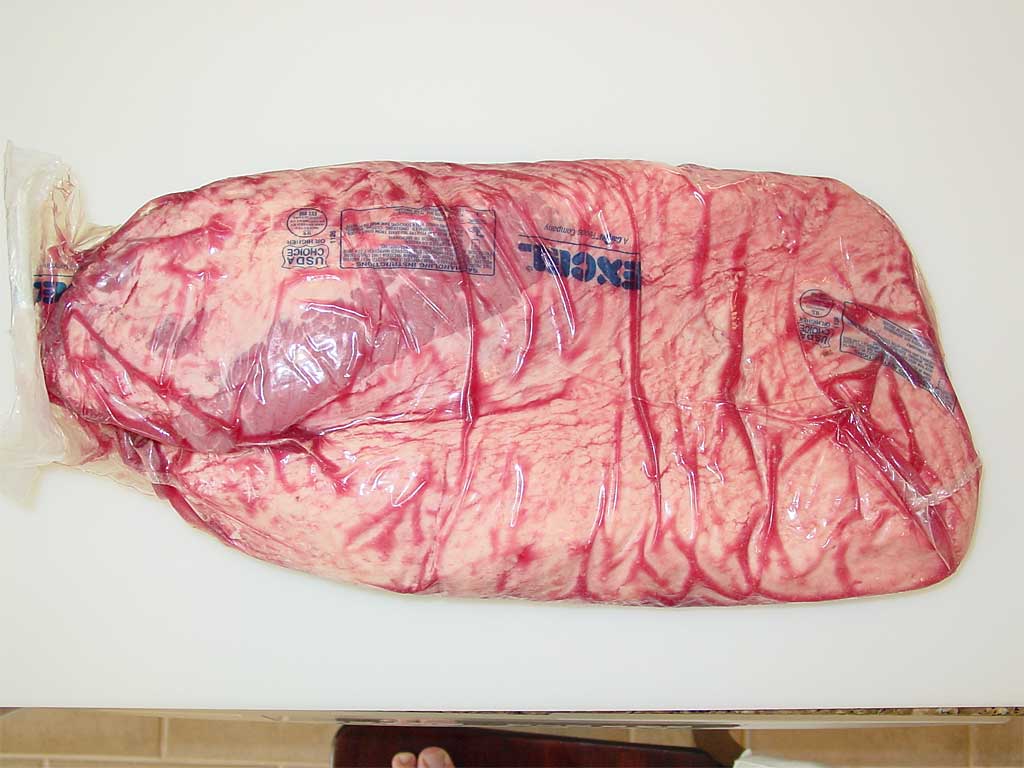
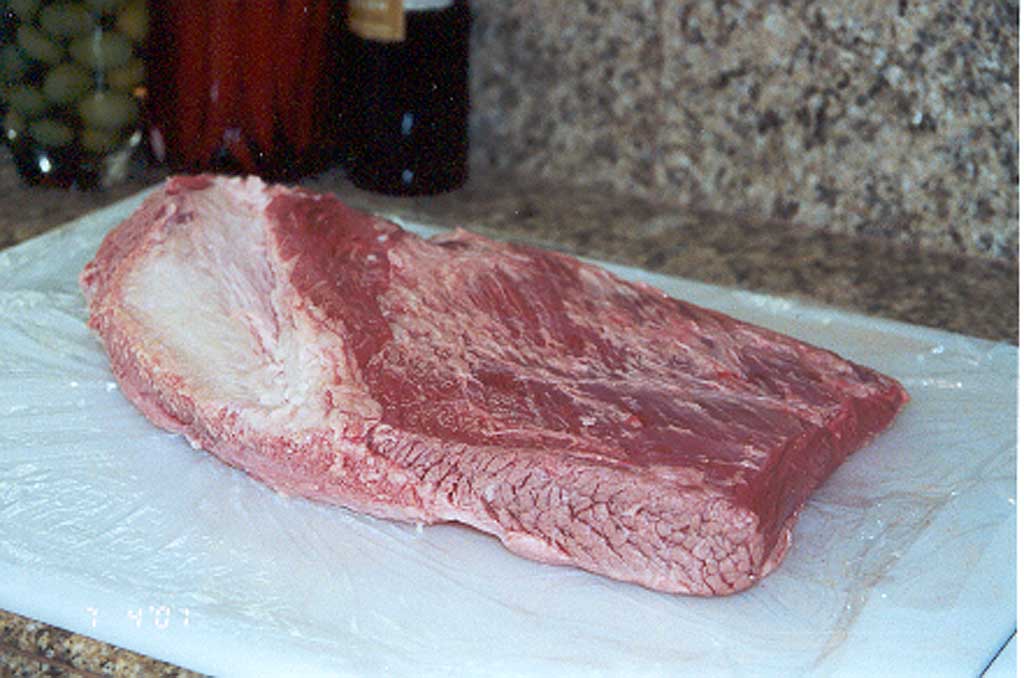
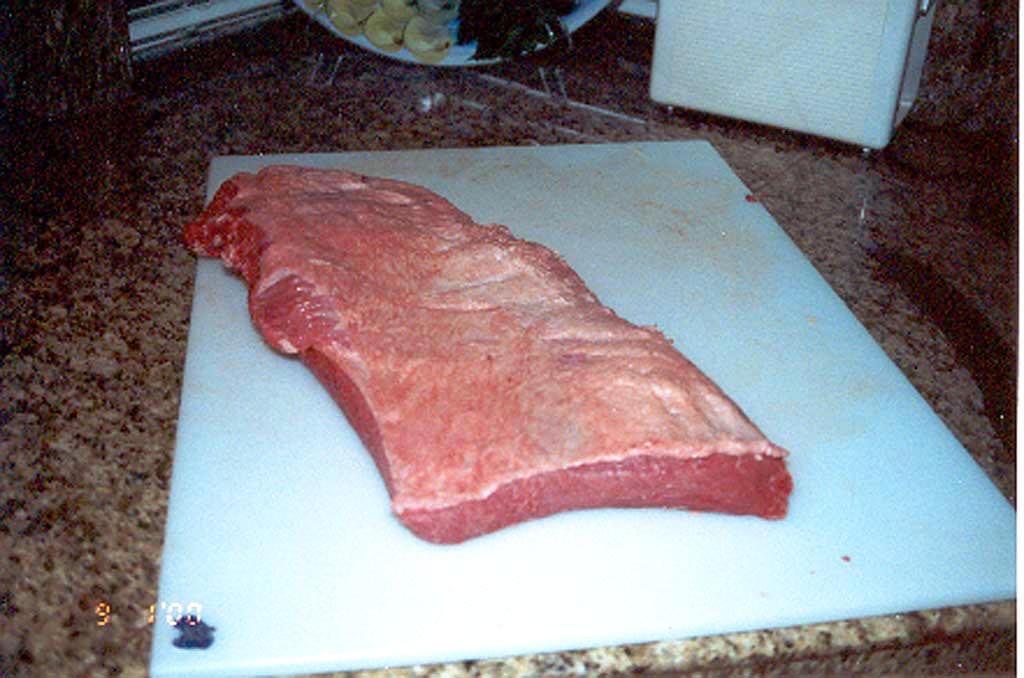
Whole, Untrimmed Brisket In Cryovac
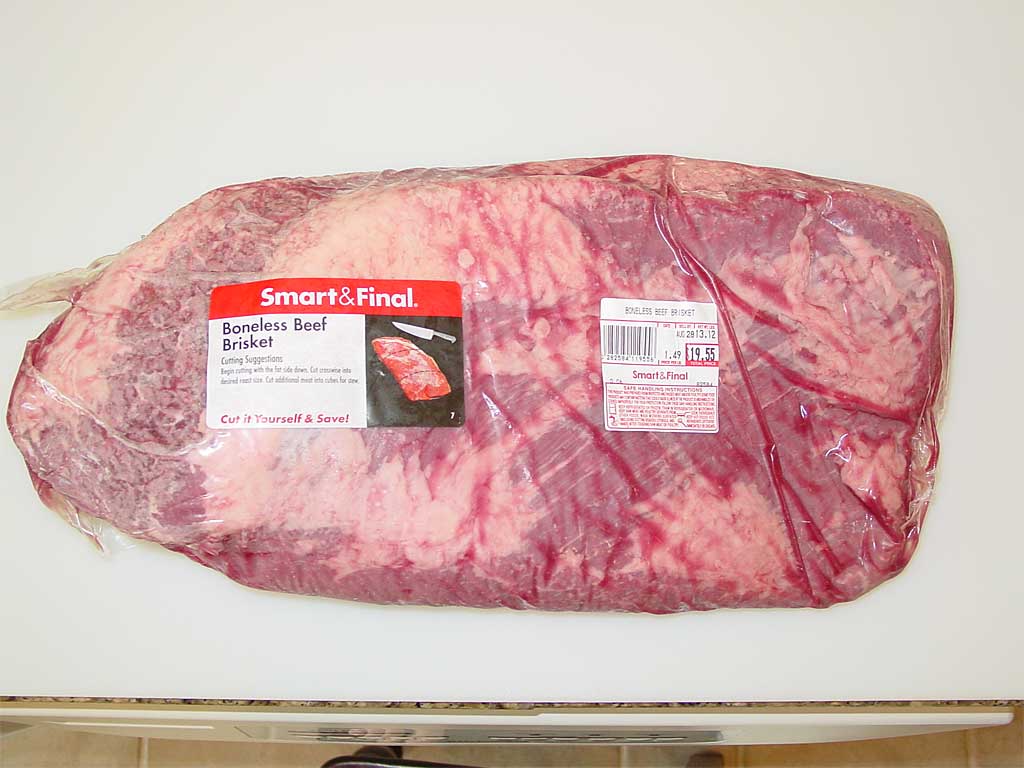 Buy a whole, untrimmed brisket still in the Cryovac packaging. This is referred to as “packer cut” or “packer trimmed” brisket—my German butcher Mark Bubert calls it “brisket for Texas barbecue.” Buying an untrimmed brisket allows you to trim it just the way you like, and all that fat will keep the meat moist during cooking. These photos show what a whole brisket in Cryovac looks like.
 Avoid small, super-trimmed brisket flats with the point removed. They may be advertised as “first cut”, “nose off”, or “cap removed”. These are fine for braising in the oven, but are hard to barbecue without drying them out. If this is all that’s available to you, a layer of bacon placed on top may help to keep the meat moist during cooking.
Large brisket flats with the fat cap intact can be barbecued successfully, and some folks prefer this to whole brisket, as there is less waste.
Weight
Whole, untrimmed briskets weigh 8-20 pounds. A brisket weighing about 12 pounds fits easily on either WSM cooking grate.
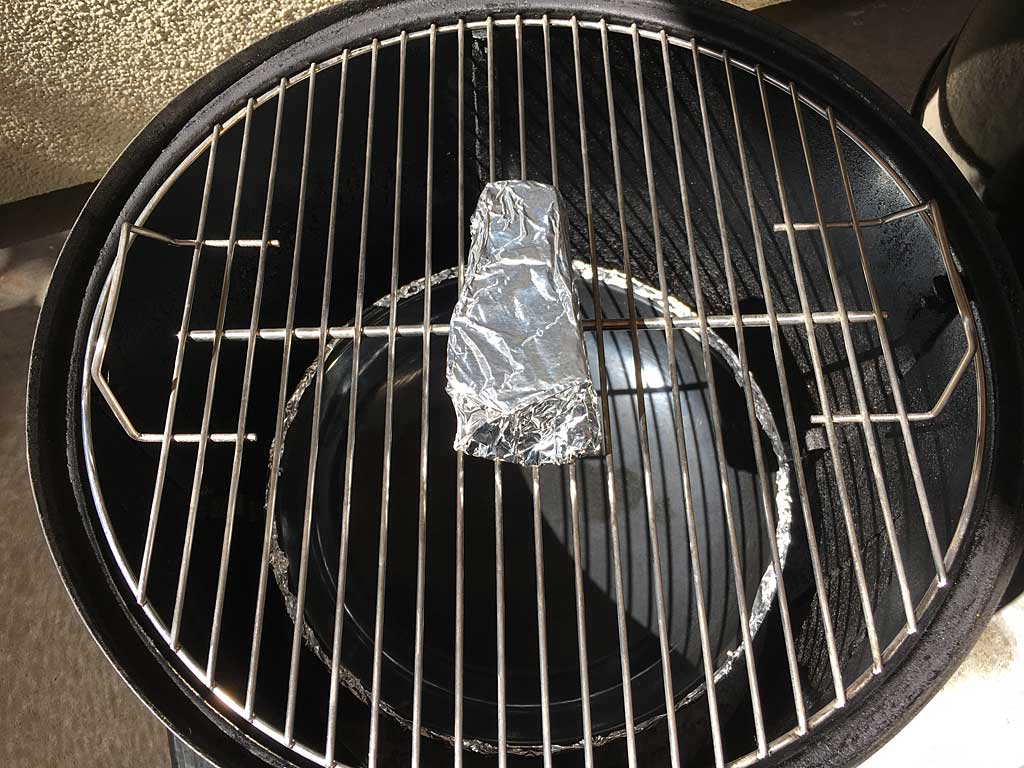
Briskets larger than 12 pounds can be “shoehorned” between the handles on the cooking grate and will shrink during cooking. Other approaches include folding a portion of the flat section under itself, or “draping” the brisket over a large chunk of foil-wrapped smoke wood, as shown here, or over a foil-wrapped brick so it fits on the grate. In any case, the brisket can be repositioned later once it starts to shrink during cooking.

Large brisket flats with the fat cap intact weigh 6-8 pounds.
If you’re cooking a monster brisket on the bottom cooking grate and it extends beyond the edge of the water pan, you may want to wrap the ends with aluminum foil. This protects it from the blast of heat coming up from around the water pan. Once the brisket shrinks and no longer sticks out past the edge of the pan, you can remove the foil.
White, Hard Fat
 The conventional wisdom in barbecue circles is to choose a brisket covered in white, hard fat. This indicates that the animal was fattened on grain at the feedlot during the final weeks before slaughter. Fat that trends toward yellow in color is an indication of grass feeding and is thought to be less desirable for barbecued brisket—although attitudes may change as grass-fed beef becomes more popular in the U.S.
When I visit my butcher, I don’t have too many briskets to choose from, so I can’t always be picky. I try to choose a brisket with white, hard fat if I can, making sure it has a fat cap 1/4″ to 1/3″ thick over the entire flat portion. Admittedly, this can be difficult to judge through the Cryovac packaging.
Flat With Even Thickness
 Try to choose a brisket that has a flat section of even thickness. Most flats tend to narrow a bit toward one edge, and this is normal—but avoid those that taper off to a very thin edge. Even thickness helps promote even cooking and provides uniform slices. Again, this can be difficult to judge through the Cryovac packaging, and may be a moot point if you don’t have many briskets from which to choose.
Flexibility & Left-Handed Briskets As An Indication Of Tenderness
Some people believe that the flexibility of a brisket is an indication of its tenderness. They will pick up a brisket by one end and waggle it around or try to fold it over on itself end to end to see how flexible it is. However, it’s not clear this is an actual indication of meat tenderness since flexibility is affected by the overall thickness of the brisket and how much white hard fat is covering the meat.
A more colorful claim is that the brisket from the left side of the cow is more tender than that from the right side. In his book Franklin Barbecue: A Meat-Smoking Manifesto, pitmaster Aaron Franklin says of this claim, “For the record, I think this is a joke. In all the thousands of briskets I’ve cooked, I’ve found no evidence that the meat from one side of the cow is noticeably more tender than the other.” He continues, “I guess I slightly prefer the shape of left-sided briskets because it’s easier to wrap, but it’s not really something I pay much attention to and I recommend that you don’t worry about it either.”
But left-handed briskets do make for a great story, especially after a few beers with friends. You can read all about this claim and how to identify left- and right-handed briskets in the InfoBullet at the bottom of this page.
Prepping A Brisket
There are some folks who do nothing more than remove the brisket from the Cryovac, pat it dry with paper towels, apply a favorite rub, and throw the brisket into the cooker. If this works for you, go for it.
I had never seen a whole brisket until I attended the Paul Kirk Pitmaster Class in 1997, and the way he taught us to prep a brisket in that class is the way I’ve been doing it ever since.
Chef Paul’s main point was this: It makes no sense to leave all of the fat on the brisket. Smoke and rub won’t penetrate it. It will take more time and fuel to cook the brisket with all the fat intact. And in the end, you’re not going to eat the fat—you’re going to cut it away and discard it.
So, Chef Paul’s approach was to cut away some of the thickest areas of fat on the brisket and to trim the fat cap over the flat to 1/8″ to 1/4″. This leaves enough fat to keep the brisket moist during cooking.
Before going any further, I must point out that every brisket is unique—no two are identical! I continue to be amazed at the variation from one brisket to the next in terms of size, shape, amount of fat, and the relationship between the flat and point sections. So don’t be surprised if your brisket is longer, shorter, skinnier, fatter, taller, or different in some way from those shown in the photos below. I should also point out that a couple of different briskets are pictured below, which explains some of the differences you’ll see between photos.
One last note: It’s an exercise in futility to try trimming a brisket with a knife that’s not up to the task. You need a very sharp knife. Don’t try this with a paring knife, a utility knife, or any knife that is dull. A butcher’s knife does a great job, but a sharp flexible boning knife is my preferred knife for trimming brisket.
Remove Brisket From The Cryovac
Remove the brisket from the Cryovac packaging. Pat dry with paper towels. Place on a large cutting board with the point facing up. Remember, the brisket has one side with a large, relatively fat-free area—if you place that side facing down, then the point will be facing up.
Trim Thick Areas Of Fat Around The Point
Most briskets have extremely thick areas of fat on top of and around the point section, as well as a thick edge of fat running down one side of the flat section. Trim away most of this fat as best you can. Remember, the goal is to remove excess fat while still leaving a 1/4″ layer to protect the meat below.
Admittedly, it takes some time and experience to judge this, and there’s really no harm if you leave too much fat. You also don’t have to freak out if you cut a little too deep and strike red meat! Just back off on the knife and don’t cut so deep. Take your time and remove what make sense to you, without cutting so close that you’re exposing the meat.

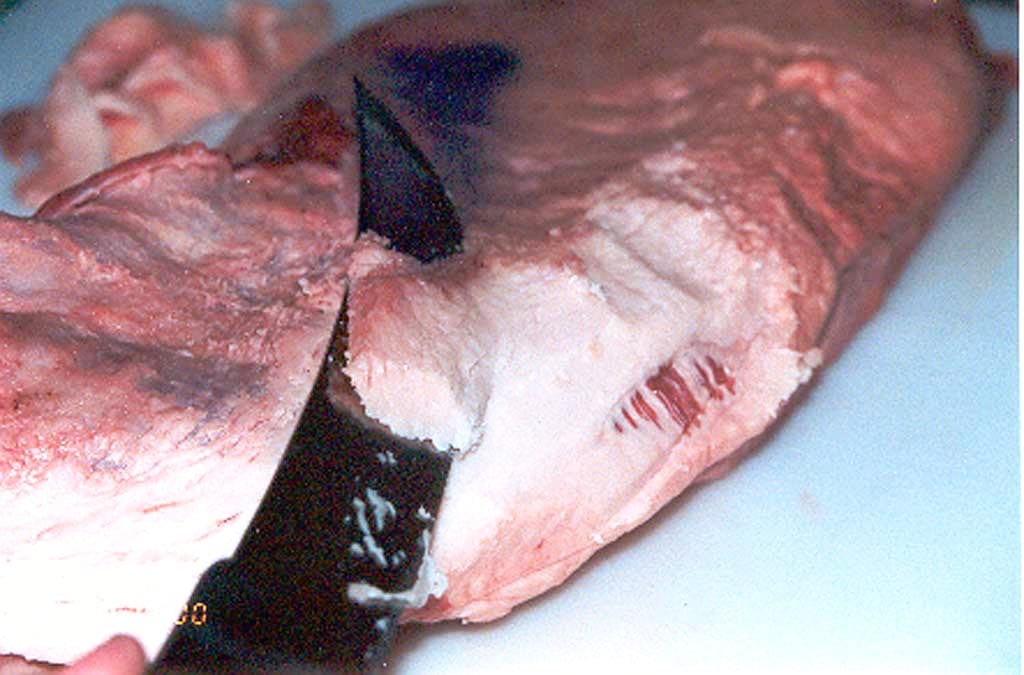
You will notice a very thick vein of fat running between the point and the flat sections. Some folks will trim this area flush to the surface of the meat without actually cutting into the vein itself. I usually cut a V-shaped chunk of fat from this vein. You can be pretty aggressive in removing fat from this area, but if you keep cutting and cutting, you’ll end up almost separating the two sections! In the photo above, I think I was a bit too aggressive and should have left more fat.
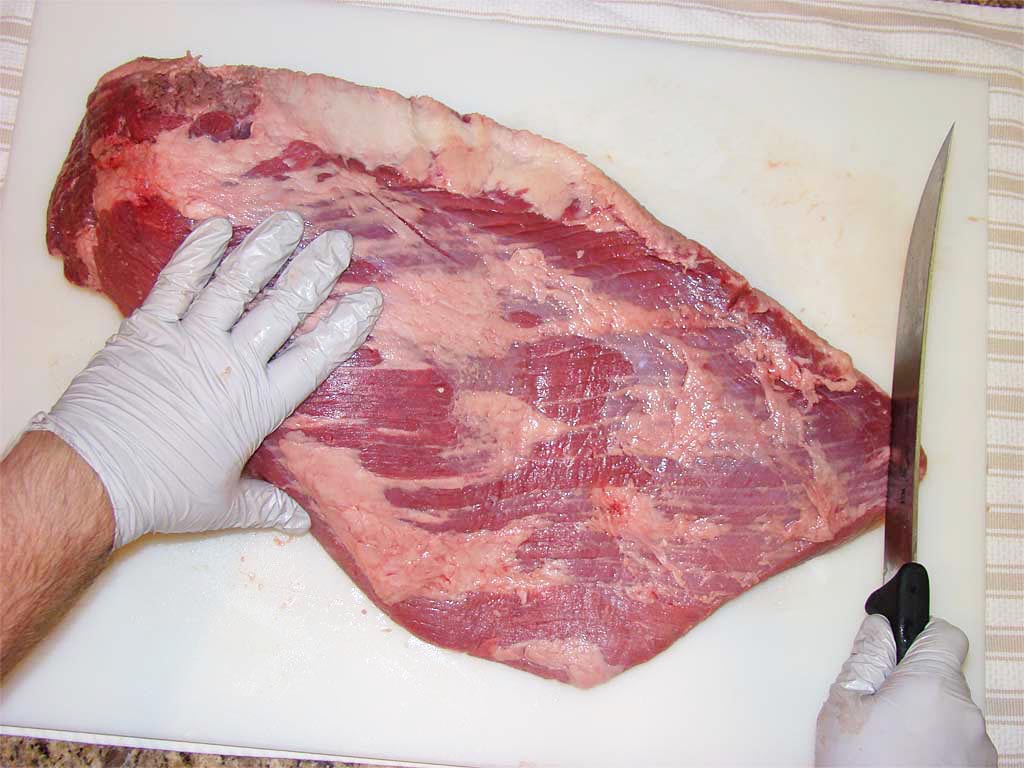
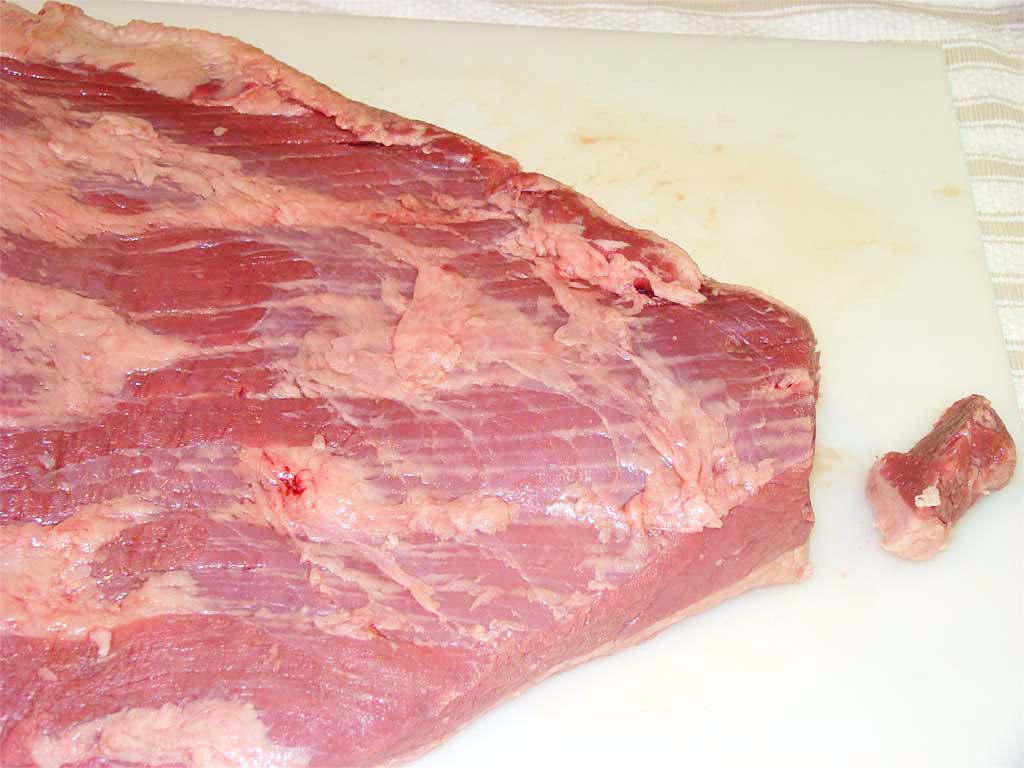
Trim Fat From The Flat
Now turn your attention to the large expanse of fat covering the brisket flat. Trim the surface fat, leaving a 1/8″ to 1/4″ layer. By running your fingers over the surface, you’ll get a feel for where the thickest areas are located. Just go slow and trim carefully, backing off on the knife if you hit red meat. Again, this takes some practice, so don’t beat yourself up if you shave a spot a little too close. There’s no harm done if you leave a little too much fat.
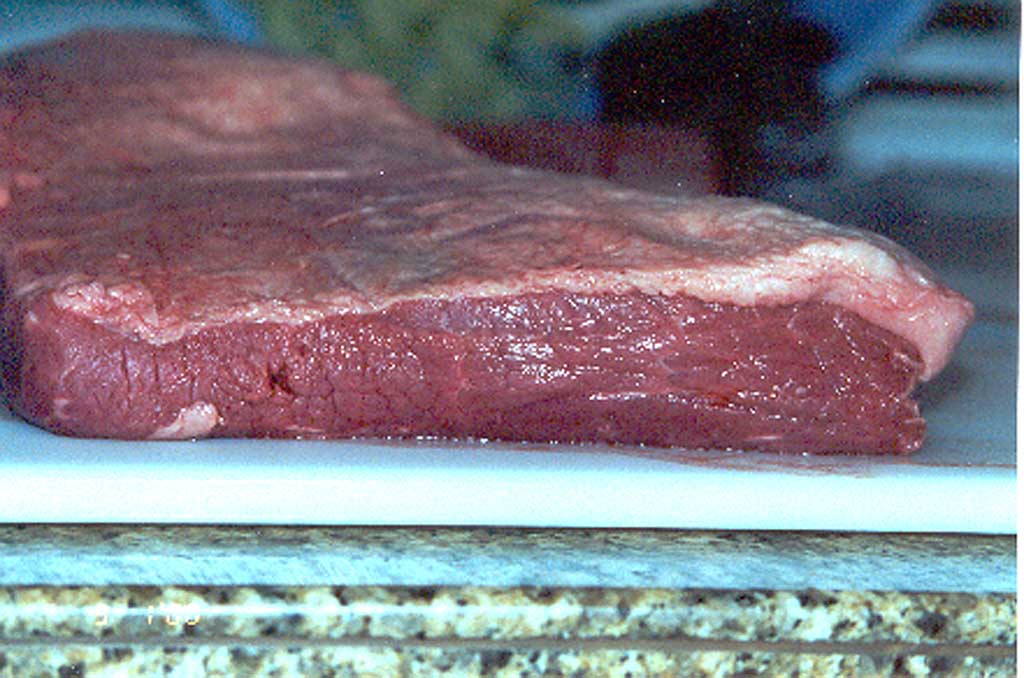
The two photos below show the same brisket flat before and after trimming. Notice that toward the end of the flat, I only had to trim fat from the right side; the left side was already in the 1/8-1/4″ range.

As you move down the flat away from the point, the fat becomes less hard and more spongy, making it more difficult to cut. This is where a sharp knife really comes in handy.
Turn & Trim The Other Side
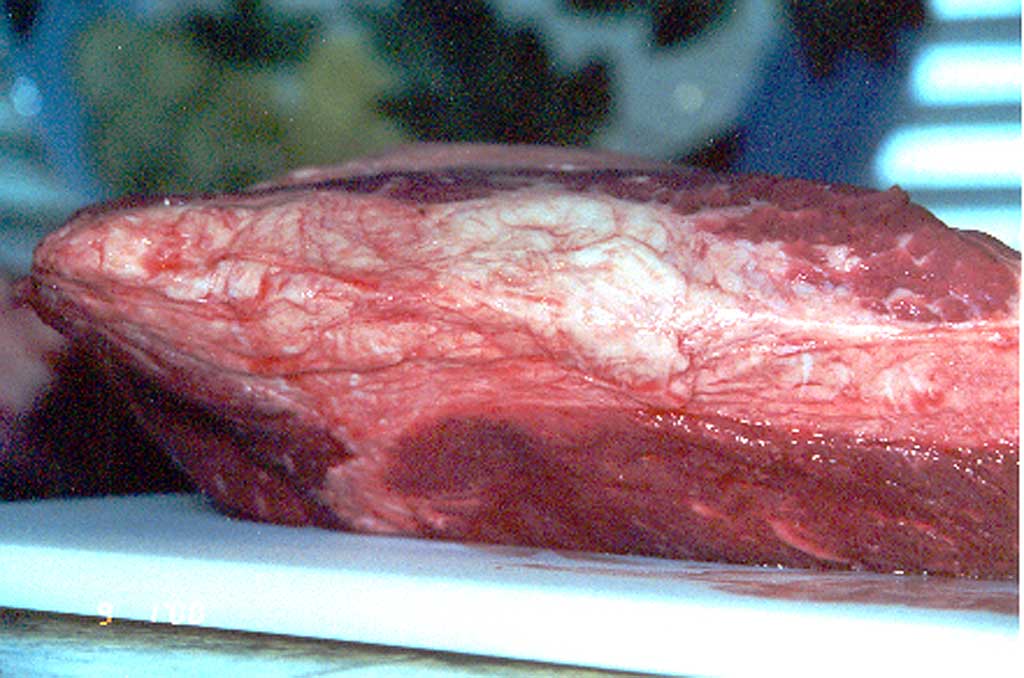
Turn the brisket over. You should be looking at a large expanse of flat that needs much less trimming. Carefully trim areas of fat and silverskin that would prevent rub from penetrating the meat.
There may some significant fat around the bottom side of the point and in the vein between the two sections. In fact, the vein of fat may appear more pronounced from this side than from the other side. Trim away what makes sense to you.
In the photo above, you’ll notice that I made another V-shaped cut into the vein, leaving behind a more appropriate amount of fat this time. You’ll also notice that the edge of the brisket is kind of gray and desiccated. Some people will trim this off, but it’s OK to leave it as-is.
Why Is The Edge Of The Brisket Discolored?
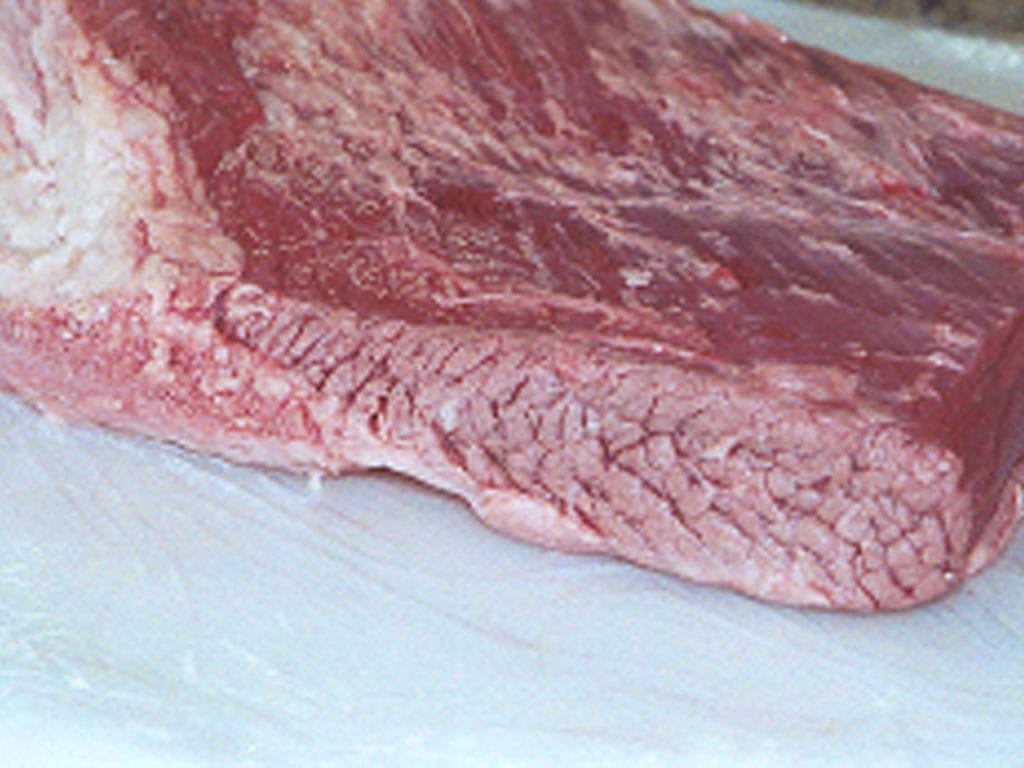
In this photo, you’ll notice that the edge of this brisket is discolored, sort of a brown color, while the rest of the brisket is bright red. According to Jeff Savell, Professor in the Meat Sciences Department at Texas A&M University, this is a common condition that occurs as a result of processing at the slaughterhouse.
“The reason for this discoloration is that this edge of the brisket is exposed when the carcass is split into sides, and these sides have various antimicrobial treatments applied to them such as organic acids (lactic acid is the most common), hot water, and/or steam pasteurization to destroy potential pathogens,” says Savell. “The application of these acids and/or heat will denatured the color pigments in the meat causing this graying or browning appearance to develop.”
Savell says these treatments have been applied to briskets since the early 1990s and that there’s nothing unhealthful about the discoloration. You can leave the edge as-is or you can trim it off—it’s up to you. I didn’t trim it off on this brisket, but in recent years it’s become my habit to trim off the discolored edged.
The End Result
Here’s how the brisket may look after trimming.

The first photo shows the fat side facing up, with a 1/8″ to 1/4″ layer of fat covering the whole surface. On this brisket, a thick edge of fat ran down the right side of the brisket, and I trimmed most of it away.
The second photo shows the same brisket flipped over, with the lean surface of the flat facing up. I trimmed much of the fat from the vein between the point and flat.
Marking The Brisket
Sometimes it can be difficult to determine which way the grain is running in the flat after cooking. In his School of Pitmasters Class, Paul Kirk suggests that you trim a small corner of meat from the end of the flat section, perpendicular to the grain of the meat. Use that edge as a guide for slicing across the grain after cooking.
As I suggest later in this topic, if you remove the point from the flat section before slicing the flat, the grain becomes well exposed and you won’t have much difficulty determining which direction the grain runs.
Seasoning The Brisket
In the Lone Star State, they apply a 50/50 mix of kosher salt and coarse ground black pepper and smoke the brisket. That’s it—they let the natural flavor of the beef and smoke do all the talking. Some people, however, prefer to season a brisket with something a bit more complex.
After trimming a brisket, you can use either a dry rub or a marinade to season the meat. You can apply the rub and put the meat into the cooker immediately, but I prefer to apply rub, then wrap in plastic wrap and refrigerate overnight. I don’t have any illusions about the rub penetrating the meat, because it doesn’t, at least not deeply. However, it does form a moist layer of seasoning that adheres well during cooking. I also usually apply a bit more rub before putting the meat in the cooker. As in the Pork Butt – Slathered With Mustard & Rub article, you can apply a thin coat of mustard to a brisket before sprinkling on the rub, if you like.
A marinade is a liquid concoction in which a brisket is soaked, usually overnight. Typically, it’s a mix of a dry rub with some flavorful liquid such as beer or soda pop. Again, don’t be deceived into thinking that a marinade somehow penetrates the meat to its core, because it doesn’t. It only affects perhaps the outer 1/8″ of meat. Nor does a marinade tenderize meat deep inside. Marinades that contain an acid, like vinegar, may have an affect on the surface of meat, but if you’re not careful, it will just make the surface sort of mushy. So think of a marinade only as a method for adding flavor to the outside of meat.
You’ll find lots of dry rub and marinade recipes in the Rubs & Marinades forum on The Virtual Weber Bulletin Board. In Brisket – Wet Rub, I used a paste on a brisket, which is sort of a wet rub…or a really thick marinade.
Temperature Of Brisket Before Cooking
There are two schools of thought on this point. Some recipes suggest that a brisket should sit at room temperature for up to two hours before cooking to minimize the difference in temperature between the meat and the cooker. The belief is that cold meat can be fouled by creosote that results from a poorly managed fire, especially in wood-burning pits, with the result being a bitter-tasting brisket. This isn’t much of a concern in the WSM as long as the top vent is fully open at all times. And of course, the WSM is charcoal-fired, not wood-fired.
Other recipes say that it’s best to take meat straight from the refrigerator and put it into the cooker. The theory is that the smoke ring, that pinkish/purple color that forms beneath the surface of the brisket, is formed only while the meat is below 140°F. By starting with a colder piece of meat, it spends more time below 140°F in the cooker, resulting in a stronger smoke ring.
I’ve cooked briskets both ways, and I’m not sure I can tell a difference either way. Lately, my habit has been to take the brisket from the refrigerator and place it directly in the cooker. I’ve not gotten out a measuring tape to see what affect, if any, this has on the formation of the smoke ring, nor have I noticed any bitter flavor to the meat.
Frankly, I think meat temperature is more of an issue with grilled meats that cook quickly over high heat than it is for large cuts like brisket that barbecue for many hours.
Converting Collagen To Gelatin Is Key To Tender Brisket
In his book On Food And Cooking, author Harold McGee says that meat is composed of three tissue types: muscle fiber, connective tissue, and fat. Connective tissue consists of the proteins collagen, elastin, and reticulin. Collectively, these proteins bind the muscle fibers together and help connect muscles to bone—McGee calls it “the physical harness of the muscles.”
Brisket has an abundance of connective tissue, as do most muscles that work very hard. It’s this connective tissue that makes brisket such a tough cut of meat. The good news is that muscles that work hard tend to be more flavorful than those that don’t work hard.
According to McGee, connective tissues made of elastin and reticulin don’t break down during cooking, but collagen turns into soft gelatin. It is this conversion from collagen to gelatin that renders the tough old brisket into the tender barbecue we enjoy so much.
Internal Temperature Of Finished Brisket
In the book How To Cook Meat, authors Chris Schlesinger and John Willoughby say that tough cuts of meat must be “cooked through doneness to tenderness.” In other words, you don’t stop cooking a brisket when it reaches the internal “done” temperature we associate with tender cuts of beef like a Porterhouse steak or even a tri-tip roast. A brisket is not edible if cooked to 125°F or even 175°F.
In order to be tender, a brisket must be cooked to an internal temperature of 200-205°F. The reason for this, according to McGee, is that the conversion of collagen to gelatin doesn’t even begin until meat reaches an internal temperature of 140°F, and is most efficient as internal temps approach 212°F. “Low and slow” barbecuing at 225-250°F is ideal to facilitate this conversion, providing gentle heat over many hours, allowing the collagen to make its transition into gelatin. While some moisture will be driven out of the brisket as it reaches these high internal temps, the gelatin makes up for it and keeps the meat moist. Of course, the fat layer on the brisket also helps maintain moisture in the meat during cooking, too.
205°F is a very popular finished temperature for tender brisket and is the temp I recommend. I’ve tried a variety of temps over the years and 205°F gives me the most consistent results.
Barbecue experts with years of cooking experience say a brisket is done when it’s “fork tender” or “probe tender”, meaning that a fork or a probe thermometer goes in and out of the meat with little resistance. The problem is that both a properly cooked brisket and an overcooked one will both be “fork tender”. For most folks like you and me, it’s best to rely on internal meat temperature to determine when a brisket is properly cooked.
What most everyone agrees on is that a properly cooked slice of brisket should pull apart easily, while still maintaining good texture. An overcooked slice will fall apart when picked up.
Estimated Cooking Time
How long will it take to cook brisket to 200-205°F? As a rough estimate, assuming a cooker temp of 225-250°F, figure 1 hour to 1 hour 30 minutes per pound for a whole, packer brisket weighing 12 pounds after trimming any excess fat. Remember, this is only an estimate—it may take more or less time, depending on the thickness of the brisket, the amount of connective tissue that needs to be converted to gelatin, the temperature of the cooker, weather conditions, the number of times you open the cooker for turning and basting, and whether you foil the meat during cooking.
Where To Measure Internal Temperature
I get confusing temperature readings in the point end of a brisket, probably because of all the fat and connective tissue. Your best bet is to measure the internal temp in the flat section. Insert an instant-read thermometer or probe thermometer into the middle of the flat from the side of the brisket—not from the top.
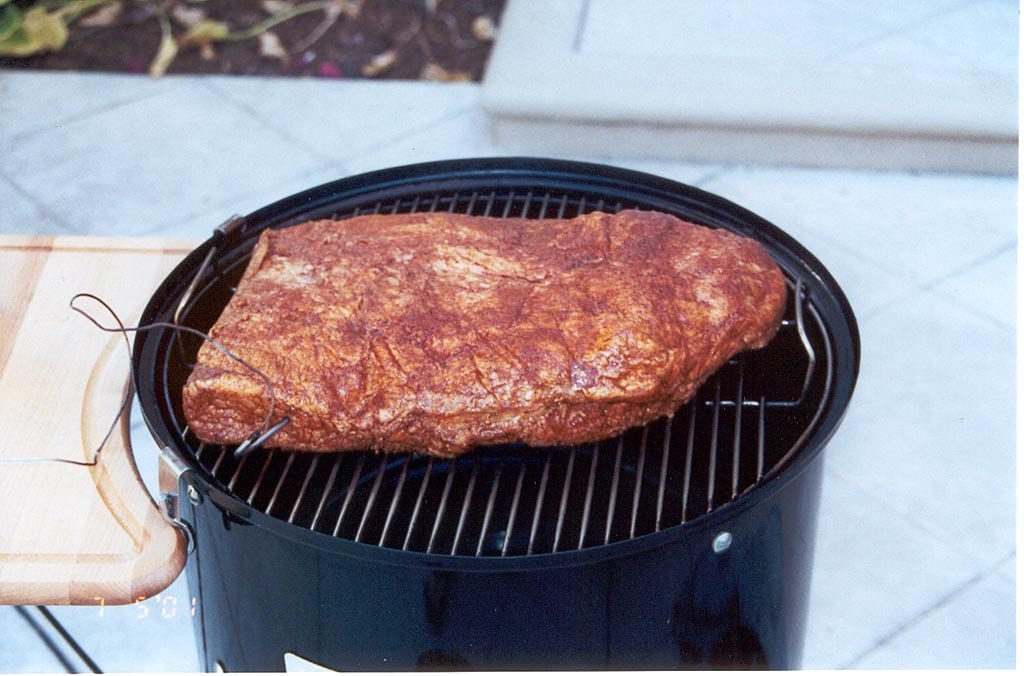
Cook Fat-Side Up Or Fat-Side Down?
Some people cook briskets fat-side up, while others cook fat-side down. Some people turn briskets during cooking, others don’t. When I first learned how to cook a brisket in 1997, I was taught to start the brisket fat-side up and to turn and baste it throughout the cooking process. Starting around 2004, however, many barbecue competitors began singing the praises of cooking brisket fat-side down and not turning it at all—and sometimes not even basting it.
Proponents of fat-side up say it allows the rendered fat to “baste” the brisket flat during cooking. In his School of Pitmasters Class that I attended in 1997, Paul Kirk suggested that you start a brisket fat-side up and then turn the meat “at the halftimes” to promote even cooking, and that’s what I’ve done for many brisket cooks. (The halftime process is described below in Turning, Basting & Crust Formation.)
Proponents of fat-side down say that the fat layer shields the brisket flat from direct heat coming up from the bottom of the cooker, preventing it from drying out. They will cook fat-side down the entire time without turning the meat even once. I’ve cooked many briskets fat-side down and gotten good results using this method, too.
In recent years, I’ve settled on cooking briskets fat-side down because it does seem to protect the flat side from drying out during the cooking process.
Turning, Basting & Crust Formation
As mentioned in the previous section, not everyone agrees upon the need to turn a brisket during cooking. I used to turn briskets during cooking but I no longer do so. If you decide to turn your brisket, consider using the “halftimes” method described below.
Assuming a 10-12 pound whole brisket and 1-1/2 hours of cooking time per pound as a guideline, calculate how long it will take to cook the brisket. For example, a 12 pound brisket will take approximately 18 hours to cook. Divide this time in half. The first time to turn the brisket is after 9 hours of cooking. Now divide the remaining time in half. In our example, the next time to turn the meat will be in 4-1/2 hours. Repeat this process until about the last hour of cooking, then stop turning the meat.
As for basting, it helps keep the meat moist, it cools the surface of the meat to promote the development of the smoke ring, and it can add some flavor to the surface of the meat depending on what you use. You can baste with plain water or any flavorful liquid you like. It might be apple juice applied with a spray bottle or a complex concoction applied with a cotton mop. You’ll find lots of ideas in the Recipe Forums on The Virtual Weber Bulletin Board.
You must wait for the crust to setup on the surface of the brisket before you start basting. The crust (or bark) is the flavorful dark layer that develops on the surface of the meat as the result of the rub and the Maillard Reaction. If you baste before the crust sets up, you will wash away the rub and ruin the crust formation.
To test for crust formation, use the method described by Harry Soo of Slap Yo’ Daddy BBQ in his Amazon review of the WSM: “Use your fingernail and scrape the meat surface,” writes Harry. “If the crust has formed, it will not come off when you gently scrape it with your fingernail. If the crust comes off, the bark has not set (still wet) so don’t spray until it sets. Let it cook longer and check back in 15 mins.”
Once the crust has setup properly, you can baste every 30-45 minutes.
Remember, every time the cooker is opened, it loses some temperature. The WSM recovers temp fairly quickly, but don’t dilly-dally—be quick and efficient when turning and/or basting.
Foiling During Cooking
Wrapping a brisket in aluminum foil during cooking is not required to make a delicious end product. However, it is a technique commonly used in competition barbecue for several reasons:
- It accelerates the cooking process by braising the meat in its own juices (or with beef broth or other flavorful liquids added). Speeding up the process with foil may be necessary so that the competitor gets the meat tender in time for turn-in to the judges.
- It prevents the meat from getting too dark in color (a consideration in terms of appearance).
- It prevents further exposure to smoke (a consideration in terms of flavor).
- It helps retain moisture.
If you decide to foil a brisket during cooking, just as with basting you need to wait for the crust to setup on the surface before foiling, otherwise the rub may simply wash off. It’s common to let the crust form, then baste every so often, then finally wrap in foil to finish cooking.
Some will suggest that you can foil brisket at an internal temperature as low as 150°F, but I have found that 165-170°F works better for me.
If you intend to combine basting and foiling, wait for the crust to form, then baste every 30 minutes for 2 hours, then foil and finish cooking to your final internal meat temperature.
Foiling a brisket during cooking is sometimes referred to derisively as “The Texas Crutch”.
Wrapping With Butcher Paper During Cooking
Some pitmasters in Texas use butcher paper instead of aluminum foil as part of the cooking process. It’s somewhere in between using aluminum foil and using nothing at all. Butcher paper does not hold moisture as well as foil, so there is somewhat less of a braising effect, but it does help control meat color and the application of smoke. And despite what you might think, it doesn’t burst into flames when used at normal barbecue cooking temperatures.
See Brisket Flat – Central Texas Style Butcher Paper or Whole Brisket – Central Texas Style Butcher Paper to learn how to choose the right butcher paper for barbecue and how to use it with brisket. You can buy authentic pink butcher paper in 24″ width at Amazon.com or from ABCO Paper in Austin, Texas at 800-556-2677.
Temperature Plateau—The Stall
It’s common for a brisket to reach a temperature plateau during cooking known as the stall—a point at which the internal temperature stops rising and stalls, sometimes for several hours. It happens somewhere in the range of 150-170°F, when the meat fibers are contracting and squeezing moisture out to the surface of the brisket. It takes quite a bit of time and heat energy to evaporate that moisture, and the internal meat temp will not move out of the stall until that moisture is evaporated
With some patience and a 225-250°F cooker temperature, the brisket will eventually move beyond the plateau and the meat temperature shall rise again. If you want to shorten the length of the stall, just kick the cooker up to 275°F. Or if you’re really getting impatient, when the brisket reaches 165-170°F, wrap it in foil and finish it in a 300°F cooker or oven, like in the Brisket – Smoked & Oven Finished article.
Foiling & Resting After Cooking
As with any large roast, it’s important to let a brisket rest for at least 30 minutes before slicing so the juices inside the meat have a chance to redistribute. I’ll never forget the first time I cut into a brisket as it came right out of the cooker—it gushed liquid all over the cutting board and ended up being quite dry! You can read more about the science behind this in Letting Meat Rest After Cooking.
At a minimum, place the brisket on a rimmed baking sheet pan, cover loosely with foil, and let rest 30 minutes before slicing.
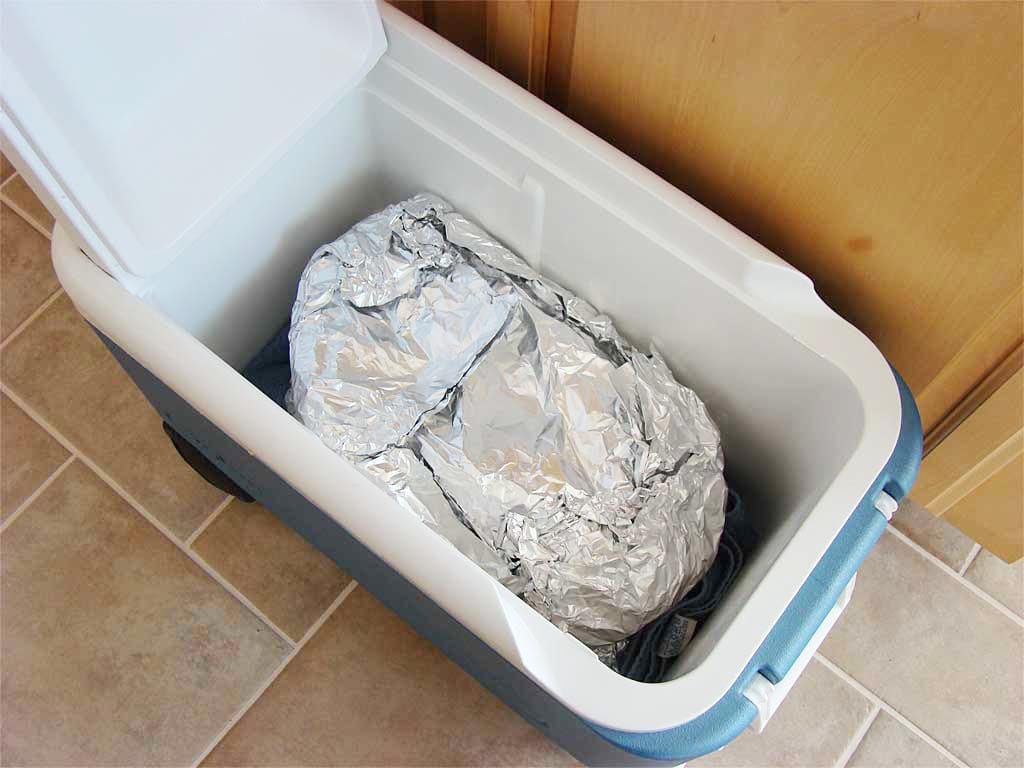
For even better results, wrap the brisket in aluminum foil (if not already wrapped during cooking), place in an empty cooler (an old bath towel in the bottom will protect the plastic from the high heat of the meat) and let rest for 2-4 hours. The meat will continue to cook for a little while because of carry-over heat, making the meat even more tender. More importantly, the extended rest results in moister meat, and the collected juices inside the foil will soften any tough crust on the brisket flat. Just make sure to keep the meat above 140°F internal temp for food safety.
Some folks will pour a little beef broth into the foil package with the brisket before sealing it tightly for the extended rest, again to help promote moister meat.
 Whatever you do, save the juices that have accumulated in the foil. Run them through a fat separator and use to moisten leftover brisket the next day or as an ingredient in homemade barbecue sauce.
Slicing & Chopping Brisket
 After resting, it’s common to separate the point from the flat and deal with each section separately.
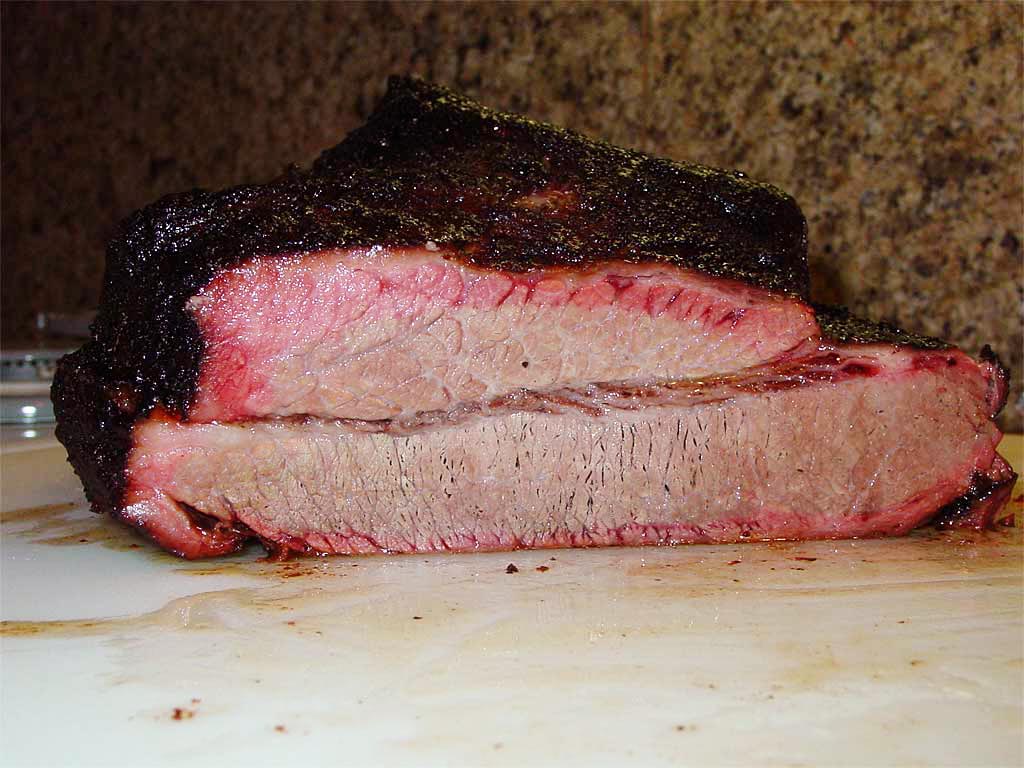
The photo above shows what happens when you slice a whole brisket without separating point from flat. In the photo, the point is on the top, the flat is on the bottom, and the grain of the meat runs in different directions in each section. If you slice the whole brisket so that the flat is cut across the grain as shown in the photo, the point is not cut across the grain and it ends up being a bit chewy. That’s why you want to separate the two sections and slice the flat and either slice, chop, or make burnt ends with the point.
Here’s how to break-down a whole, cooked brisket.
Separate The Point From The Flat
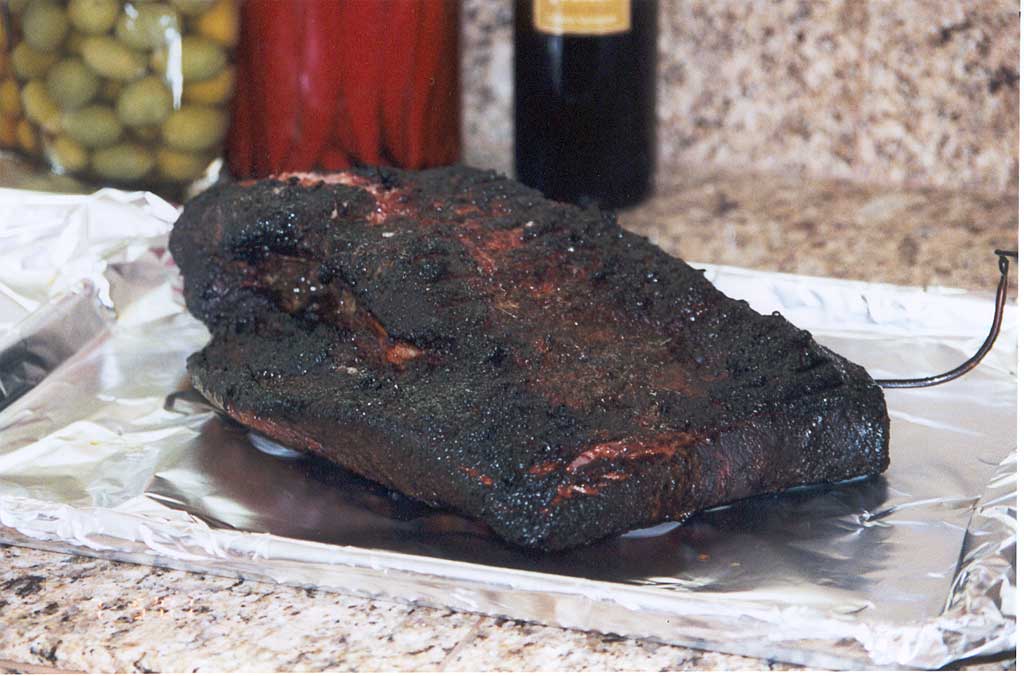
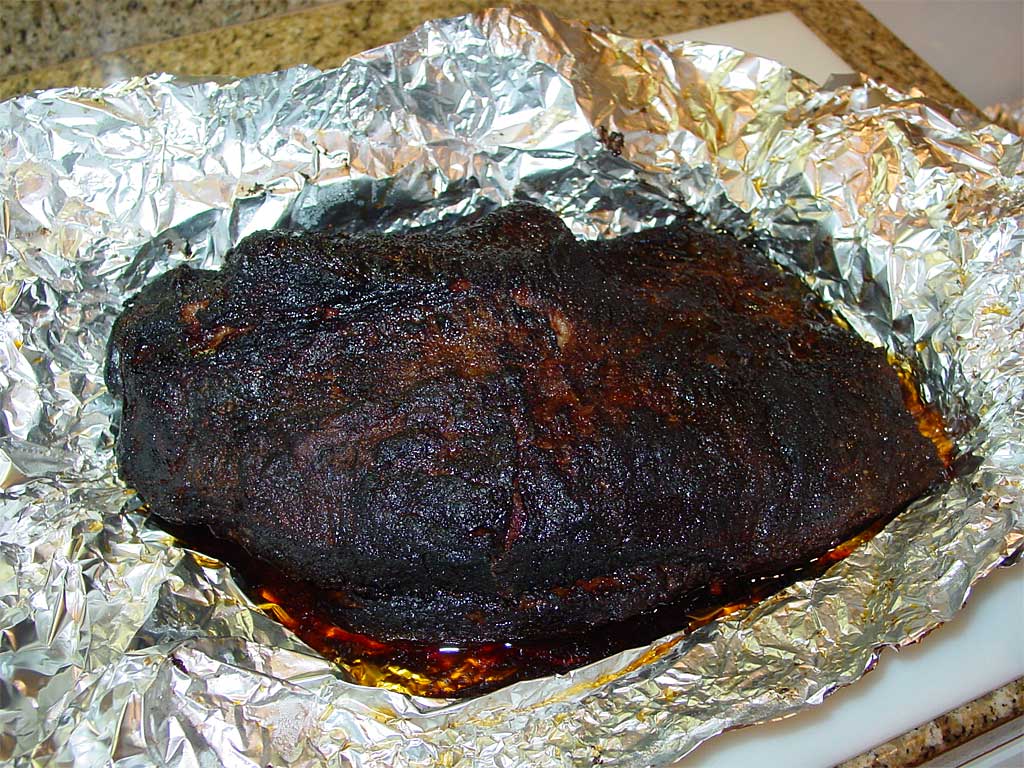
This dark, almost burned looking piece of meat is, in fact, a properly cooked brisket. Don’t be surprised if your brisket turns out looking like the one shown here.
Start by separating the point from the flat. After the brisket has cooked, the demarcation between these two sections becomes fairly clear. Often times, you can take hold of the point section, move it back and forth, and see where the thick vein of fat is that separates the two sections.
Using a sharp knife, cut through that thick vein of fat to separate the two pieces. Some people find that scraping the excess fat from the flat section first helps to reveal the vein of fat between the two sections more clearly; I don’t recommend that you do this. You’ve worked too hard to develop a crust on the brisket, and that fat you’re scraping off is flavor.
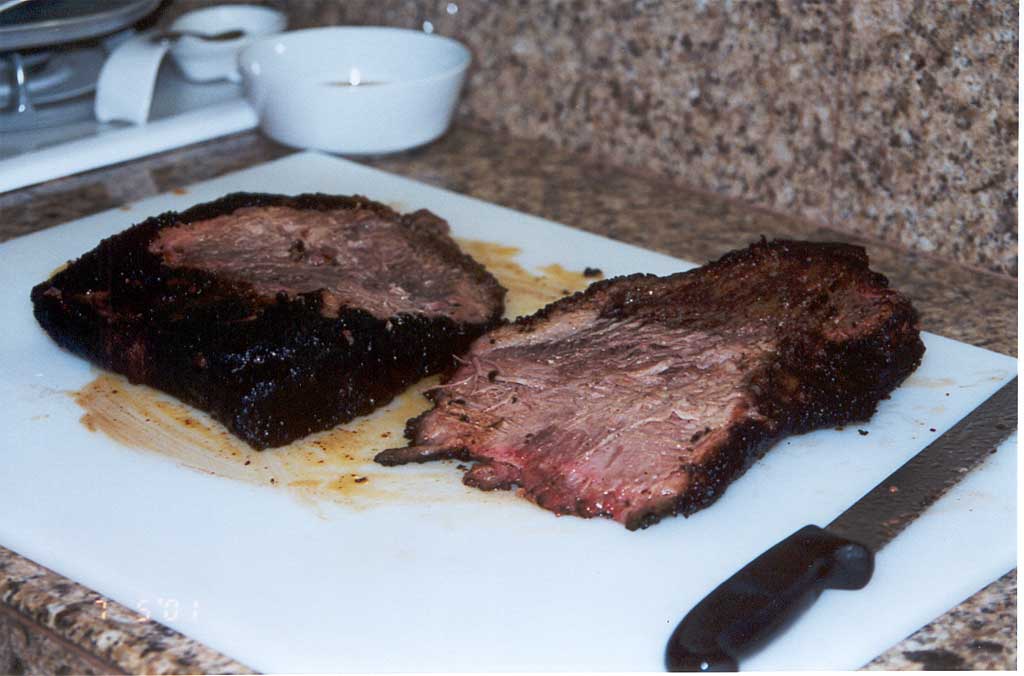
The photo above shows how the two pieces look after being separated. The flat is on the left and the point on the right. This particular brisket has an enormous point, almost as big as the flat, which is quite unusual. The point on your brisket will most likely be smaller.
Slice The Flat
Scrape any unattractive fat from the flat section where it was connected to the point, then turn the flat fat-side up and determine the direction of the grain of the meat. Cut across the grain into 1/4″ slices. If the meat seems a bit tough, slice it thinner; if fall-apart tender, slice it up to 1/2″ thick.
The photo above shows how the slices will look. A 12″ slicing knife works best for a large brisket flat. If the brisket is a lot wider than your knife, cut the brisket down the center with the grain, then cut shorter slices across the grain from each half.
Sliced brisket oxidizes and dries out real quick. Don’t let the pieces flop around like I did in the photo above—keep them together as you slice them. Slice only as much brisket as you’re going to eat right away. To retain moisture, keep the remainder as a whole chunk and slice it later.
Slice Or Chop The Point
Trim the excess fat from the point section and either slice it across the grain or chop the meat. I don’t care for the texture of sliced point very much. My preference is to shred the meat and serve it on a plate or in a sandwich.
To shred the point, hold a serrated knife across the grain and push the knife away from you at an angle down through the meat. You’re not trying to cut a clean slice—you want to tear shreds from the soft meat. Weed out any bits of excess fat and connective tissue that did not break down during cooking. Add to the shredded meat any cutting board leftovers from slicing the flat section, then chop through the meat a few times with a chef’s knife to cut up any large pieces.
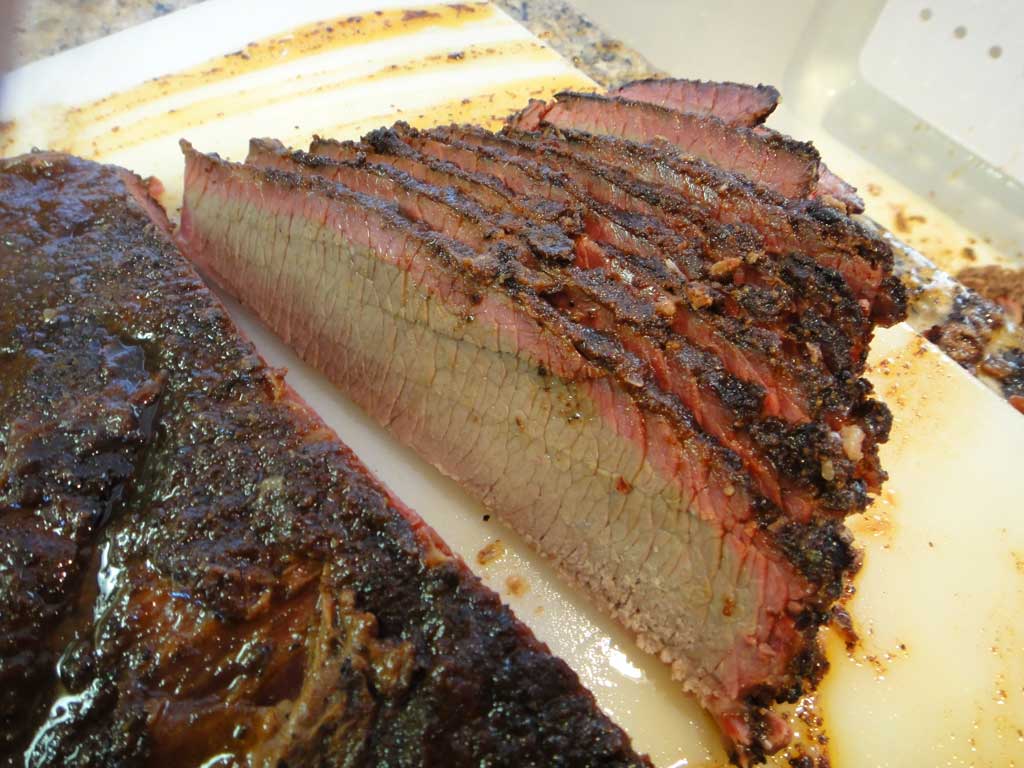
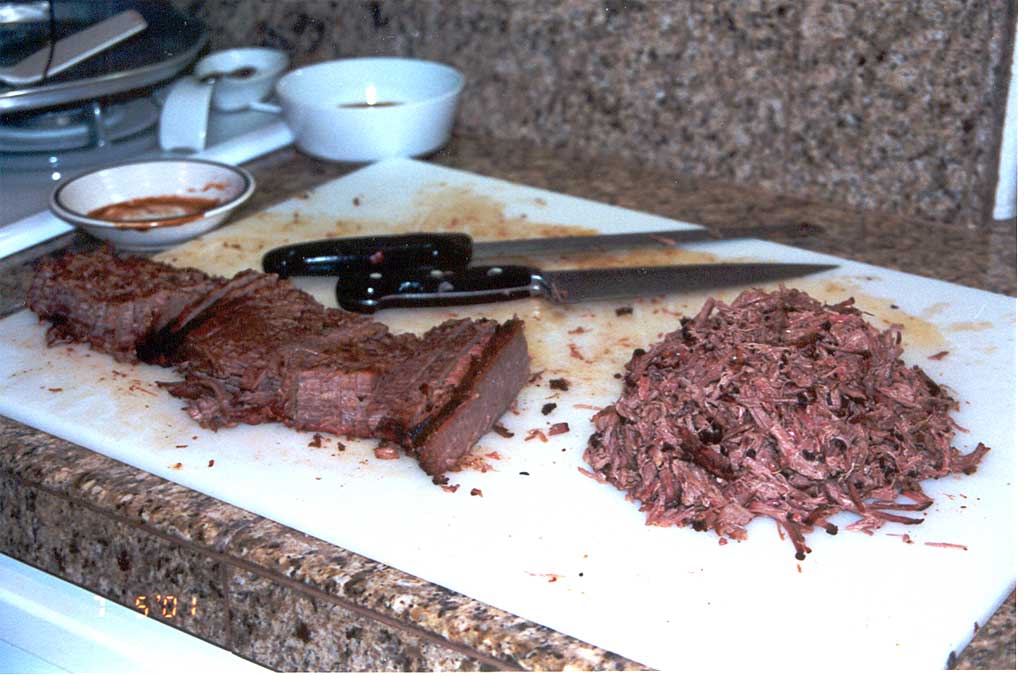
The photo above shows slices from the flat on the left and chopped meat from the point on the right.
The Texas Turn
Down in Texas, some pitmasters don’t like to separate the flat and point sections. Instead, they start by slicing the brisket flat across the grain, and just as they hit the point section, they turn the brisket 90° and slice across the grain of the point. This results in a slice of meat containing both point and flat, where the point is cut precisely across the grain, but the flat is cut at an angle across the grain.
Here’s a video by Aaron Franklin of Franklin Barbecue in which he demonstrates The Texas Turn (although he does not call it that by name). Scroll forward to timestamp 10:15.
Burnt Ends
Traditionally, burnt ends sold in restaurants were the dry edges and leftover bits and pieces of the brisket flat after slicing, mixed with barbecue sauce. These morsels were highly prized for their intense, smoky flavor.
Today, famous barbecue joints like Arthur Bryant’s in Kansas City can’t meet the demand for burnt ends using leftover bits, so they make a facsimile by cubing fully cooked brisket flats, placing the cubes in a pan and smoking them for a couple of hours, then adding sauce and smoking for a couple more hours.
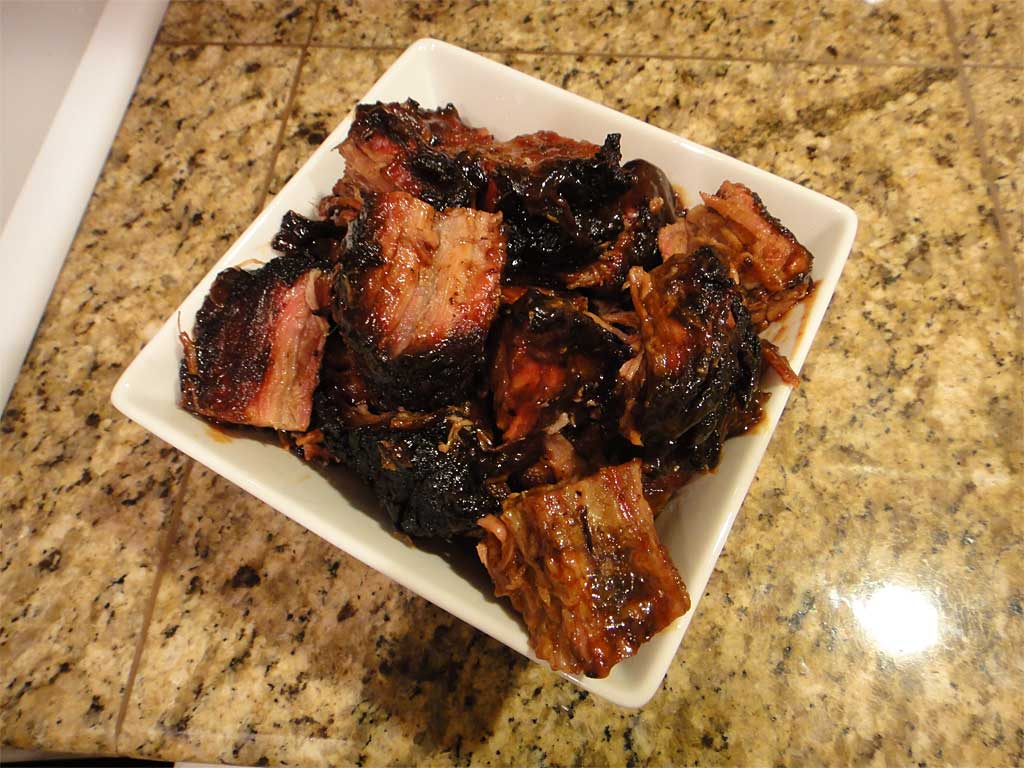
Another approach for making burnt ends is to separate the point section from the flat section after the flat is done, then return the point to the cooker for an additional 4 hours. Cut the point into cubes, mix with just a little barbecue sauce, and enjoy!
See the Burnt Ends article for more details and photos of this process.
Brisket Yield
When you take into account the trimming of the brisket before and after cooking, plus the shrinkage that occurs during cooking, don’t be surprised if you end up with a 50% yield of edible meat from a whole, untrimmed brisket. That means 6 pounds of edible meat from a 12 pound brisket. Depending on the brisket and the internal temp you cook it to, it may be as low as 40% or as high as 60%.
If you’re cooking brisket for a party, figure 4-5 ounces of meat per sandwich or 6 ounces of sliced meat on a plate (8 ounces for hearty eaters). Using a 40% yield, just to be safe, a 12 pound brisket yields 19 4-ounce sandwiches or almost 13 6-ounce plate servings.
Brisket Servings Calculator
This calculator estimates pounds of brisket to purchase based on number of servings, yield after shrinkage/waste, and portion size.
Leftovers
There’s a good chance you’ll end up with leftover brisket. See Holding, Storing & Reheating Barbecued Meats for tips on how to freeze and reheat the leftovers.
Remember to moisten leftover brisket using the defatted au jus you saved after cooking the brisket. If you don’t have any, try using some beef broth.
More Brisket Links On TVWB
- Brisket – High Heat
- Brisket – Smoked & Oven Finished
- Brisket – Midnight Cook
- Brisket – Wet Rub
- Whole Brisket – Central Texas Style Butcher Paper
- Whole Brisket – Competition Trim
- Brisket Flat – Central Texas Style Butcher Paper
- Burnt Ends – Kansas City Style
- Burnt Ends – Smoky, Sticky, Sweet
- Pastrami – Dry Cured
- Quick Pastrami – Smoked Corned Beef Brisket
- Brisket Servings Calculator
- Separating Brisket Flat & Point
- Using An Electric Oven To Hold Brisket At Temperature
- Camp Brisket 2020 Trip Report
 The Tale Of The Left-Handed Brisket
Posted by Shingleman on The BBQ Forum, July 18, 2001
A few years back at the Texas State Finals, lovingly known as the “Meridian”, several of us early birds would arrive on Thursday to get in line for the first-come, first-serve pick of the best cook sites. Thursday night was devoted to serious drinking, hoping to pry secret tips out of other cooks.
One of the better cooks there was ole Connie Baker of team “Lil’ Pit of Heaven”. He was throwing back quite a few of those Mexican beers with a chunk of lime stuck in the neck of the bottle. Connie had so many of them limeade beers that he was starting to smile with a pucker. As a matter of fact, some of the strangers started to scook away and look at him kind of funny. This was when I figured that ole Connie was ripe for the prying of secrets.
One of us asked him how come his brisket was so tender and always placed in the top three. I thought to myself, boy oh boy, if loose lips sink ships, then Ole Connie is going down tonight. All got quiet as he stuffed another lime in a long neck and said that he only cooks left-handed briskets.
He explained that most, but not all, steers rest on their left side, which means when they get up they have to push harder with their right legs.
At this point about half of the bunch murmured something to the effect of “bull hockey” and went back to their 4 or 5 different conversations.
A few of us noticed that ole Connie wasn’t smirking. Hmm, was he onto something? Two or three of us moved closer and I told him, “You can’t stop there. What does pushing up with their right legs have to do with the left brisket?”
Ole Connie stuffed another lime and told us that when they push up with the right legs it flexes the right brisket muscle more so than the left. Therefore, the right-handed brisket will be tougher and less marbled than the left, not always, but usually. Most everyone had written Connie off as a bull sheeter and was not paying much attention to me and Connie. I had to know more and asked him, “How the heck do you tell a left-handed brisket from the right?”
As expected he stuffed another lime and I mixed another Makers. He then told me that with the fat side down, on a left-handed brisket, the point will curve to the right.
Saturday awards time rolled around and Connie took 1st brisket and Grand Champ over 180+ of the best cooks in Texas. His next stop was gonna be the American Royal.
I think that I came in 19th with my right-handed brisket. I just could not get this left-handed brisket thing off my mind. When we got home Sunday afternoon I stopped to look at the cows. Four were laying down and three were on their left side.
Welp, I have been raising a few head of cattle for 24 years and this got me to thinking about what ole Connie had spilled out to us that night. I phoned the kin folk in LaGrange, Texas and told them the story and asked if they would check out their herd. Yep, you guessed it—only 3 out of 37 consistently rested on their right side.
Dangnation, Connie has got it going big time. I went to 5 different grocery stores and flexed briskets to see which sides were more limber and which ones were more marbled.
I have found that there are exceptions to every rule. There are some right-handed briskets that are more limber and marbled than the lefties, but for the most part I find that the majority of the best pick comes from the left-handed pile of briskets.
Another exception to the rule is that you can find a Prime Grade quality brisket that is marked Select and a Select grade marked Choice.
My rule of thumb is flexibility and marbling. Evenness on the flat end is a plus. I’m going to inspect the lefties before I move on to the right-handed ones.
Welp, there it is folks. Take it or leave it. As Jack used to say in the 1950’s Dragnet TV detective show, “Only the facts, ma’am.”
– Shingleman
Reprinted with permission from Ray Basso.
Brisket diagram: 2009 by JoeSmack from Wikipedia Commons


