Summary
- Buy a 15-16 pound boneless chuck roll in Cryovac from a store catering to foodservice businesses.
- Apply a favorite rub and refrigerate at least two hours or as long as overnight before cooking.
- Fire the WSM using the Minion Method. Add the meat direct from the refrigerator without waiting for the cooker to come up to temperature.
- Smoke at 225-250°F to an internal temperature of 160-165°F, then wrap in foil and cook to an internal temperature of 190-195°F.
- Slice or shred as you would pork butt.

Diagram indicating chuck location
The chuck is one of nine primal cuts that comes from a side of beef. Essentially the shoulder of the cow, the chuck consists of part of the neck and backbone, the first five ribs, and portions of the shoulder blade and upper arm. It weighs in at 66-106 pounds or more.
The chuck primal is broken down into smaller, subprimal cuts. One of these is the chuck roll. It weighs 13-21 pounds or more and is one of the largest hunks of beef you’ll ever cook in the WSM.
Chuck roll is sort of the pork butt of beef. It has the structure of pork butt—lots of muscle, fat, and connective tissue coming together from a bunch of different directions—and is easier to pull or shred than to slice.
Here are some photos I took on April 11-12, 2003 when barbecuing a chuck roll overnight.
Buying And Preparing A Chuck Roll
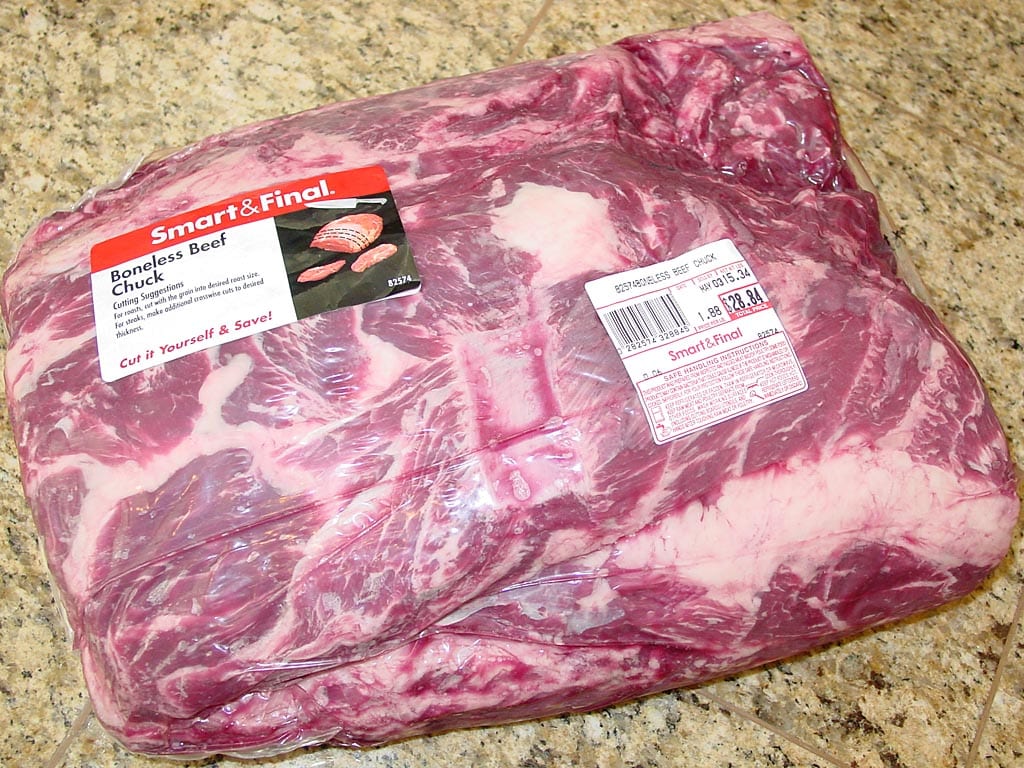 Chuck roll is available at stores that cater to foodservice businesses, including Smart & Final, US Foods Chef’Store, Gordon Food Service, and Restaurant Depot. These stores usually carry a boneless USDA Select or USDA Choice grade chuck roll. You may see the words “trimmed” and “neck off” on the box, meaning that some extraneous portions of the chuck roll have been removed during processing.
If you are a Kansas City Barbeque Society (KCBS) member, you can get a free day pass to Restaurant Depot by showing your KCBS membership card and a photo ID.
To ensure that the chuck roll fits in the WSM, buy one that’s 15-16 pounds. This piece of meat will be shorter in length than a large, untrimmed brisket, but will be much thicker overall. The photo above is a 15.34 pound chuck roll in Cryovac.
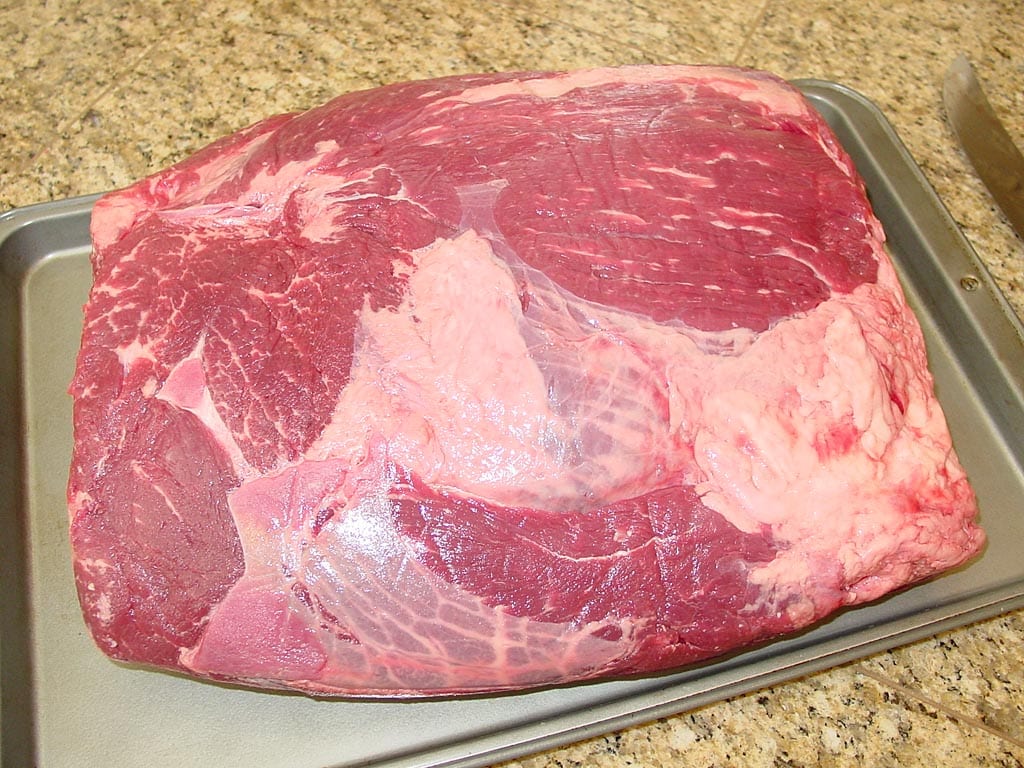
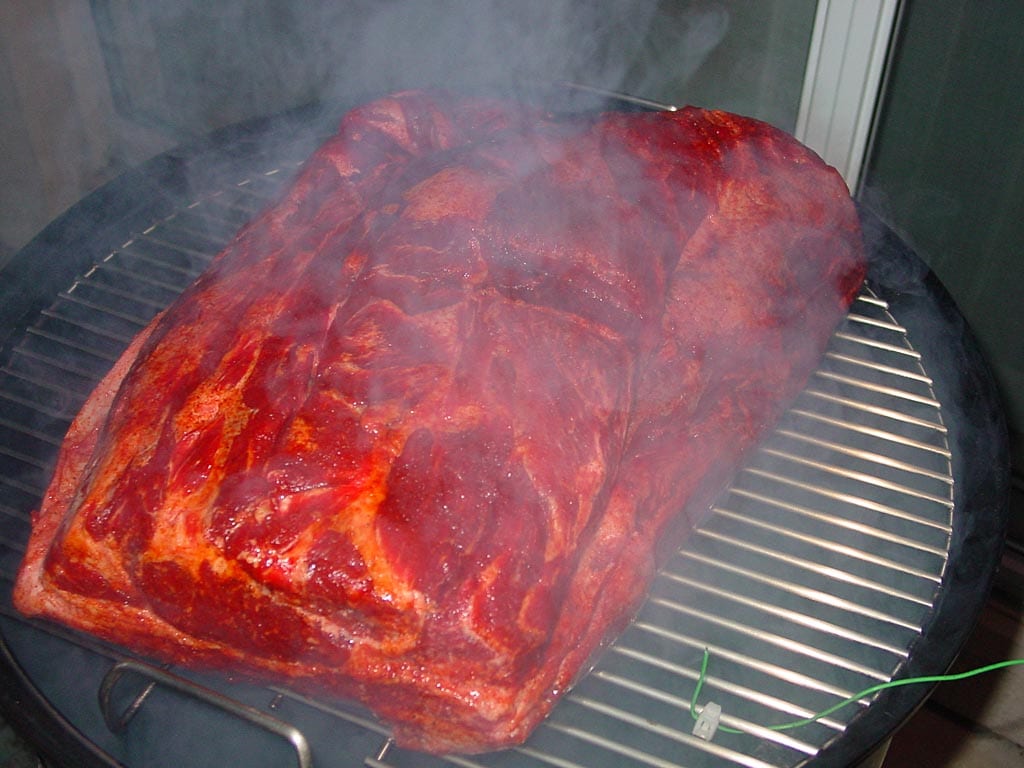
This photo shows the top side of the unwrapped chuck roll.
This photo shows the bottom side of the unwrapped chuck roll.
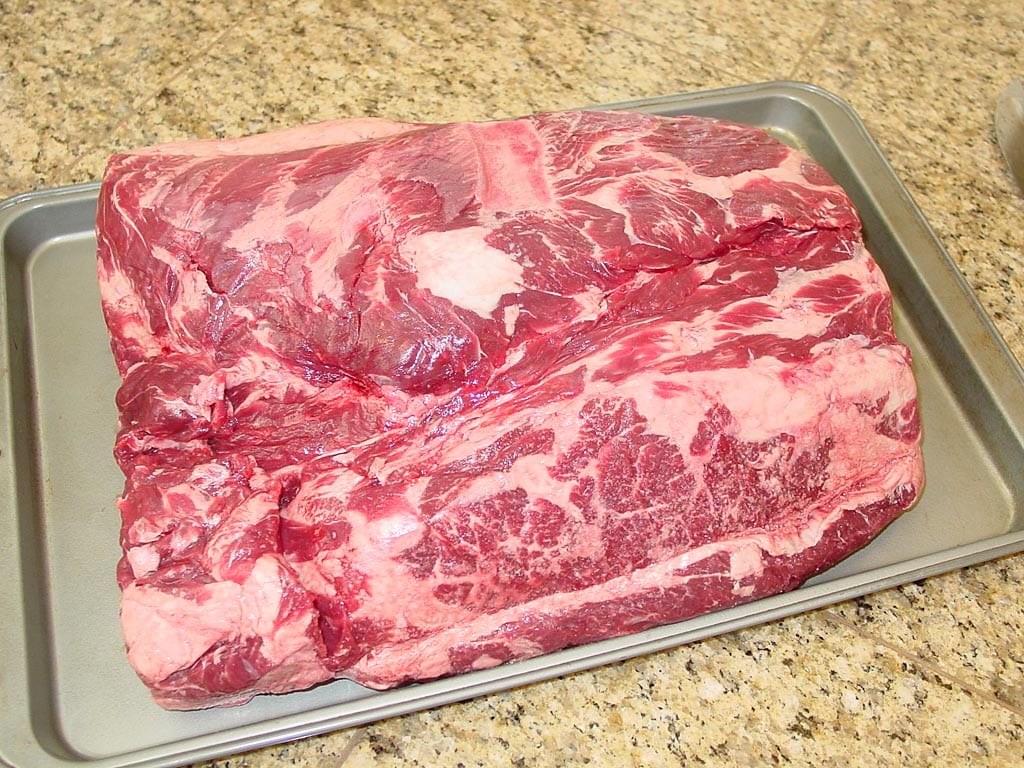
A chuck roll doesn’t have a fat side and a lean side, so there’s no need for extensive trimming before cooking. Just trim away anything that doesn’t look appealing and pat all surfaces dry with paper towels.
Applying The Rub
Any rub that works with brisket will also work with chuck roll. I used a bottled rub from my favorite barbecue joint, Armadillo Willy’s. Here’s an approximation of their rub that was printed in the San Jose Mercury News on May 20, 1998.
Armadillo Willy’s Rub
- 1/4 cup brown sugar
- 1/4 cup non-iodized table salt
- 1/4 cup paprika
- 1 Tablespoon freshly ground black pepper
- 1 Tablespoon granulated garlic powder
- 1 Tablespoon onion powder
- 1-1/2 teaspoons cayenne pepper
- 1/2 teaspoon crushed fennel seed
- 1/2 teaspoon ground coriander
Combine all ingredients and mix thoroughly.
Apply a generous amount of rub to all surfaces, place on a rimmed baking sheet pan, cover with plastic wrap, and refrigerate for at least two hours or as long as overnight before cooking.
There’s no need to allow the meat to come to room temperature before cooking—just move it directly from the refrigerator into the cooker.
Using The Minion Method
Light the cooker using the Minion Method, filling the charcoal ring all the way to the top so that the cooker doesn’t run out of fuel before the end of the cooking session.
Since it was a breezy evening with a chance of showers, I used a Weber chimney starter to light 30 Kingsford Charcoal Briquets and spread them over the full ring of unlit charcoal. I then put two large chunks of oak smoke wood on the hot coals and assembled the cooker.
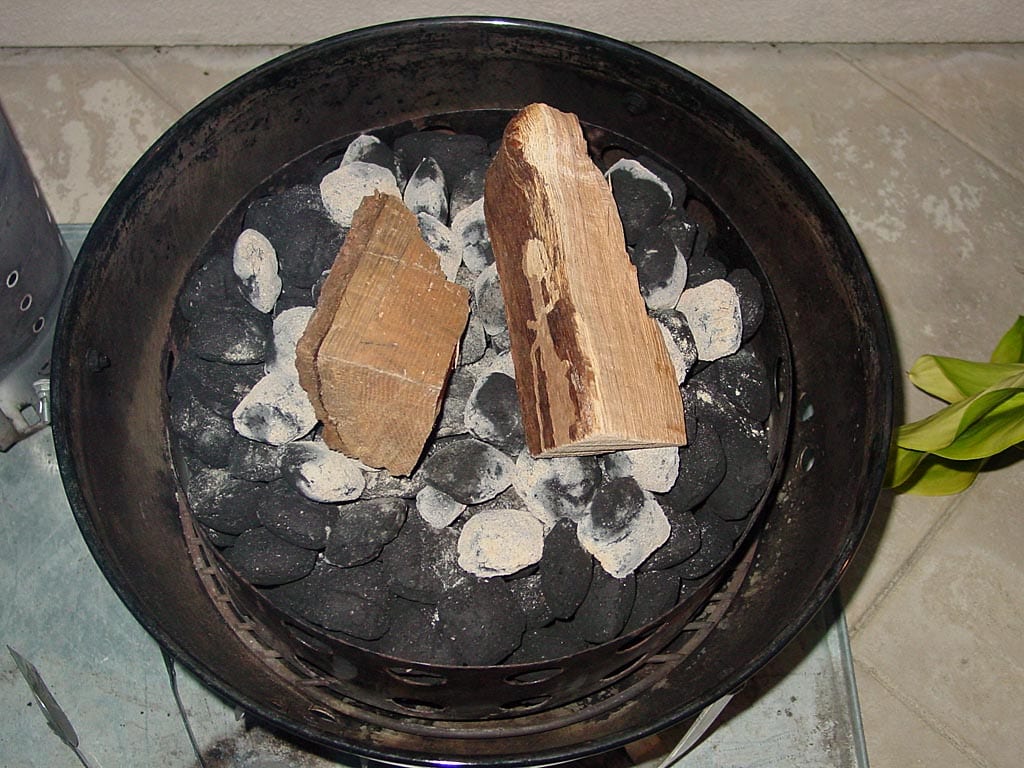
I used the 2-gallon Brinkmann pan for this overnight cook, filling it with hot tap water. Using this big pan, I had to replenish the water only once during the cooking session. (If you have a 2009 or newer 18.5″ WSM, you may also want to look into this alternative water pan.)
With the cooker assembled, place the chuck roll into the cooker immediately—don’t wait for the cooker to come up to temperature. Start with all dampers 100% open until the cooker reaches 200°F, then set the three bottom dampers to 25% open and adjust as needed to maintain a temperature of 225-250°F measured at the lid. Leave the lid damper 100% open throughout the cook.
Details Of The Cook
Barbecue the chuck roll at 225-250°F until it reaches an internal temperature of 160-165°F measured with an instant-read thermometer, then wrap in foil and return to the cooker until the internal temp reaches 190-195°F. The foil speeds the cooking process and facilitates the conversion of connective tissue from collagen into gelatin. Skip the foil, if that’s your preference, but using it helped me cook this monster hunk of meat in a reasonable amount of time, and guaranteed that it would be both moist and tender.
Replenish the water pan with hot tap water during the cook, as you feel necessary, and gently stir the coals if the cooker temperature begins to drop after 10 hours.
There’s no need to turn or baste the chuck roll during cooking, but you can if you like. I didn’t do either and it didn’t seem to matter.
I started this cook at 7:45pm and checked the cooker one last time at 12:45am before going to bed. When I checked the next morning, the cooker temp was down a bit, but the meat was in the 160-165°F range, so I foiled it and returned it to the cooker. I also stirred the coals twice to reinvigorate the fire.
Here’s how the cooker temperature went during this 15-hour cook:
| Time | Lid Temp | Vent 1 % | Vent 2 % | Vent 3 % |
| 7:45 pm | – | 100 | 100 | 100 |
| 8:00 pm | 150 | 100 | 100 | 100 |
| 8:15 pm | 158 | 100 | 100 | 100 |
| 8:30 pm | 200 | 25 | 25 | 25 |
| 8:45 pm | 206 | 25 | 25 | 25 |
| 9:00 pm | 214 | 25 | 25 | 25 |
| 9:30 pm | 213 | 25 | 25 | 25 |
| 10:00 pm | 219 | 25 | 25 | 25 |
| 10:30 pm | 220 | 25 | 25 | 25 |
| 11:00 pm | 220 | 25 | 25 | 25 |
| 11:30 pm | 226 | 25 | 25 | 25 |
| 12:00 am | 225 | 25 | 25 | 25 |
| 12:45 am (w) | 212 | 25 | 25 | 25 |
| 7:30 am (f)(s) | 180 | 100 | 100 | 100 |
| 8:00 am | 195 | 100 | 100 | 100 |
| 8:30 am (s) | 193 | 100 | 100 | 100 |
| 9:30 am | 248 | 100 | 100 | 100 |
| 11:30 am | 255 | 100 | 100 | 100 |
(w) added hot water to pan
(f) wrapped meat in foil
(s) stirred coals gently
Note that the vent percentages represent the way I set the vents at the time indicated.
During this cooking session, I also measured the temperature at the top grate using a data logging thermometer. This thermometer uses a K-type bead probe thermocouple attached to the grate (you can see the probe in the picture above showing the meat in the cooker) and records the temperature at a configurable interval. I set the thermometer to take readings every 5 minutes, for a total of 183 readings between 7:47 pm and 10:57 am. Here’s the result:
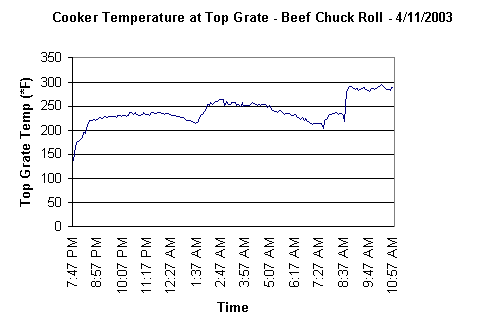
This graph highlights several interesting points. First, you’ll notice that the grate temperature is always a few degrees higher than the lid temperature at any given point in time. This is interesting because when I did some temperature experiments back in 1999, I found just the opposite—that the lid averaged 12-15°F higher than the top grate. This difference may be explained by the fact that in 1999, I took measurements with no meat in the cooker, and I measured temperature at the center of the grate. In this case, there was a 15-pound chuck in the cooker, and the thermometer probe was positioned just a few inches from the edge of the grate, where heat rises up around the water pan.
You’ll also notice that something happened at 1:30 am that caused the temperature to jump about 35°F, and the cooker ran hotter until about 5:00 am when the temp started to drop again.
Finally, you can see what happened when I stirred the coals, first at 7:30 am and again at 8:30 am. It was that second stir that really did the trick!
Looks Like Brisket, Pulls Like Pork
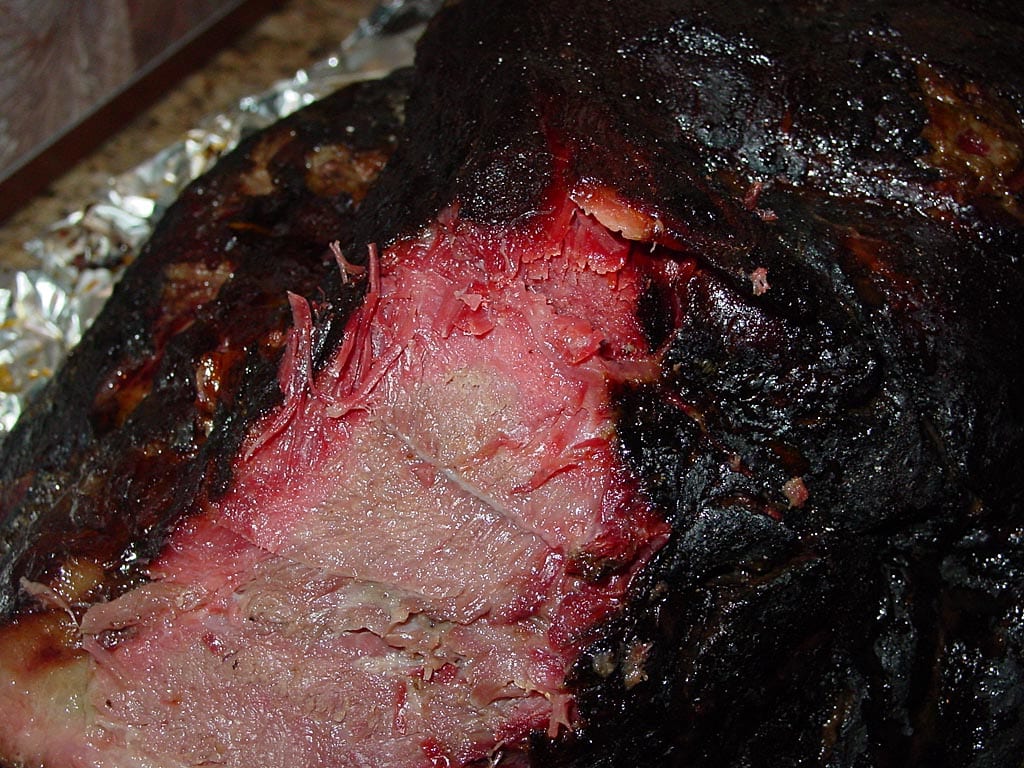
As with pork butt, a chuck roll will show a variety of temperature readings as you probe different locations with an instant-read thermometer. The chuck roll shown here measured 190-206°F depending on where I poked it. Looks just like one of those brisket meteorites, doesn’t it?
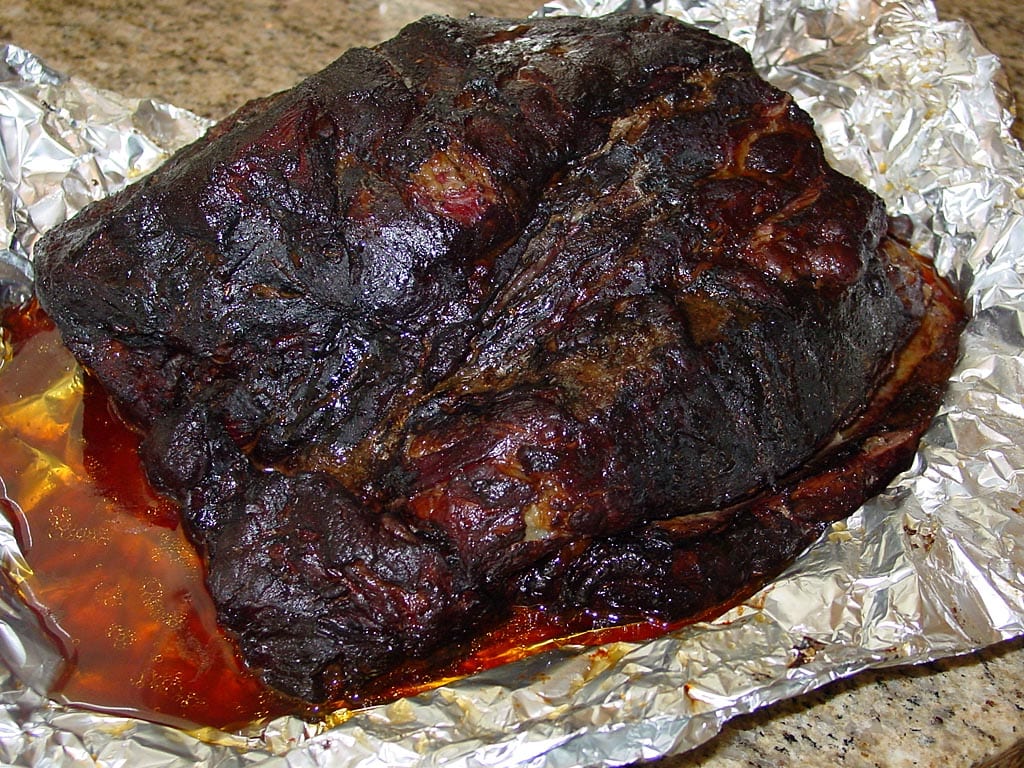
Once it reaches 190-195°F, remove the chuck roll from the cooker and let it rest in the foil for at least 30 minutes before serving. If you need to hold the meat at temperature for several hours before serving, place the foil-wrapped meat directly into an empty cooler per the instructions in the Holding, Storing & Reheating Barbecued Meats article.
This photo shows the deep smoke ring in the chuck roll.
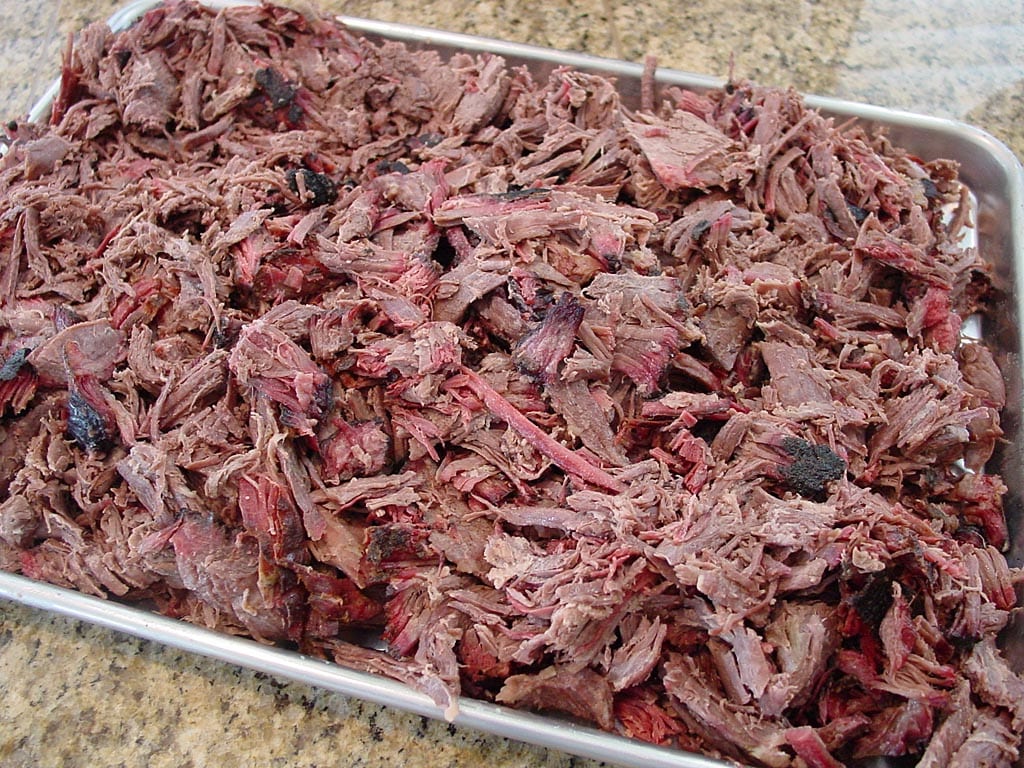
 This photo shows the tray of pulled meat this chuck roll rendered. You can slice portions of the chuck roll, but it’s easier to treat it like a pork butt, pulling off large chunks of meat and shredding by hand or with a knife. I like to hold a serrated knife across the grain and push the knife away from me at an angle down through the meat, not trying to cut a clean slice, but tear shreds from the soft meat. Weed out any excess fat or connective tissue that did not break down during cooking.
You’ll end up with some really tasty outside meat, but also a lot of inside meat that may benefit from some rub or sauce stirred in for good measure.
A chuck roll feed an army, so make sure to invite over a lot of friends, or portion the leftovers using a FoodSaver vacuum sealer and freeze to enjoy later.
More Beef Chuck Links On TVWB
Beef Chuck diagram: 2009 by JoeSmack from Wikipedia Commons


