In This Topic
- Wind Is The Enemy
- Building A Wind Screen
- Insulating The Cooker
- Building A Styrofoam Enclosure
- Building A Wooden Enclosure
- Building A Metal Enclosure
- Adjustments For Cold Weather Cooking
- What About Rain?
- Warnings From Weber
- How Low Can You Go?
- More Thermometer & Temperature Links On TVWB
Everyone knows that the Weber Smokey Mountain Cooker is easy to operate on a warm summer day, but what about on a cold, windy day in the dead of winter? Here’s what I’ve learned from people that are experts in running the WSM in the most extreme weather conditions.
Wind Is The Enemy
Wind—not cold—is the biggest problem when it comes to maintaining temperature in the Weber Bullet. Wind sucks the heat out of the cooker, or it forces its way into the air vents and ignites more fuel, actually driving up the cooker temperature. Cold air temperatures affect the amount of fuel consumed by the cooker, but don’t have much affect on temperature control.
Your best approach is to move the cooker to a sheltered location that still offers adequate ventilation. If you can do this, there’s usually no need to undertake any of the methods illustrated below.
Before proceeding with a wind screen, insulation or enclosure, see the Warnings From Weber at the end of this article.
Building A Wind Screen
If you can’t move the WSM to a sheltered location, then a wind screen is a simple way to protect your cooker from wind.
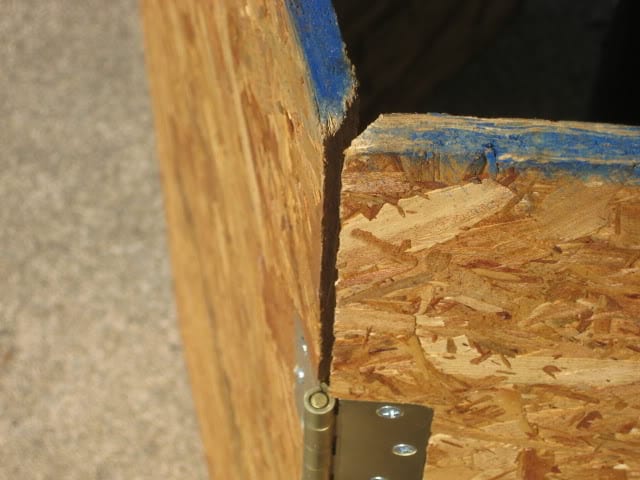
A wind screen is made of wood or metal and wraps around the cooker on 2 or more sides. It should be taller than the cooker and heavy enough (or anchored to the ground) so that it will not blow over. When making a wind screen from wood, it’s very important to provide adequate clearance between the cooker and the wind screen so that it does not catch fire.
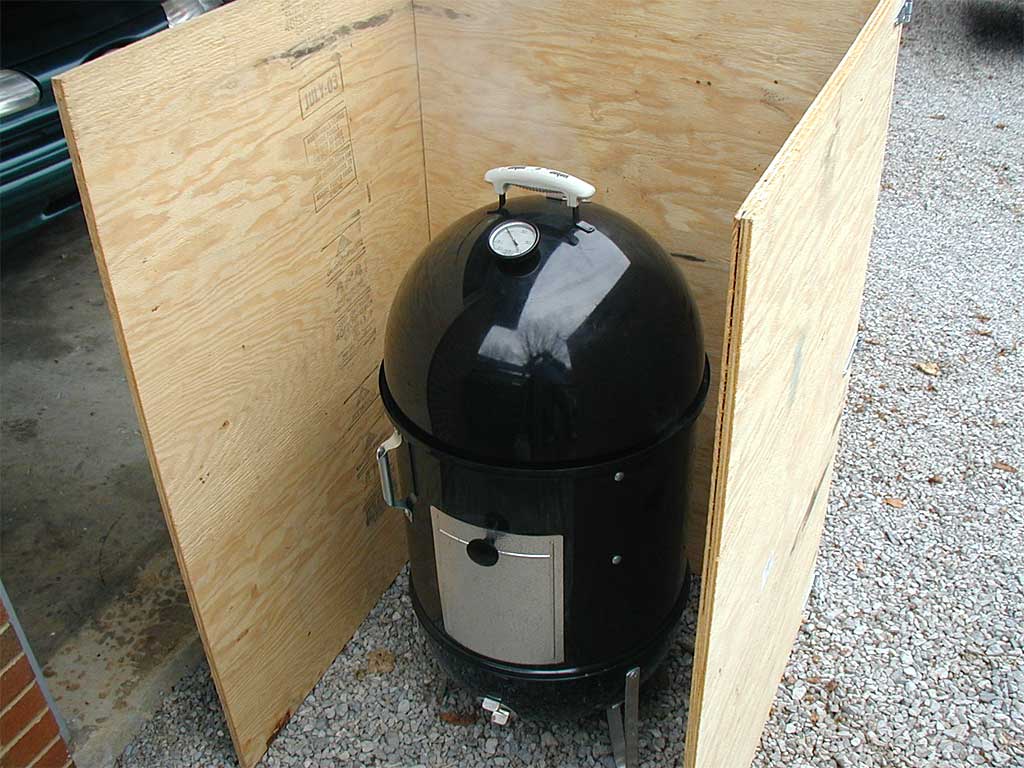
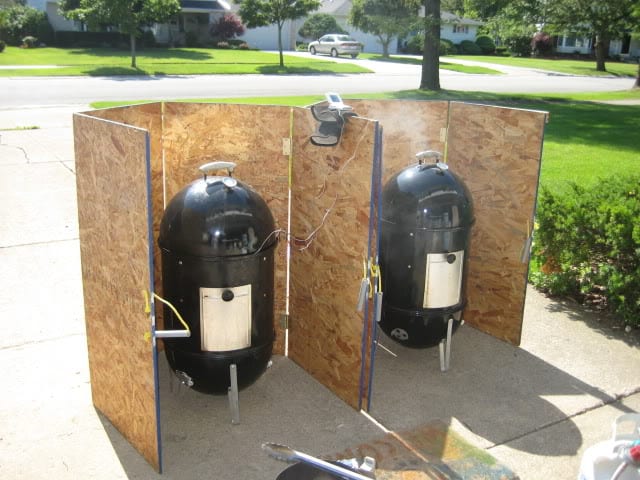
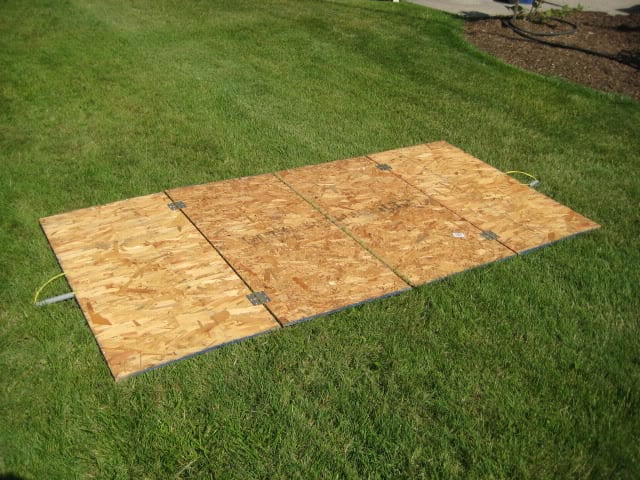
This wind screen from Wayne Sizemore illustrates the construction of a three-sided plywood wind screen. Hinges connect the three pieces so the unit can be folded for easy storage.
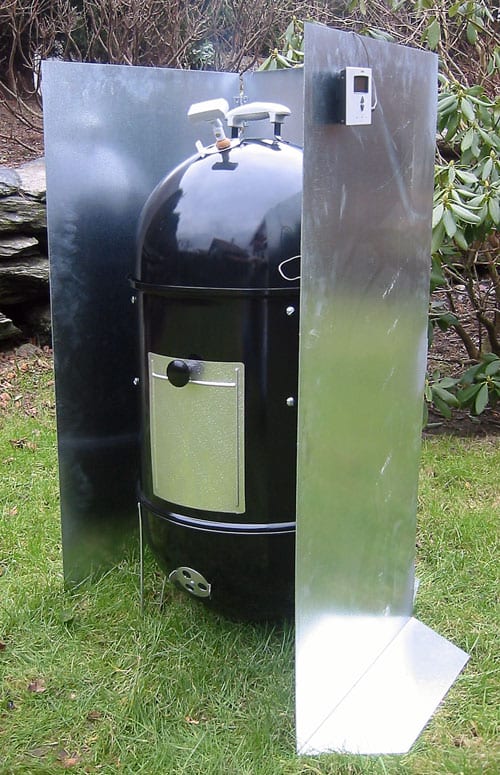
Tormod Eikill of Stavanger, Norway submitted this photo. Tormod writes, “I asked a local workshop to custom build a windshield in galvanized steel. A little bit expensive and heavy, but very good. You can fold it together after use and easily carry it under your arm.”
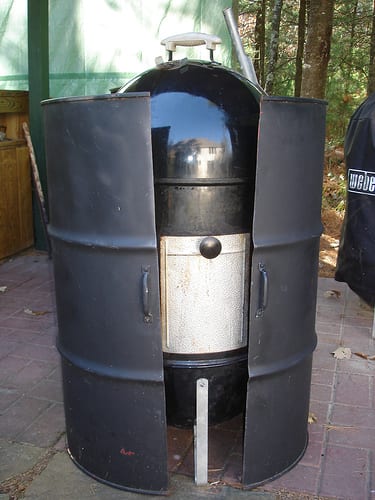
This photo shows a hinged metal barrel used as a wind screen from Dan N. of Wisconsin Rapids, WI. Dan says, “I use hinges with pins that I can pull out so the halves fit inside each other for storage or transport. I also added handles on the front to help in opening and closing. Also, I added a bracket on top into which I can insert an old umbrella to ward off precipitation.”
Buzz uses unhinged metal barrels as wind screens with some blankets draped over one side for additional insulation.
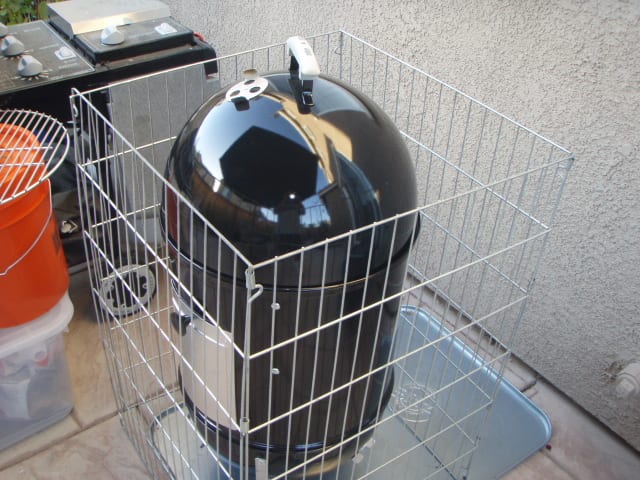
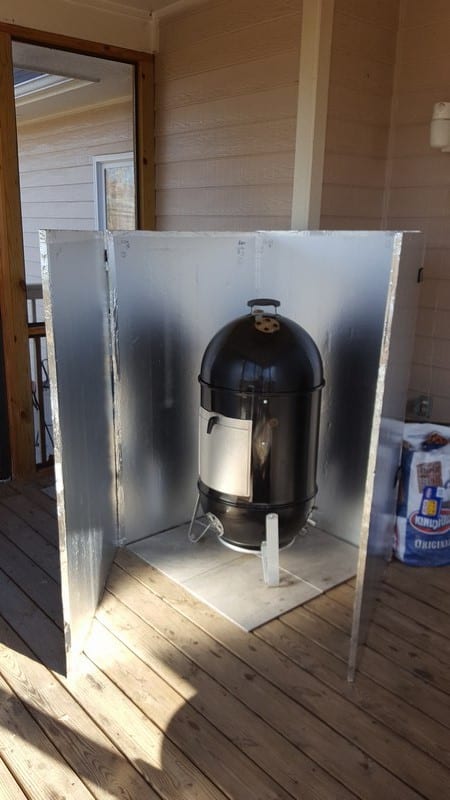
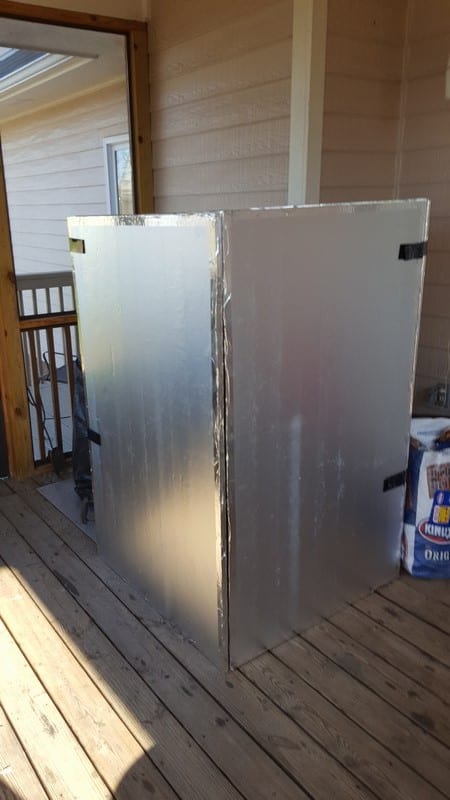
Chuck R modified a portable dog enclosure and wrapped it with Reflectix insulation to create a folding, four-sided wind screen. You can read all the details on The Virtual Weber Bulletin Board.

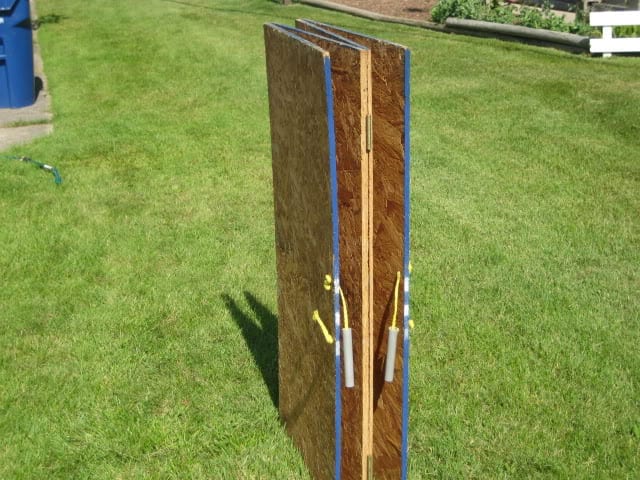
These photos show a single plywood sheet windbreak built by J. Biesinger of Buffalo, NY. He cut a 4′ x 8′ sheet of oriented strand board into 4 two-foot sections and connected them using door hinges. The sections open to form a box or fold flat for easy storage. The two cuts at the center of the plywood were made at 45° angles to allow that joint to swing open more fully.
Paul Kinnane from Birmingham, AL made this wind screen. He used eight sheets of GAF EnergyGuard 1/2″ x 4′ x 8′ R-3.6 Polyisocyanurate Insulating Sheathing Model# 1S01 from The Home Depot, glued pairs of sheets together aluminum side facing out using Liquid Nails adhesive, and cut them into 3′ x 5′ pieces. He sealed the edges with HVAC foil tape and fastened the panels together using wide Velcro strips that double as hinges. Paul likes this setup “because I am able to open one joint and pass temp probe wires out a back corner to connect to the DigiQ Dx2, another very wise grilling investment. The Velcro hinges also allow me to disassemble the panels so they stack flat for storage.” Paul’s 22.5″ WSM sits on a 3′ x 3′ square of ceramic tile and the windbreak wraps around it perfectly.
Wind screens can also be fashioned in a “V” shape, or even single-sided. Imagine a sheet of plywood standing on edge and anchored securely to the ground. In a pinch, other large, sturdy objects will do. For example, place your WSM behind a gas grill, or behind a patio umbrella laid on the ground on its side.
If you don’t have a wind screen and a mild breeze is driving up the cooker temp, close the two bottom vents on the upwind side and control temperature using the single vent on the downwind side. The top vent may be partially closed until temperature is brought back under control, then fully opened again.
Insulating The Cooker
As an alternative to a wind screen, you may want to wrap insulation around the cooker.
Here’s the 18.5″ WSM Smoker Jacket from The BBQ Guru (sadly, as of April 2023 they no longer sell it). It is made of 1000°F aluminized fiberglass, is designed specifically to fit the WSM, and costs about $99. Thanks to Bill Hays for the photo.
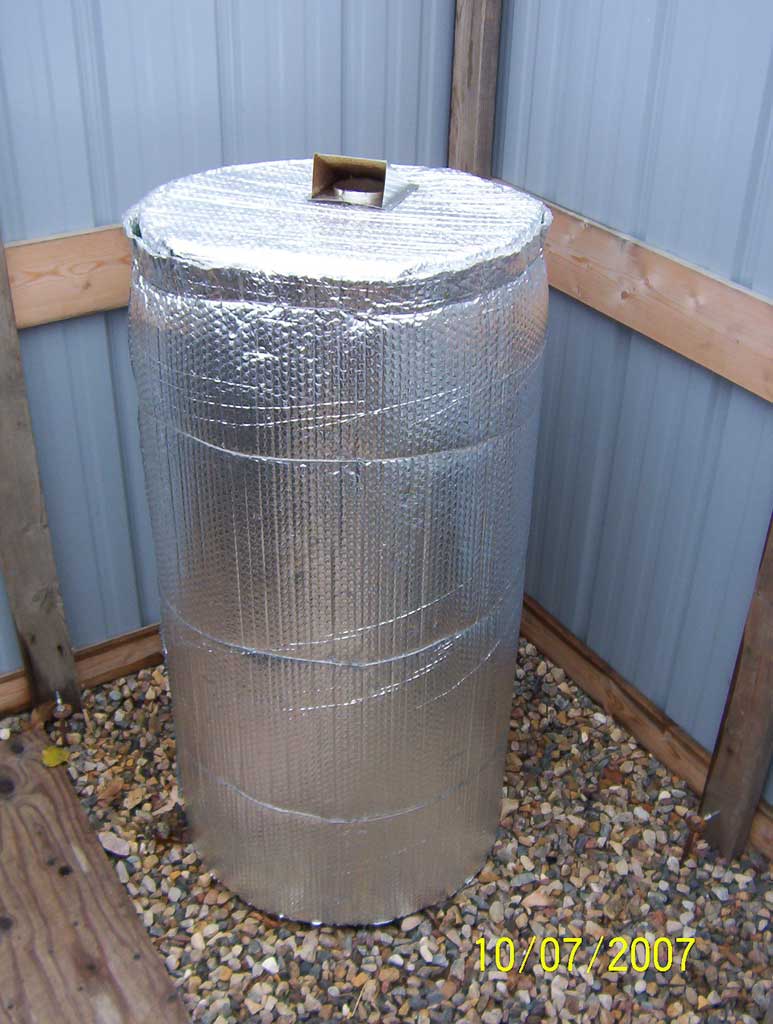
You can make your own insulated jacket for the WSM. A popular material to use is 3/8″ fiber tech insulation with a reflective aluminum face. Some home improvement stores sell hot water heater jackets made of this material, or it can be ordered by the roll as “heat shield insulation” or “fiber tech padding” from automotive suppliers like J.C. Whitney. Some folks use a single layer of material wrapped around the cooker, while others put two pieces of insulation together with the aluminum sides facing out, sealing the edges with aluminum foil tape.
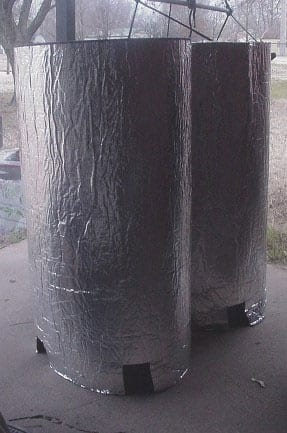
Keri Cathey wrapped two WSMs in high tech hot water heater jacket material.
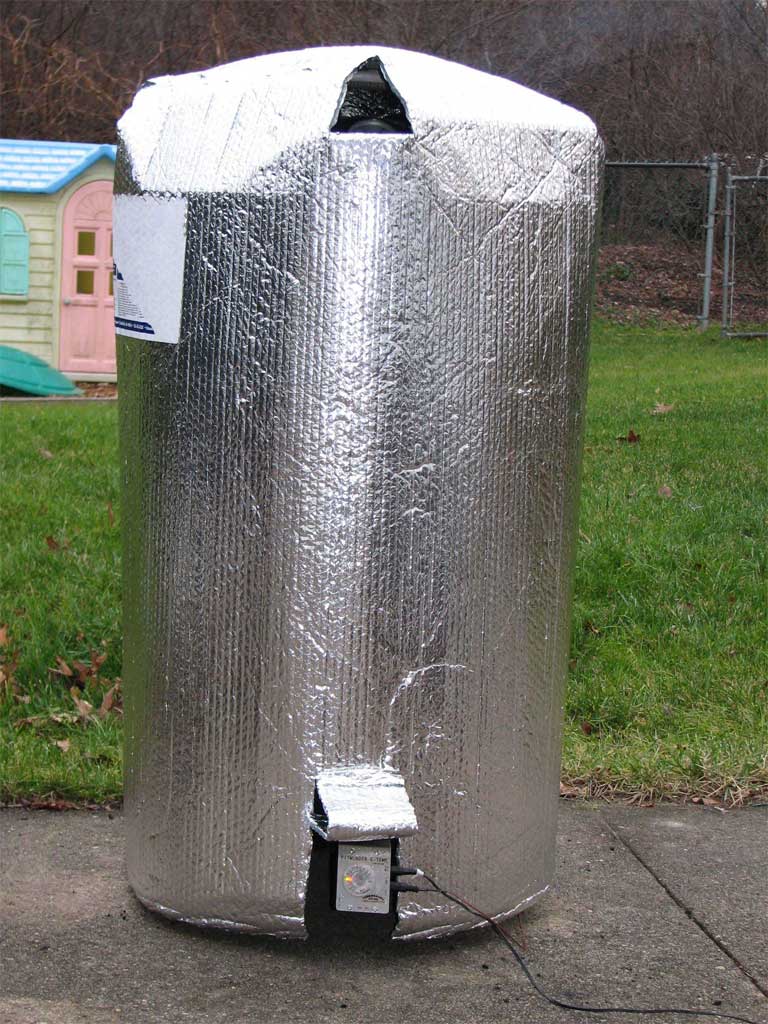
Here’s a WSM wrapped in fiber tech insulation by Lee Reiser.
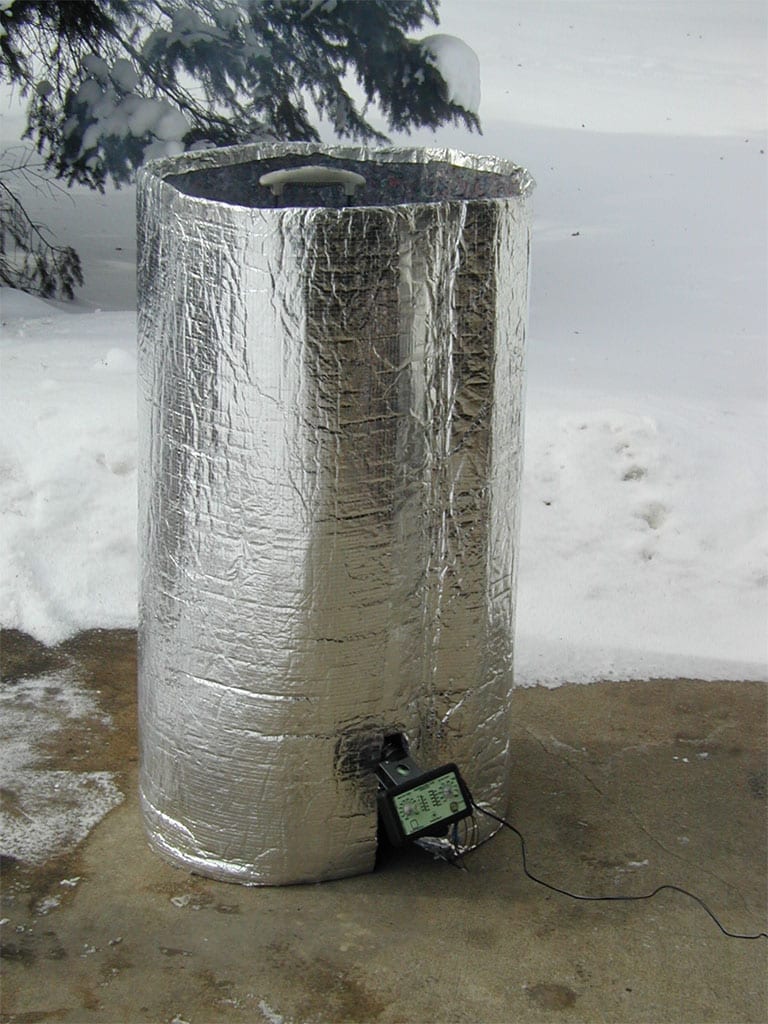
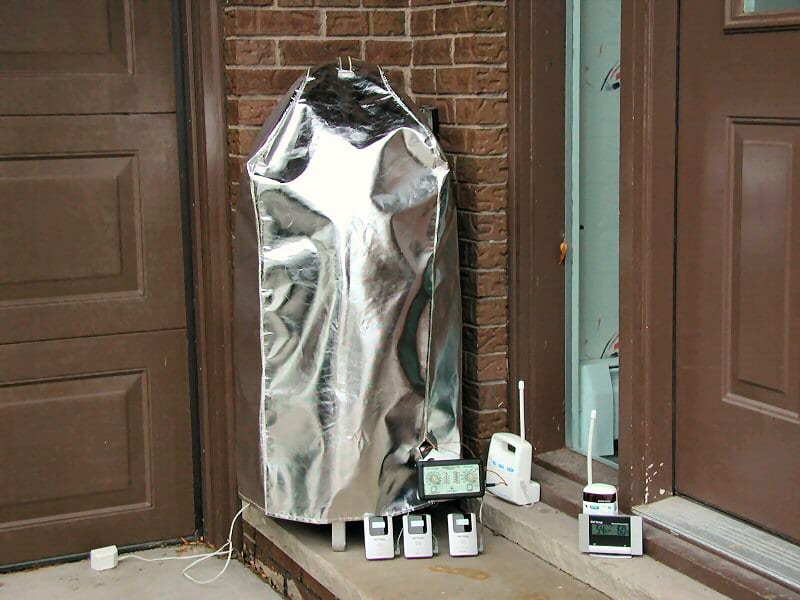
Another material used is called Reflectix, an aluminized bubble wrap sold in rolls and fitted to the WSM like the fiber tech insulation shown above.
Here’s a Reflectix insulation jacket made by Mike A. After cutting the insulation to size, the edges can be sealed with aluminum foil tape for a neat appearance, also available where these insulation products are sold. To keep the jacket fastened around the cooker, use tape or Velcro fasteners in several locations, or run a bungee cord around the cooker, or clip a clothes pin on the top edge of the jacket where the two ends overlap.
This is an insulated jacket made by Trevor Gibson. It consists of fiberglass hot water heater insulation sandwiched between two layers of Reflectix insulation with a clothes dryer vent on top. “Works really well, although I didn’t have foil tape and used duct tape instead, which I think was a mistake,” says Trevor.
Fiberglass hot water blankets have fallen out of favor for insulating Weber Bullets, primarily because they are bulkier than the high-tech materials now available and because fibers can get loose from the blanket and make a mess, getting into your cooker and potentially your food.
No matter which insulation you choose, to service the fuel and water pan, simply remove the insulation and set it aside, go about your business, then replace the insulation.
For more insulation ideas, search the posts in the WSM Modifications Forum of The Virtual Weber Bulletin Board.
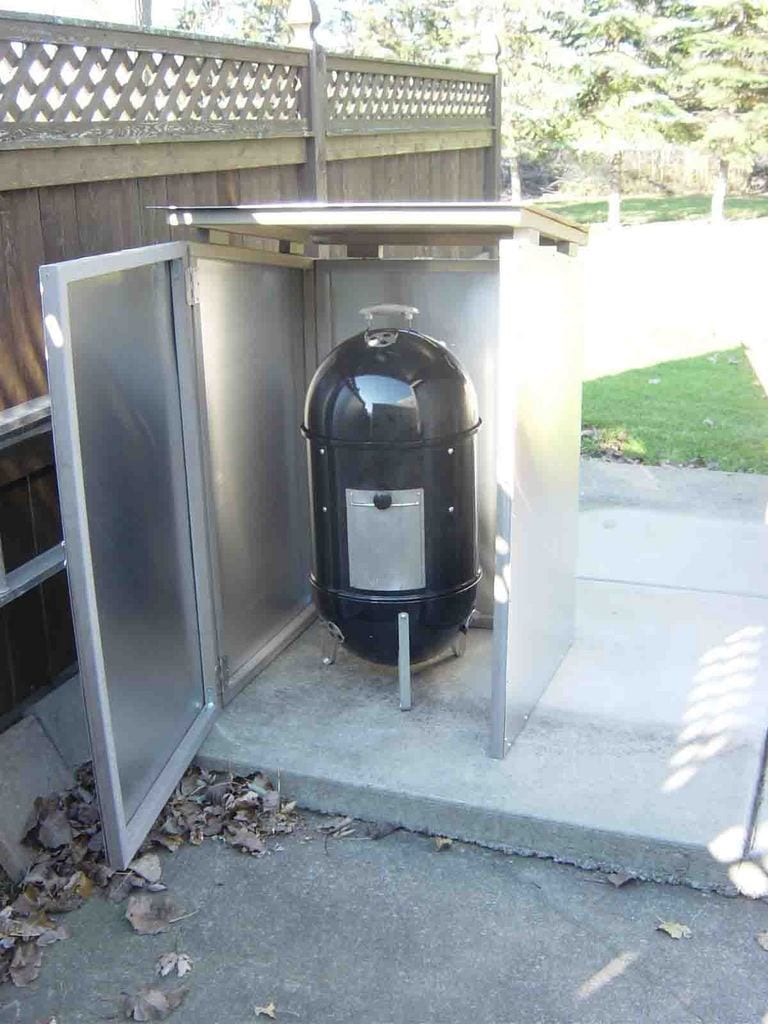
Building A Styrofoam Enclosure
If wind screens or insulation aren’t your thing, try sheltering the WSM with a removable enclosure. A large cardboard or plastic barrel with the bottom cut out will work, or you can build a custom enclosure.
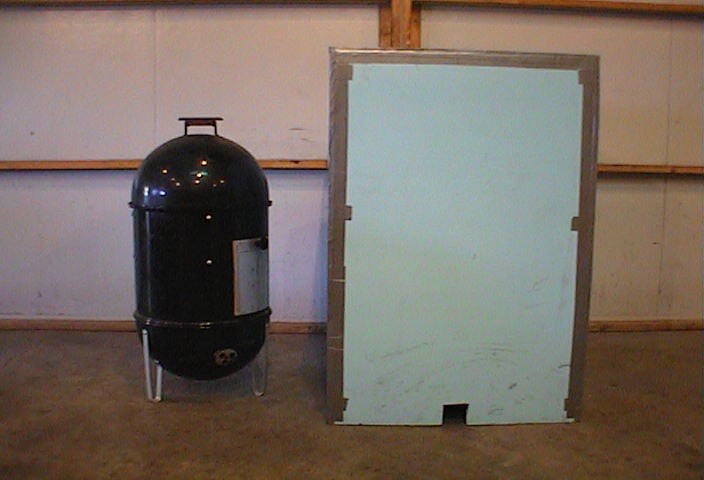
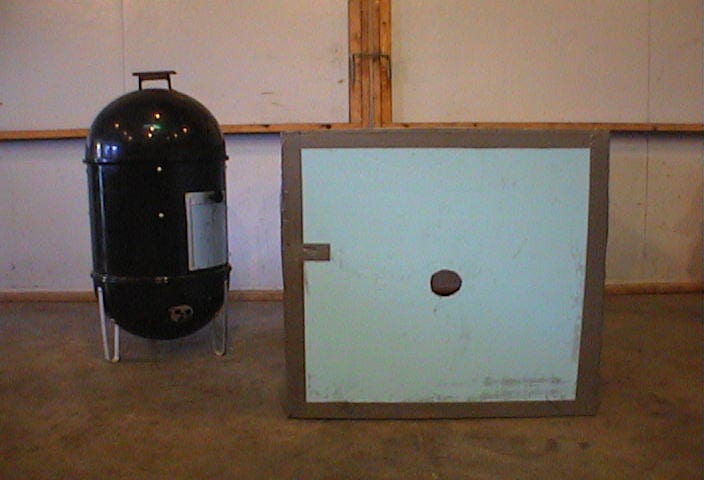
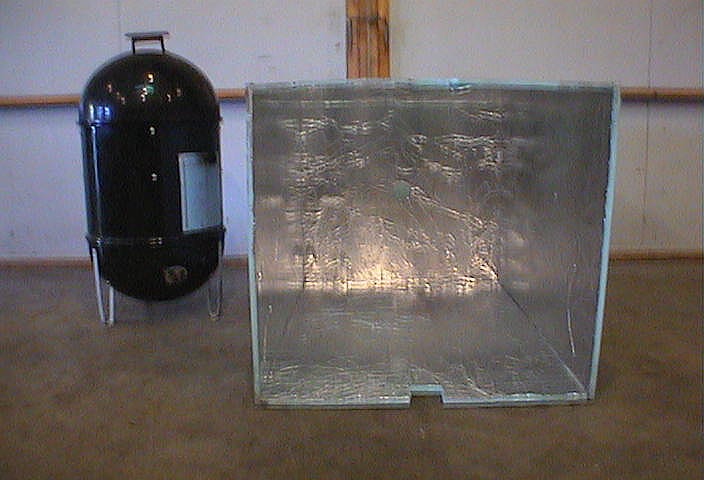
Here’s an enclosure built by Harry Jiles. I learned about Harry years ago on The BBQ Forum. Harry is a hard-working farmer from central Illinois who’s not going to let something like a little cold weather stand between him and some mighty fine barbecue. Harry was kind enough to share his method for building an enclosure.
Chris,
I finally got a little break and a chance to take the exact measurements of the cold weather cover that I use on my WSM. Basically, it is a rectangular box which is 30″ x 30″ and 48″ high. It is constructed of Styrofoam blue board that can be purchased at any lumber yard. I simply cut the panels to size with a utility knife and taped them together with duct tape. I also lined the inside of the foam box with foil by using a spray adhesive and gluing heavy duty aluminum foil on one side of the foam panels before assembling the box. I put the foil lined side on the inside when I taped the box together. One might be able to find foam sheeting that already has one side lined with a reflective foil surface and save the step of gluing on the aluminum foil. I have seen such foam sheeting before, but my local lumber yard didn’t have any when I decide to construct my box.
The box is 48″ high because the foam sheeting comes in 4′ x 8′ sheets and I didn’t bother to cut the height down any from the 48″. This 48″ height gives about 9″ clearance over the top of the handle on the lid of the WSM so one might possibly be able to make the box a little shorter if they wished to cut down on the bulk, although the foam is very light and the box doesn’t weigh much at all. However, it is rather bulky and could be a little awkward for a short person to handle, especially if it is very windy. The 30″ x 30″ size of the box gives about 6″ of clearance around the WSM, which seems to be plenty.
I cut a 3″ square hole on the bottom edge of two opposite sides of the box to allow fresh air in and I cut a 3″ round hole in the center of the top for the exhaust. These holes are more than adequate for proper draft through the WSM. Using the box makes it necessary for one to use a Polder thermometer for monitoring the temperature. I tape a piece of string to the top of the box that goes though the top hole and is long enough to tie to the end of the probe cable while the box is sitting beside the WSM. After I place the box on the WSM, I pull the end of the probe cable up through the top hole, plug it in to the Polder and set the Polder on top of the box. You then unplug the cable and drop it back through the top hole, with the string attached, to remove the box and tend to the WSM.
I have attached 3 pictures that should help to visualize the box and understand the construction details.
– Harry Jiles
Building A Wooden Enclosure
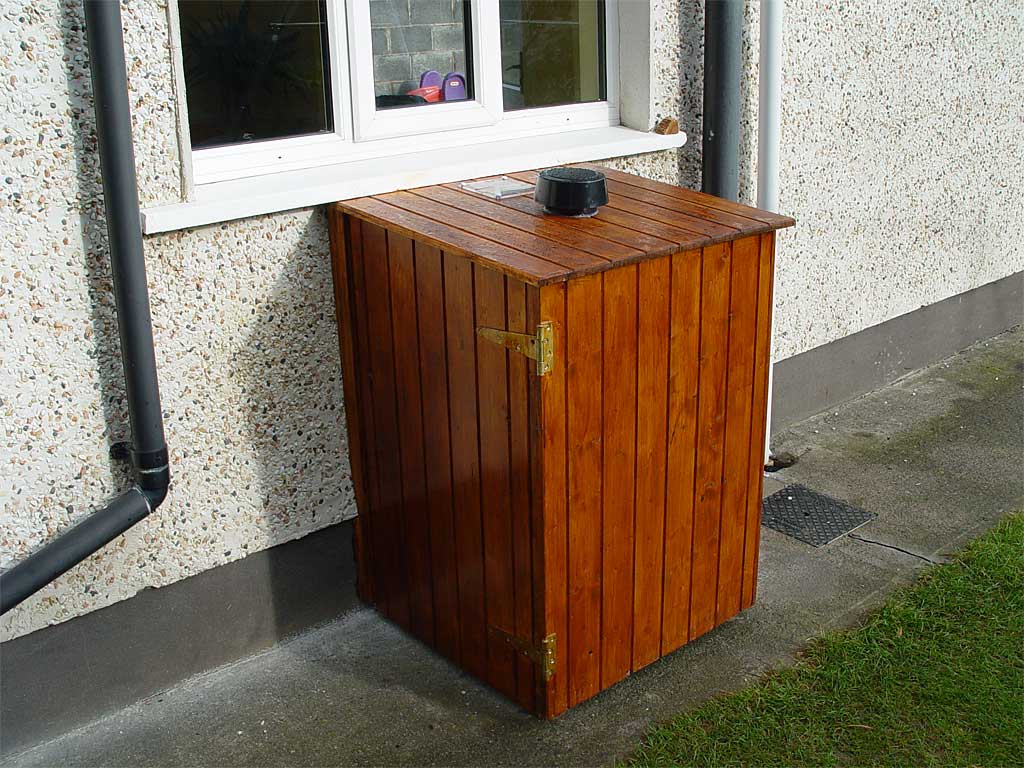
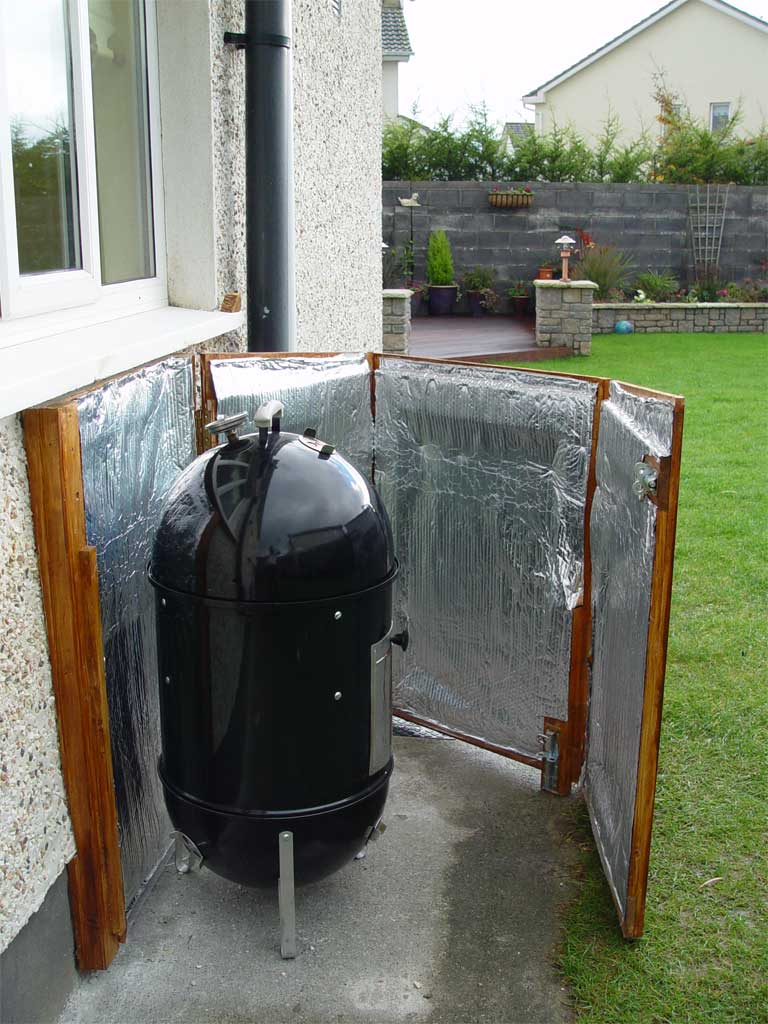
These three photos show an enclosure belonging to Bren Hickey of Dublin, Ireland, and was built with the help of a carpenter friend. Bren wanted to shelter the WSM both during use and when stored between uses.
It consists of a frame mounted to the wall of the house and three hinged sides that swing out to reveal the cooker. The tongue & groove siding is lined with an aluminum-faced insulation. Each side is 39-41″ tall and 24-28″ wide.
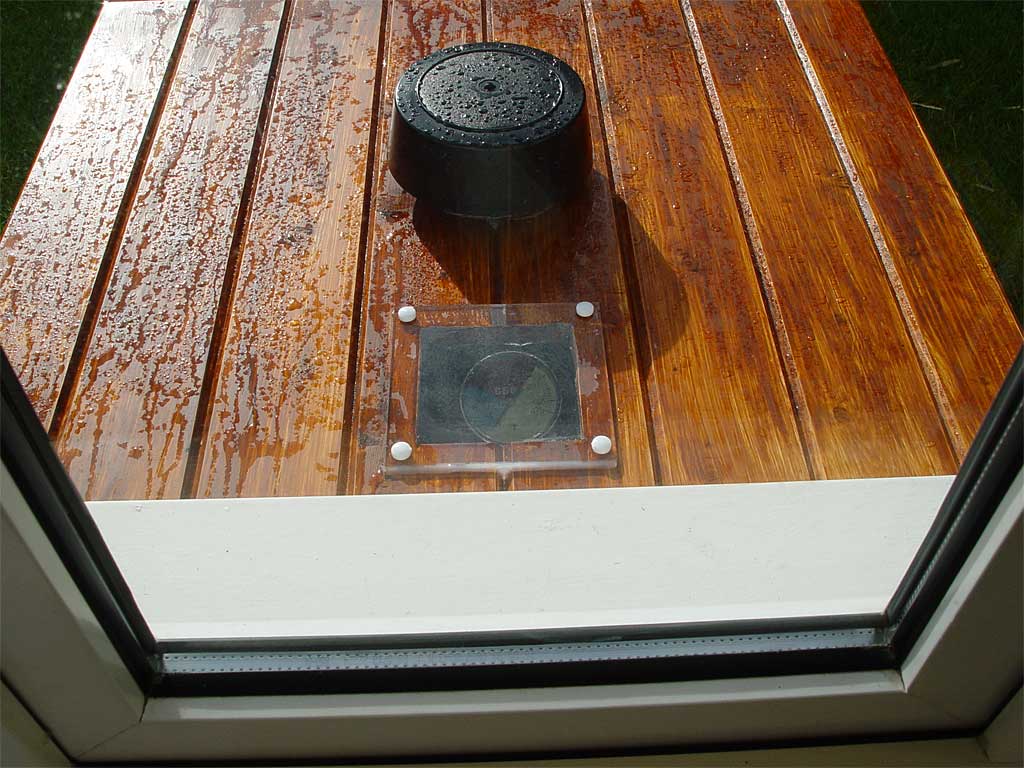
The lid measures 31″ x 28″ and slopes 2″ from back to front so the rain will run off. The lid is fitted with a vent so smoke can escape and a viewing portal so the lid thermometer can be read from inside the house.
Bren writes, “I have used the WSM a lot in the last couple of months since building the enclosure, and it works very well and saves me a lot of fuel. Most of the time I can do an entire cook with the vents only 1/4 open. If the WSM starts to run hot, I just prop the lid of the enclosure open slightly and it will bring the temp down.”
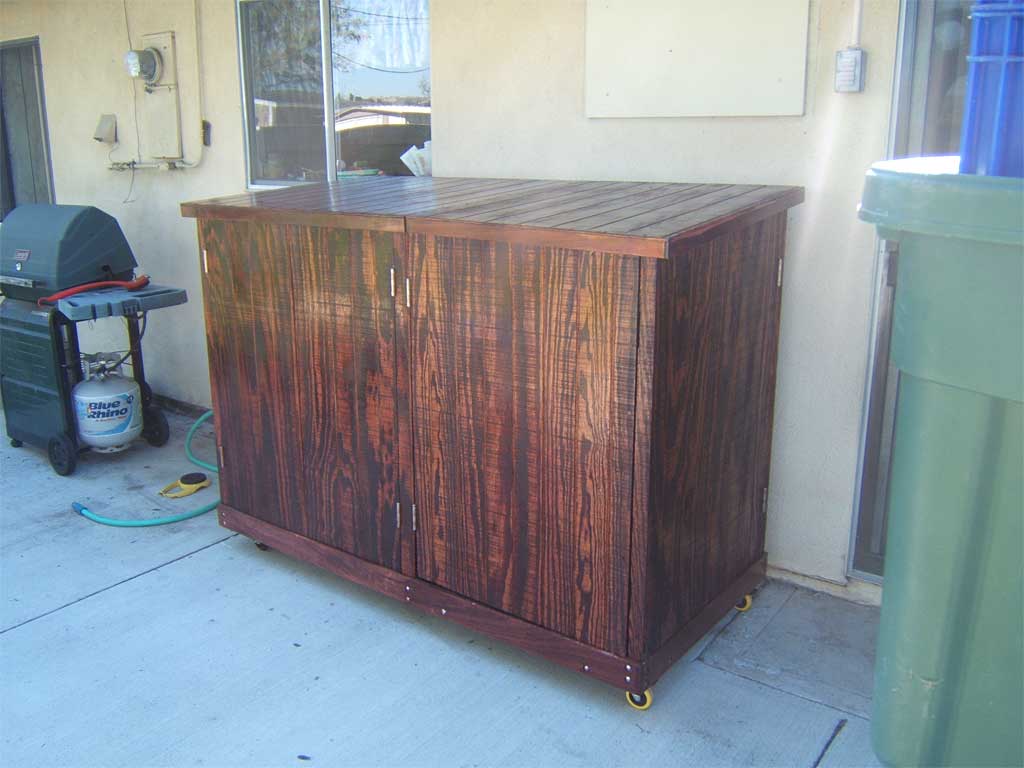
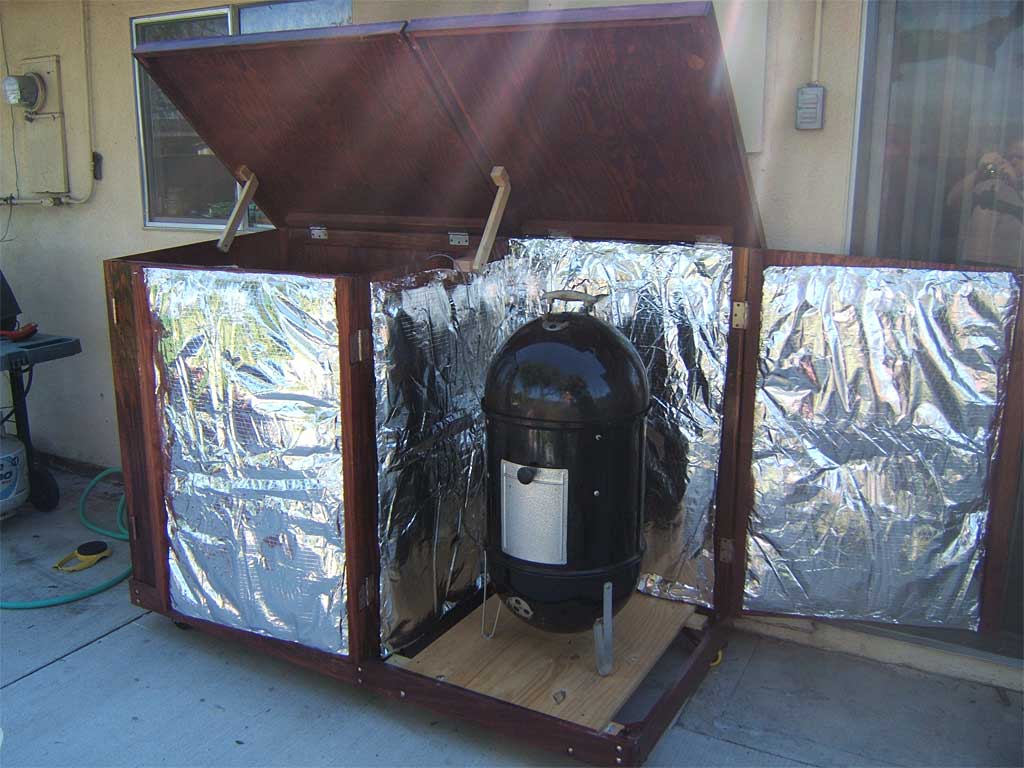
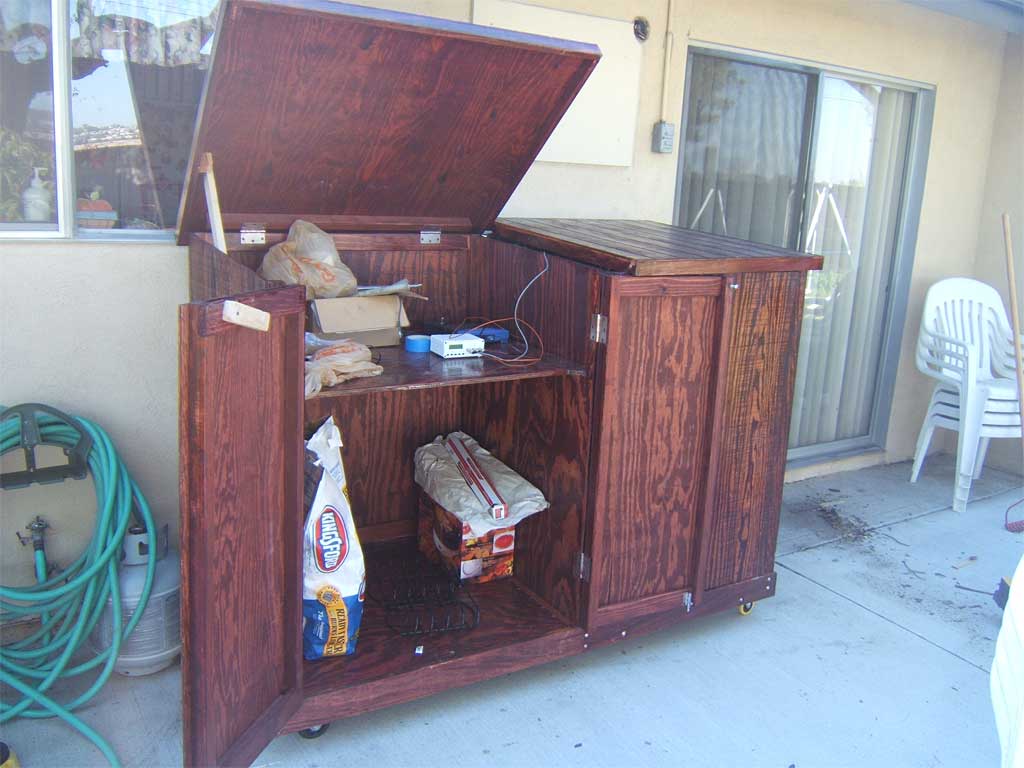
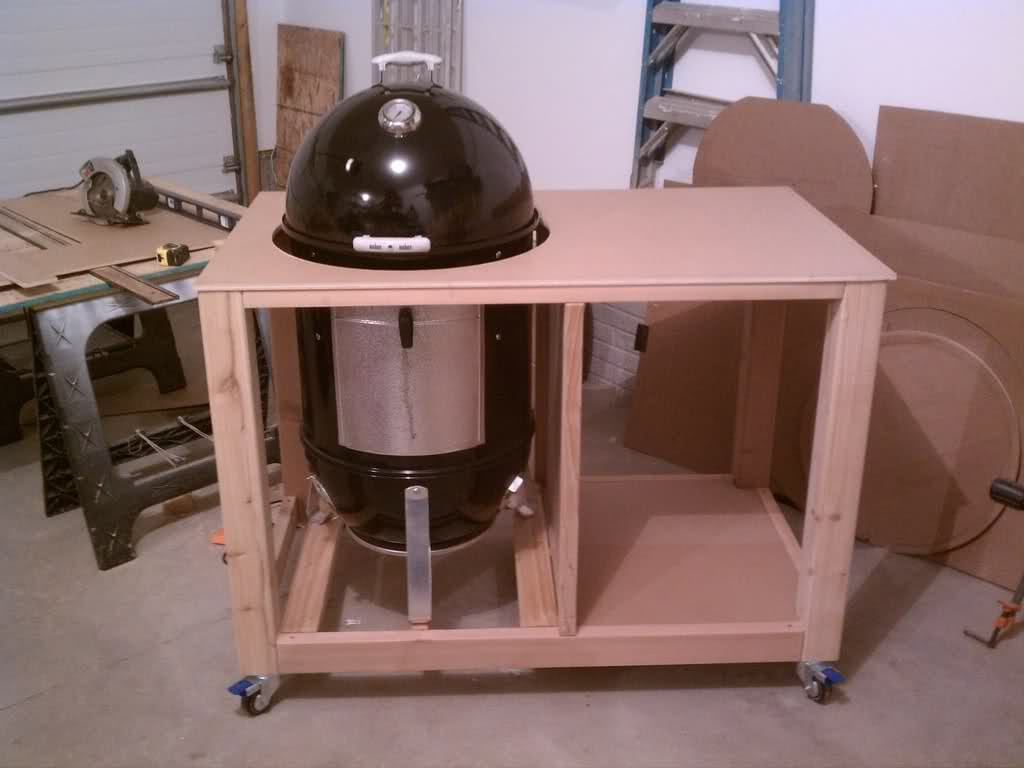
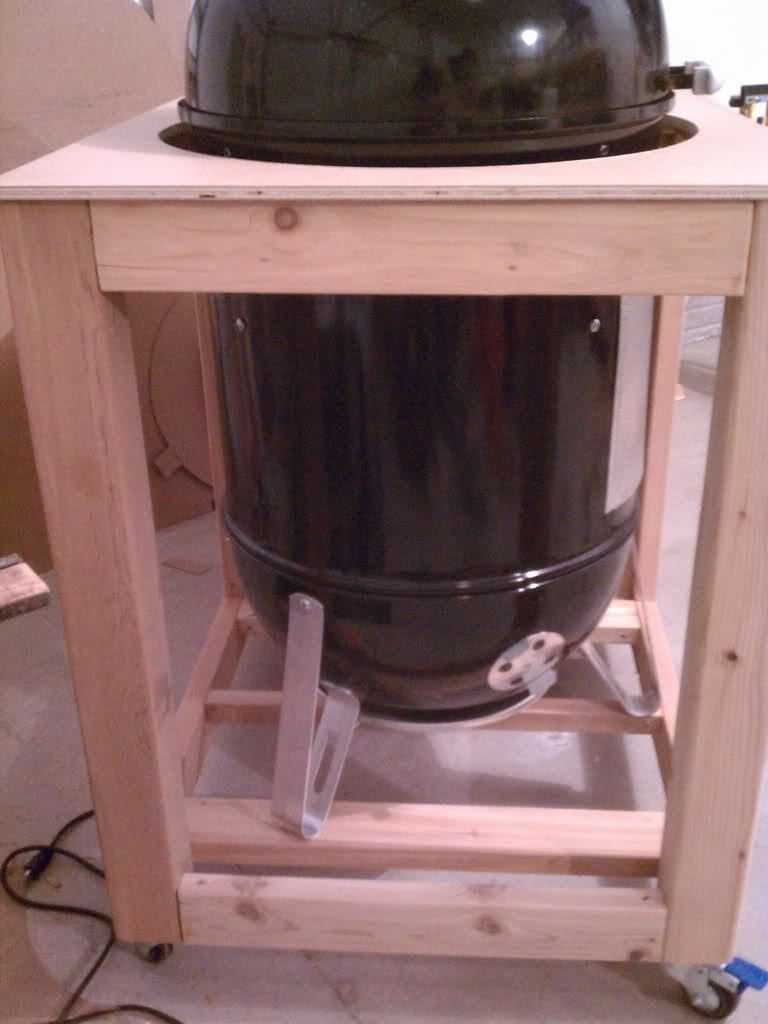
Here’s an enclosure from Bob Hunter of Orange, CA. It has a work surface and storage cabinet for supplies on the left, and holds a WSM on the right.
Folding doors open up to service the WSM. Close the doors and prop open the lid and the WSM is protected from the elements while cooking. Note the openings below the WSM to allow air for combustion into the enclosure. And the whole thing rolls around on wheels!
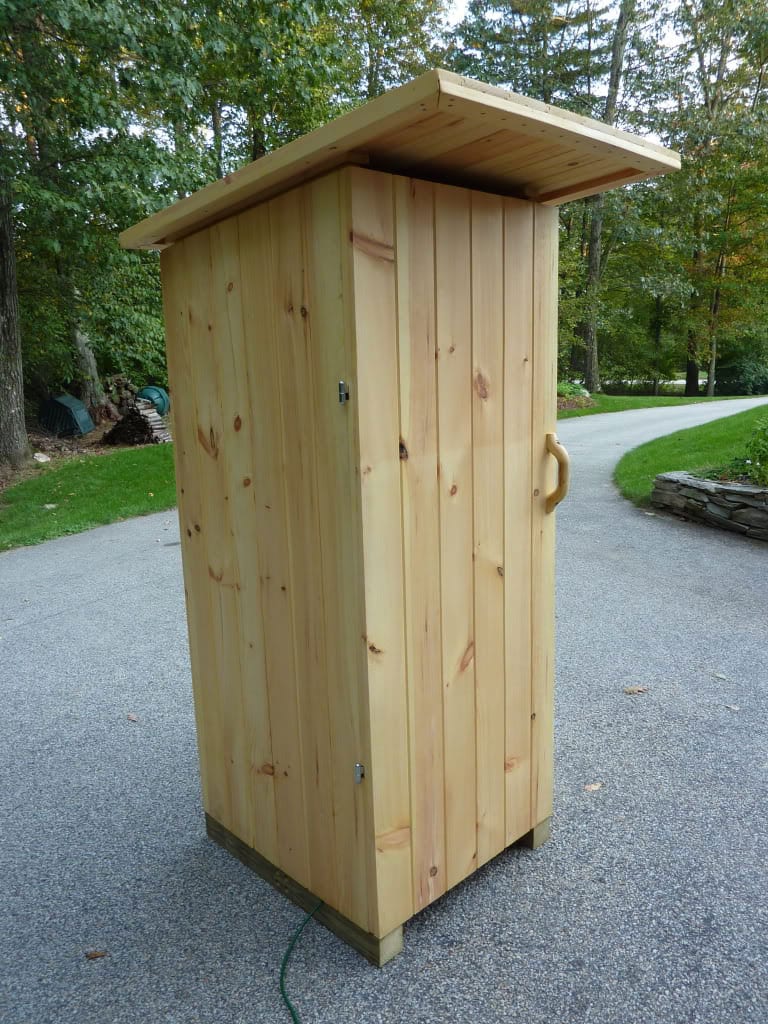
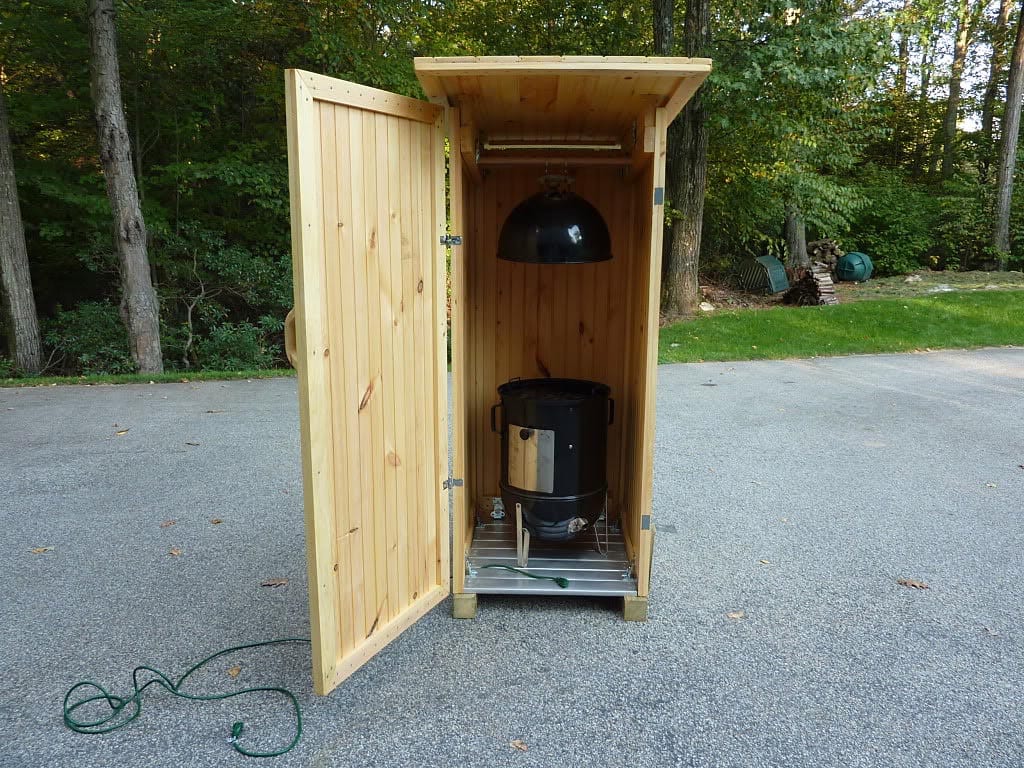
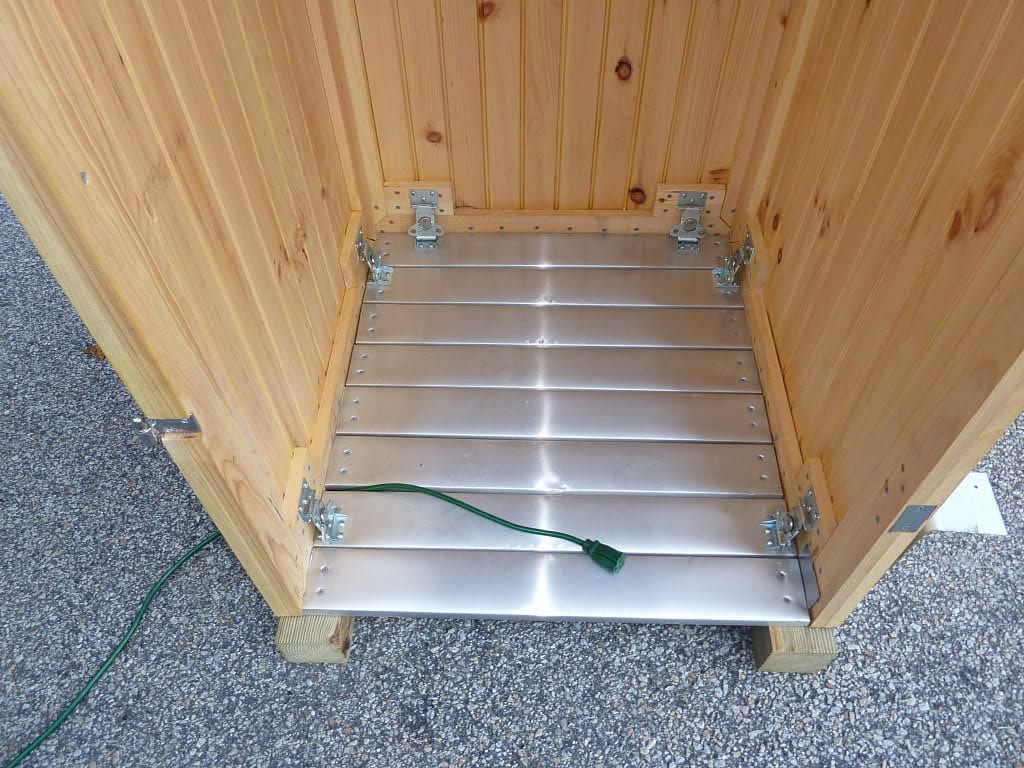
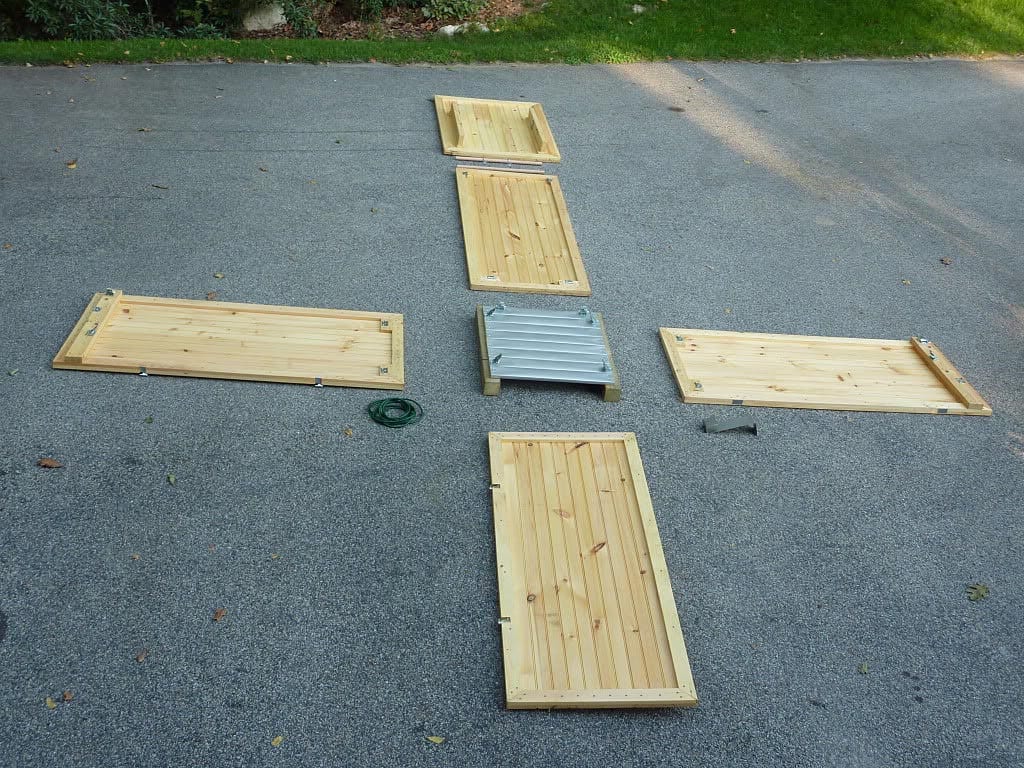
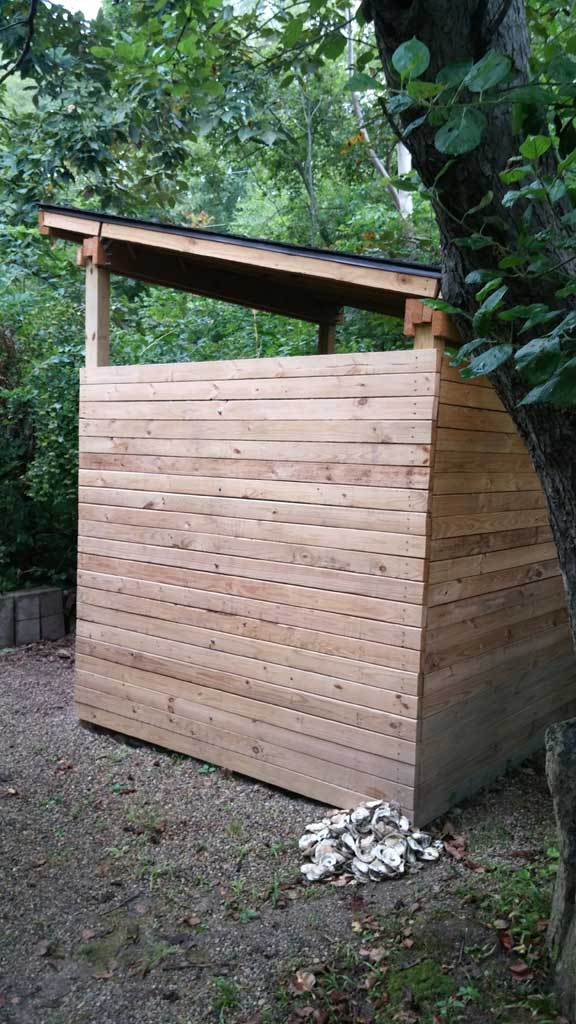
This portable smoke shack was built by Greg Maciejewski of Douglas, MA. Greg’s wind/rain shelter has a pressure-treated base with aluminum flashing floor boards for fire safety. The walls and roof are made of tongue and groove pine and coated with water sealant. The roof in angled to allow for rain to run off. The door has stainless steel hinges with magnetic latch.
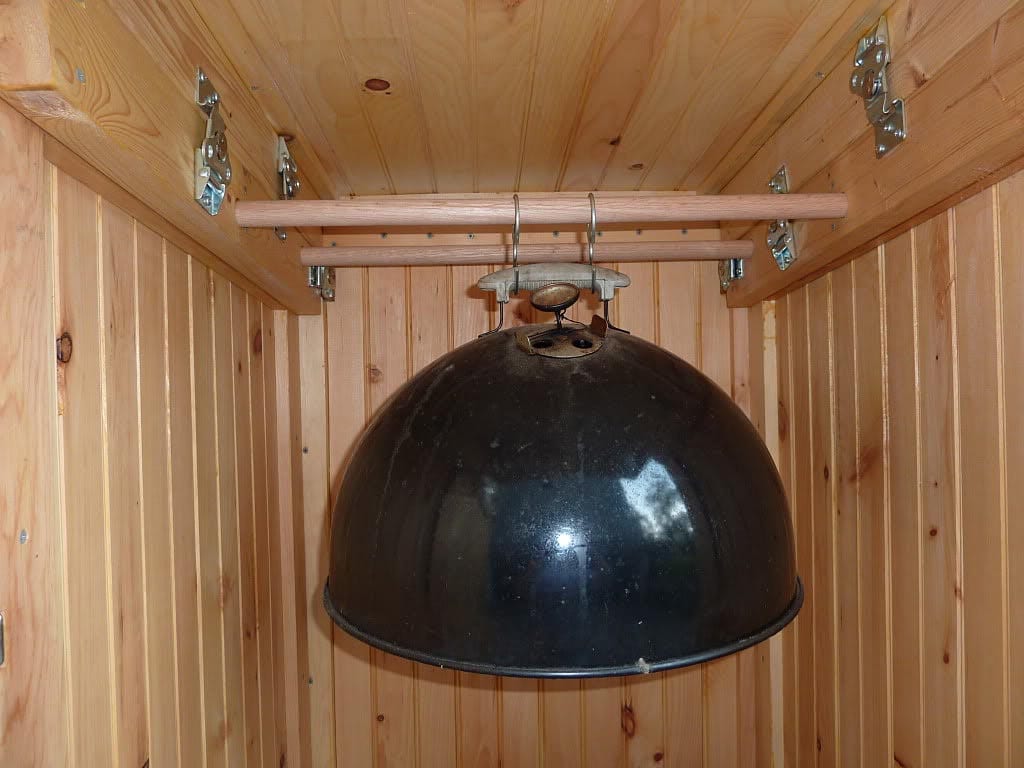
Inside, there is a rack for hanging the WSM lid while servicing the cooker. There is an allowance for an extension cord to enter the enclosure to power an automatic temperature control system. It’s large enough to handle an 18-1/2″ or 22-1/2″ WSM. And last but not least, it can be assembled/disassembled in less than 5 minutes with no tools required.
- Download WSM Smoke Shack Plans – PDF
- Read More About WSM Smoke Shack On The Virtual Weber Bulletin Board
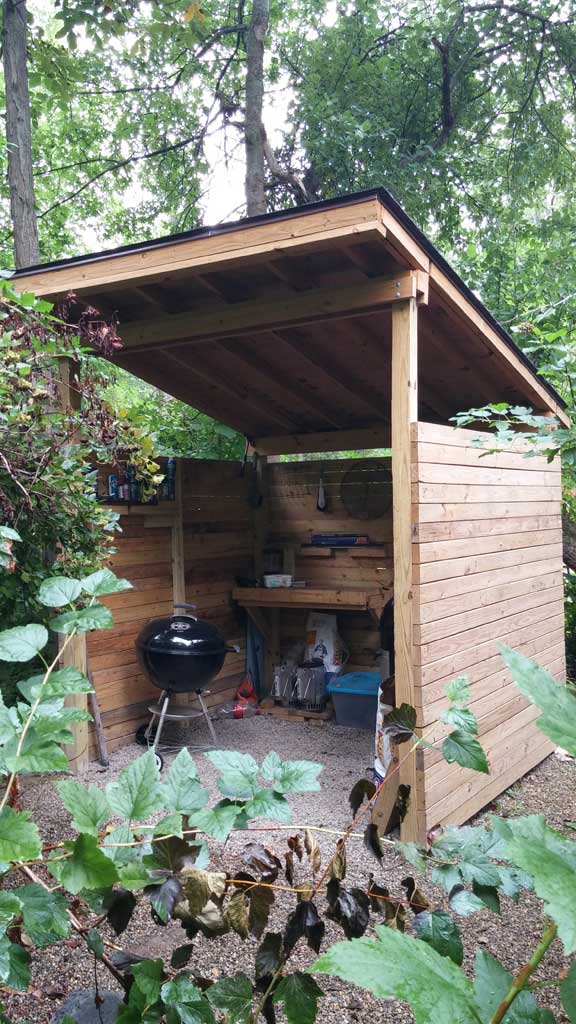
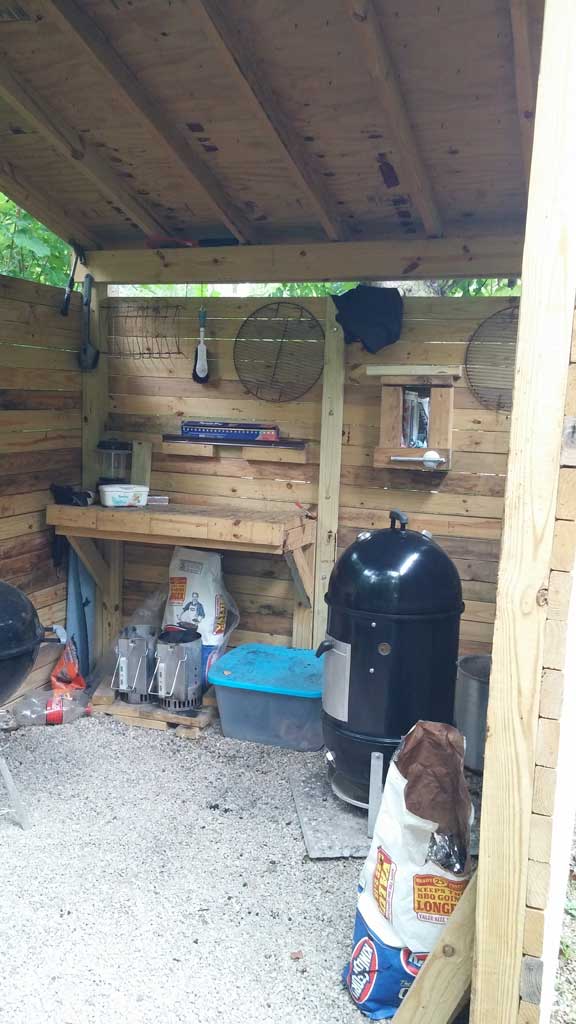
Jacob Campbell from Michigan built a grilling shed in 2014 for his 18.5″ WSM and 22.5″ Weber kettle. It includes a work table, hooks for hanging cooking grates, storage areas for charcoal and smoke wood, and a fire-proof gravel floor.
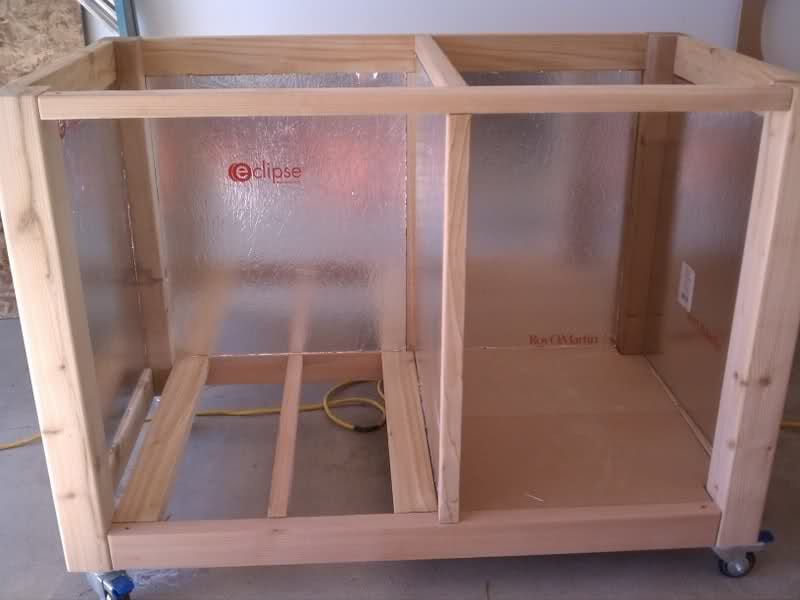
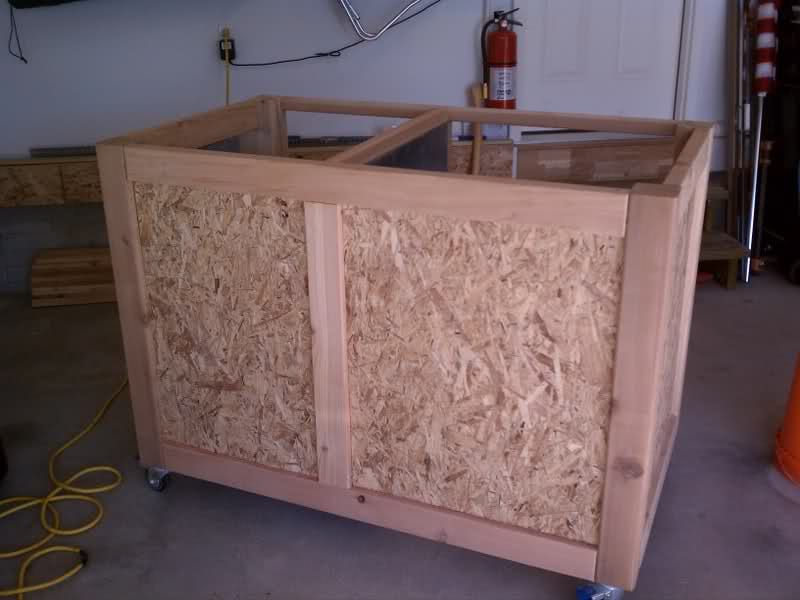
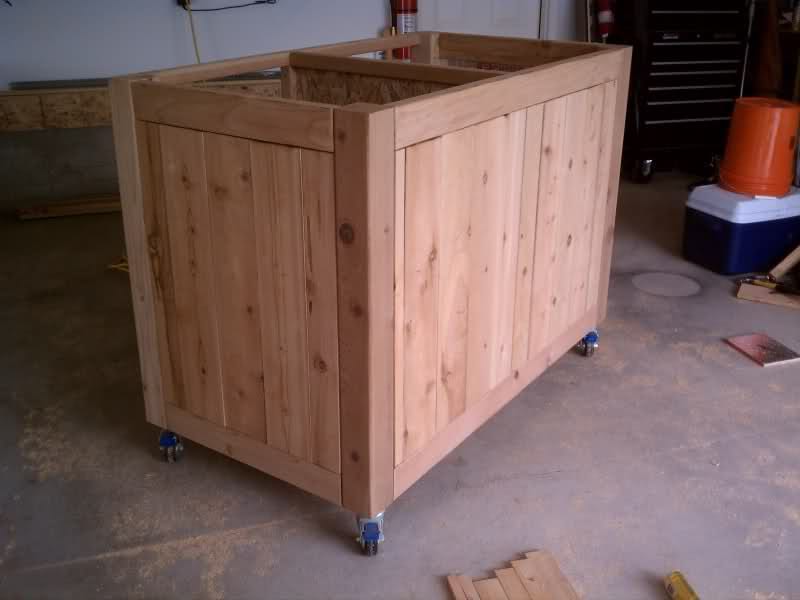
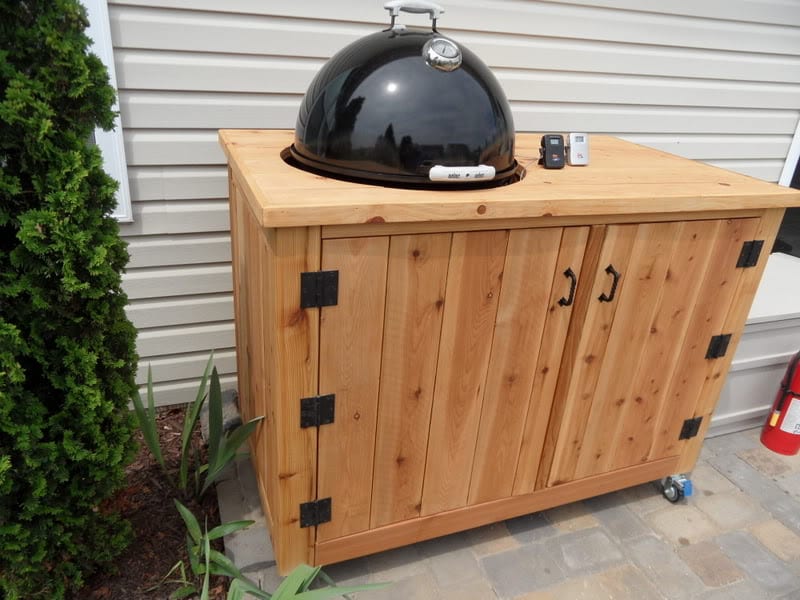
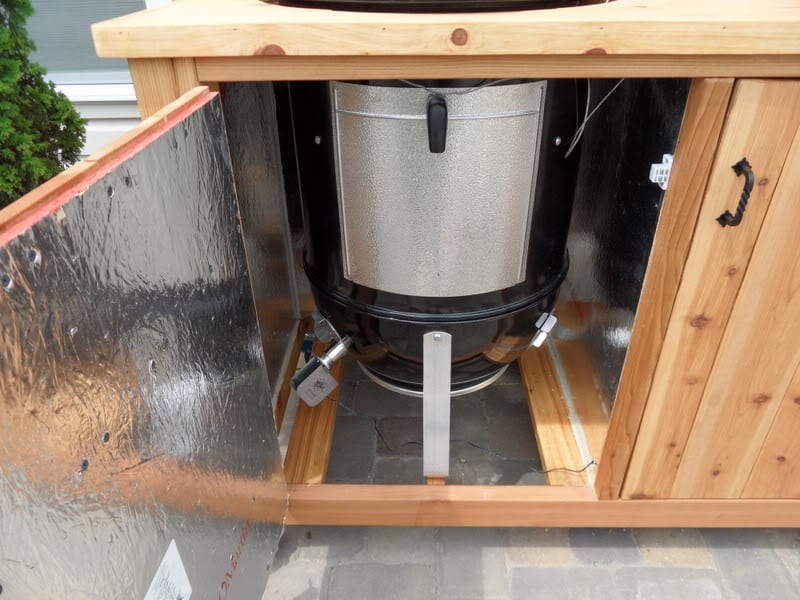
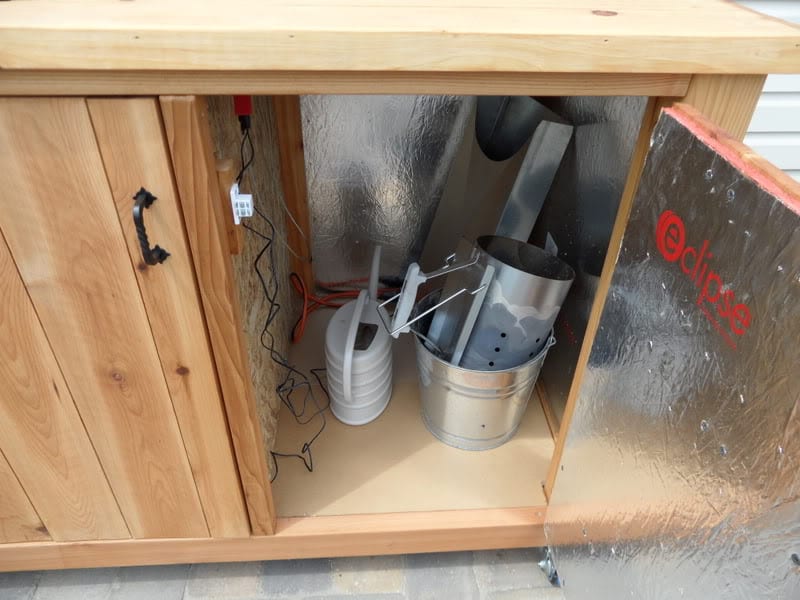
This enclosure was built by Jamie Ward of Nebraska for his 22-1/2″ WSM. It’s lined with Eclipse Radiant Barrier Panels, essentially reflective foil laminated to oriented strand board, as a form of insulation. Jamie wrapped the outside with 1″ x 6″ cedar picket fence boards. It features a storage area for accessories, and locking casters.
You can read more about this project and see more photos at The Virtual Weber Bulletin Board.
Building A Metal Enclosure
Here’s a metal enclosure built by Todd Randall. The framing is 1″ x 1″ composite decking material, the skin is aluminum, and the hardware is galvanized/zinc plated. The roof is angled to shed rain.
The enclosure breaks down for easy storage. The roof is held in place with pins that fit into holes in the wall frame. The walls are basically two bi-fold panels connected with hinges. You can read all about Todd’s project on The Virtual Weber Bulletin Board.
Adjustments For Cold Weather Cooking
- Use more fuel than you normally would. The cooker will use more fuel to cook the same amount of meat on a cold day than on a warm one.
- If using the Minion Method to fire the cooker:
- Light at least twice as much charcoal as you normally would on a warm day. On freezing cold days, you may want to start with a full Weber chimney starter of hot coals.
- Let the cooker come up to 225-250°F before adding meat.
- If using water in the water pan, start with hot water—boiling, if possible. On freezing cold days, eliminate the water altogether.
What About Rain?
Interestingly, rain does not have much impact on the performance of the WSM unless the rainfall is very heavy. It is usually the wind accompanying the rain that negatively affects cooker temperature.
Folks living in the Pacific Northwest report that they operate the WSM in light rain without any overhead protection, and they use the techniques described on the Firing Up Your Weber Bullet page without modification. Some water can enter the cooker where the lid meets the cooking section and will collect in the bottom of the charcoal bowl with the spent ashes, but this has no impact on the cooker’s performance—unless the rain is extremely heavy and fills the bowl with water.
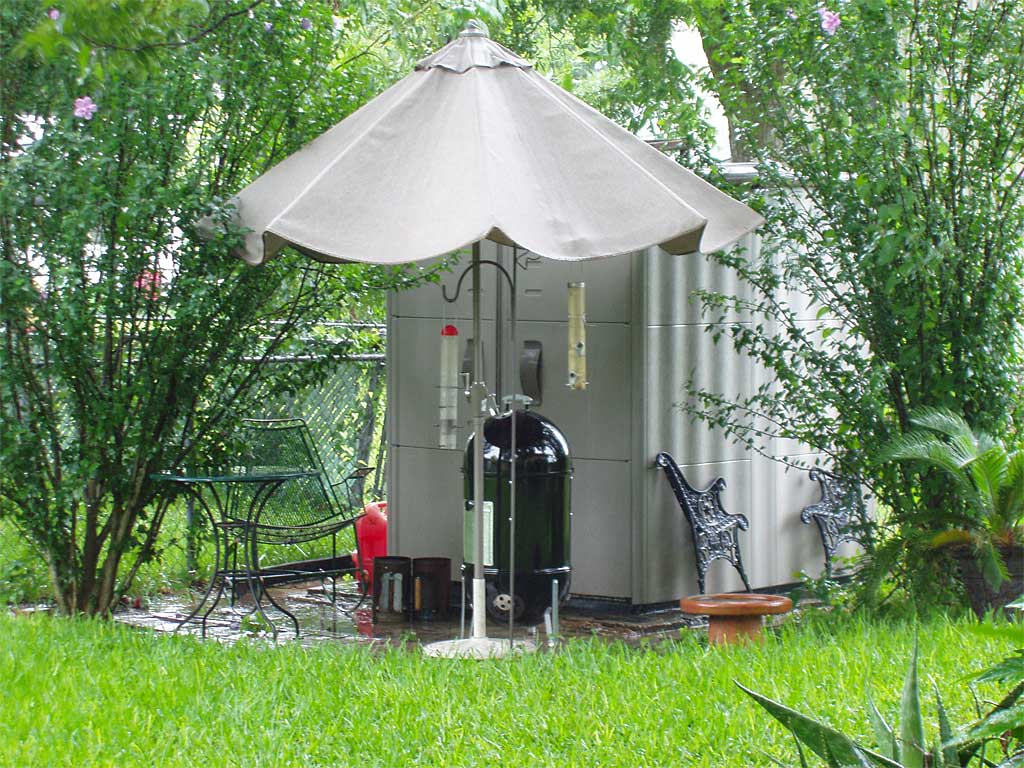
To protect the WSM from rain, move it to a sheltered location, or place it under a patio umbrella or E-Z Up shelter.
Here are some other ingenious methods from WSM owners:
- Mark Stevens attaches a clamp-on umbrella to the lid handle.
- Alan Bosch and Jim Morrissey have placed ladders covered with plastic tarps over the cooker.
- Theo B. places a plastic garbage can lid over the WSM lid. “The indent in the lid fits into the WSM handle & doesn’t block the top vent,” says Theo.
Warnings From Weber
Weber recommends that the Smokey Mountain Cooker never be used in the following conditions or locations due to the risk of fire and toxic fumes:
- High winds
- Indoors
- In a garage or other enclosed space
- Within five feet of combustible material
How Low Can You Go?
Send in a photo of you using your WSM in sub-freezing temperatures and I’ll post it here for the world to see!
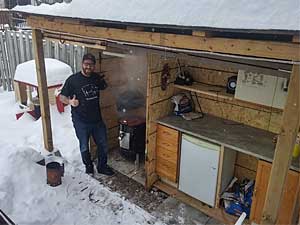
Greg Noël, Ottawa, Ontario, Canada
AKA “The Lonely Smoker”
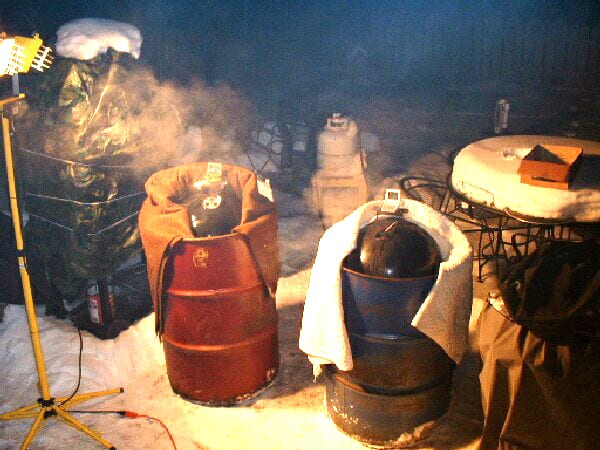
“Saw some pictures of people cooking in the cold. Thought I would send in my own from my last cook. Six racks (of ribs) in -20°C (-4°F). It’s never too cold to cook when you got a shack like this.”
Nice looking setup you got there, Greg!
Paul McKeen, Winnepeg, Manitoba, Canada
“The coldest weather I have smoked in was approximately -28°C (-19°F). I am hoping to use the smoker when the temperature gets to -40°C (-40°F).
“I have provided a picture of today’s smoke: -20°C (-4°F) with wind chill of approximately -31°C (-24°F).
“In case anyone is wondering if I stayed outside for the whole process…no, I was inside watching the Buick Classic, dreaming of summer on the golf course and smokin’ some good food outside.”
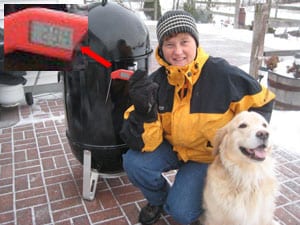
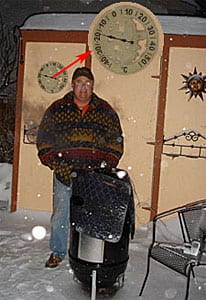
Kim & Lucy The Dog, Wisconsin
“January 23, 2012. It’s about 28°F, but with the wind it feels much colder. Smoking a chicken and two turkey breasts.”
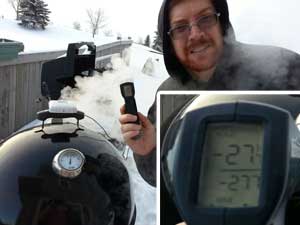
Tom Smith, Beaumont, Alberta, Canada
“Here are some pics of me smoking a couple of pork shoulders on Christmas Eve 2012 in -25°F to -27°F (-32°C) weather, while maintaining a cooker temperature of about 240°F.”
More Thermometer & Temperature Links On TVWB
- Installing A Thermometer
- More Thermometer Installations
- Cutting A Probe Thermometer Slot
- Measuring Temperature In The Weber Bullet
- Temperature Control Problems: Too Hot, Too Cool
- Vent Damper Modifications
- WSM Temperature Tests
- Testing Thermometers For Accuracy: Ice Bath Test & Boiling Water Test
- Boiling Point Calculator
- WSM Modifications Forum on The Virtual Weber Bulletin Board
Photo of plywood wind screen: 2004 by Wayne Sizemore
Photo of galvanized steel wind screen: 2007 by Tormod Eikill
Photo of hinged metal barrel: 2007 by Dan N
Photo of unhinged metal barrels: 2004 by Buzz
Photos of dog enclosure wind screen: 2009 by Chuck R
Photos of single plywood sheet windbreak: 2009 by J. Biesinger
Photos of aluminum foam wind screen: 2016 by Paul Kinnane
Photo of Silver Bullet Smoker Jacket: 2004 by Bill Hays
Photo of high tech hot water heater jacket material: 2005 by Keri Cathey
Photo of Fiber tech smoker jacket: 2005 by Lee Reiser
Photo of Reflectix smoker jacket: 2008 by Mike A
Photos of Styrofoam enclosure: 1999 by Harry Jiles
Photos of wooden enclosure: 2005 by Bren Hickey
Photos of wooden storage/WSM cabinet: 2008 by Bob Hunter
Photos of portable smoke shack: 2011 by Greg Mackiejewski
Photos of grilling shed: 2015 by Jacob Campbell
Photos of cedar wooden enclosure: 2011 by Jamie Ward
Photo of metal enclosure: 2007 by Todd Randall
Photo of WSM under patio umbrella: 2007 by Eleazar Guerra Jr
Photo of Greg Noël: 2016 by Greg Noël
Photo of Paul McKeen: 2007 by Paul McKeen
Photo of Kim & Lucy The Dog: 2012 by Kim
Photo of Tom Smith: 2012 by Tom Smith


