Summary
- Buy a regular (non-enhanced), 12-14 pound turkey. Don’t use a self-basting turkey for this recipe.
- Brine in a salt and brown sugar solution for 8 hours.
- Smoke at 325-350°F until 160-165°F in the breast, 170-175°F in the thigh, approximately 2-1/2 to 3 hours.
- Let rest for 20 minutes before carving.
- Collect the pan drippings for making gravy.
Let’s be honest…a natural turkey can be very dry and bland, especially the white meat. Traditionally we’ve used gravy to address this problem, but recently people have been turning to flavor brining to add moisture and flavor to whole turkey. You can learn more about flavor brining and the science behind it in the All About Brining article.
The brine I’ve used here couldn’t be simpler—just water, kosher salt, and brown sugar. The mixture adds flavor and moisture to the meat, but does not make the meat taste overly salty or sweet.
After brining, I applied a Creole seasoning, but you can use your favorite barbecue rub. Just don’t go overboard on the salt in the rub, since the turkey has already been seasoned by the brine.
Here are some photos I took when cooking this turkey on December 7, 2002.
Selecting And Preparing The Turkey
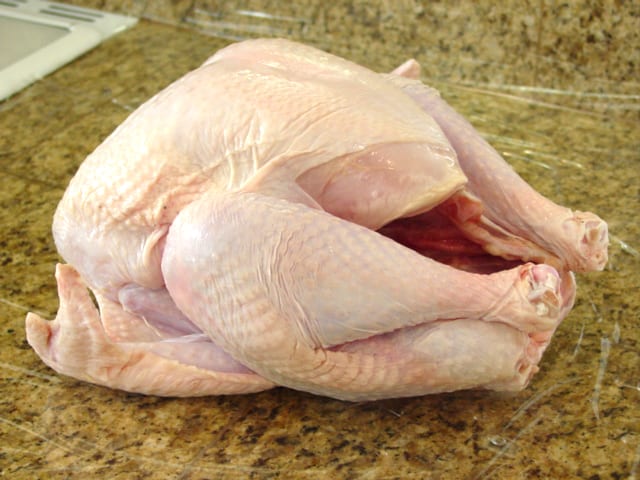
This is a 12.17 pound Albertsons Natural Turkey, just your basic, frozen supermarket turkey that has not been enhanced with a flavor solution.
Choose a regular turkey for this recipe, not a self-basting bird that’s been injected with a solution of salt and other flavorings. Read the fine print on the label—you do not want a turkey that says, “Contains up to X% of a solution to enhance juiciness and tenderness…” See Turkey Selection & Preparation for more details.
Choose a 12-14 pound turkey and thaw according to the package directions. Remove and discard any leg restraint, then remove the giblets from the neck cavity and the neck from the body cavity. Trim away large areas of fat or excess skin around the body cavity, and cut off the tail (if attached). Pat dry inside and out with paper towels.
Brining The Turkey
There are three things you need to do in preparation for brining:
- Find a non-reactive container large enough to hold the turkey.
- Make sure the container will fit in your refrigerator.
- Determine how much brine you must prepare to completely submerge the turkey in the container.
See All About Brining and Food Grade Plastic Containers For Brining for information about selecting an appropriate container, including alternatives like coolers or turkey roasting bags inside non-food safe containers. These photos show a 4-gallon plastic barbecue sauce bucket that I got for free from a local barbecue joint.
Remember that the bigger the container, the more brine you’ll have to make, so try to match the size of the container to the turkey.
To determine how much brine to prepare, place the turkey into the container and cover with cool water. Remove the turkey from the container and measure the water—that’s the amount of brine you’ll need. For a 12-14 pound turkey, 2-3 gallons of brine should be sufficient.
Two gallons of brine were required for this turkey. I doubled the recipe shown below. As I said before, it couldn’t be simpler.
Basic Turkey Brine
- 1 gallon cold water
- 1 cup Diamond Crystal Kosher Salt
- 1/2 cup dark brown sugar, packed
Mix in a non-reactive container until dissolved. Makes 1 gallon of brine. Substitute 3/4 cup Morton Kosher Salt or 1/2 cup table salt for Diamond Crystal.
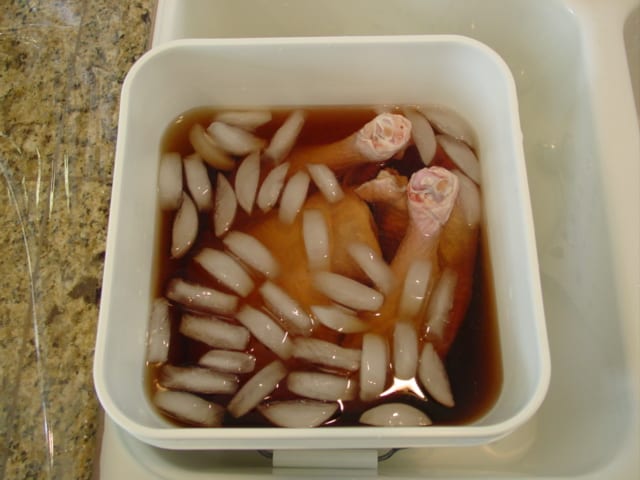
Notice that I included about 4 cups of ice cubes as part of the 2 gallons of water used to make the brine. This is an optional step that helps cool the brine.
Put the turkey in the brine breast side down. Place a heavy plate or bowl on top to keep the bird submerged, if necessary. Brine for 8 hours.

Since brining does not preserve meat, the turkey and the brine solution must be kept below 40°F throughout the entire brining process.
Applying The Rub

After brining, rinse the bird under cool running water and pat dry inside and out with paper towels. This removes sugar from the skin and prevent burning during cooking.
Tuck the wings under the body to keep them out of the way during cooking. For a neat appearance, pin the neck skin down to the back using toothpicks or skewers, and tie the legs together using kitchen twine.
Apply a light coat of vegetable oil to the turkey, then sprinkle with your favorite rub inside and out. Remember, go light on the salt in the rub.
If you’d like to try a Creole rub mix, here’s a recipe to get you started. It makes more than you’ll need for one turkey. Just sprinkle a light coating over all surfaces, don’t cake it one.
Creole Turkey Rub
- 5 Tablespoons paprika
- 2 Tablespoons granulated garlic powder
- 2 Tablespoon dry thyme
- 1 Tablespoon cayenne pepper
- 1 Tablespoon celery salt
- 1 Tablespoon table salt
- 1 Tablespoon ground black pepper
Combine with other ingredients and mix thoroughly.
Let the turkey stand at room temperature while you light the cooker.
Stoking The Cooker
Light the cooker using the Standard Method described on the Firing Up Your Weber Bullet page. Two Weber chimney starters of charcoal should be sufficient for three hours of cooking in the 325-350°F range under normal weather conditions.
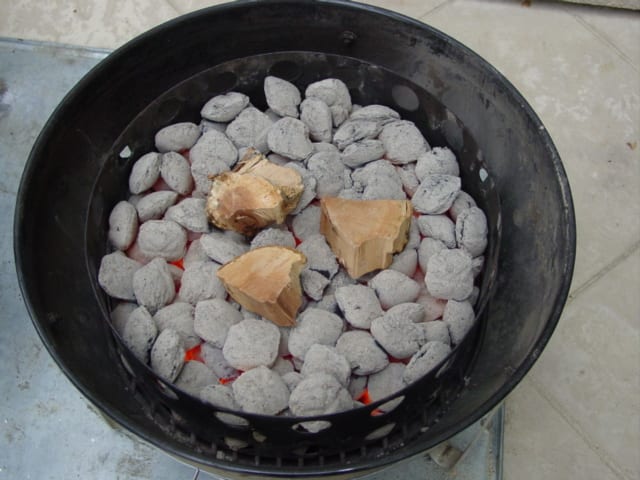
I began by dumping a Weber chimney full of hot Kingsford Charcoal Briquets into the charcoal chamber, then spreading another full chimney of unlit briquettes over the lit coals.
When the coals were good and hot, I placed three medium-sized chunks of dry apple wood on the fire and assembled the cooker. Choose a mild smoke wood that will compliment the mild flavor of turkey.
I put the empty, foil-lined water pan in place and set all the bottom vents at 50% open. I set the top vent 100% open and left it that way throughout the entire cook.
After assembling the cooker, I immediately put the turkey on the top cooking grate, breast side up, then inserted a probe thermometer vertically into the deepest part of the breast, parallel to the breast bone.
Details Of The Cook
Adjust the bottom vents as necessary throughout the cooking process to maintain a temperature of 325-350°F measured at the lid.
My cooker was well over 350°F when I put the turkey on, but it dropped to 337°F within 10 minutes.
Cook the turkey until it measures 160-165°F in the breast, 170-175°F in the thigh, using an instant-read thermometer. Cooking time is approximately 2-1/2 to 3 hours.
There’s no need to baste or rotate the turkey during the cooking process.
Here’s how the cooker and meat temperatures went during the three hour cook:
| Lid Temp | Meat Temp | Vent 1 % | Vent 2 % | Vent 3 % | |
| 9:55 am | – | 42 | 50 | 50 | 50 |
| 10:05 am | 337 | 44 | 50 | 50 | 50 |
| 10:15 am | 344 | 48 | 50 | 50 | 50 |
| 10:30 am | 341 | 64 | 50 | 50 | 50 |
| 10:45 am | 348 | 75 | 50 | 50 | 50 |
| 11:00 am | 357 | 87 | 50 | 50 | 50 |
| 11:15 am | 354 | 100 | 50 | 50 | 50 |
| 11:30 am | 356 | 109 | 50 | 50 | 50 |
| 11:45 am | 357 | 120 | 50 | 50 | 50 |
| 12:00 pm | 350 | 131 | 50 | 50 | 50 |
| 12:15 pm | 348 | 140 | 50 | 50 | 50 |
| 12:30 pm | 344 | 149 | 50 | 50 | 50 |
| 12:45 pm | 339 | 158 | 50 | 50 | 50 |
| 1:00 pm | 327 | 165 | 50 | 50 | 50 |
Note that the vent percentages represent the way I set the vents at the time indicated.
C’est Si Bon!
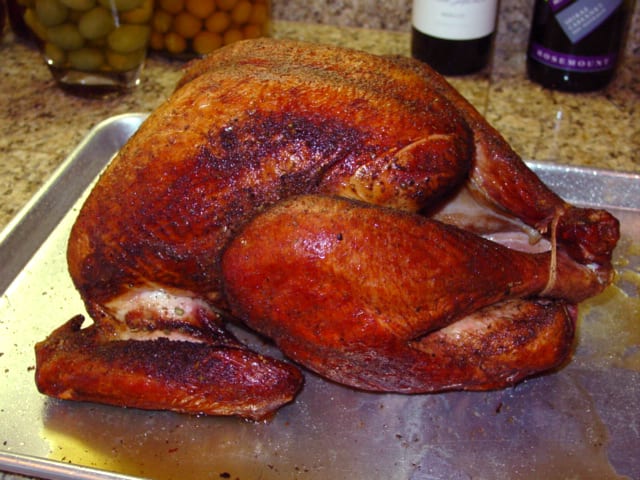
At 1:00pm, the thermometer registered 165°F in the breast. I placed the turkey on a rimmed baking sheet pan and allowed it to rest for 20 minutes before carving. The internal temp rose 7°F to 172°F during this time. Do not cover with foil, as this will cause the skin to go soft.
Right out of the cooker, the skin looked a little dry, but was nice and moist after the rest.
I carved the turkey following the steps outlined on the Turkey Selection & Preparation page. Using an electric carving knife, I cut the breast meat into perfect 1/4″ slices.
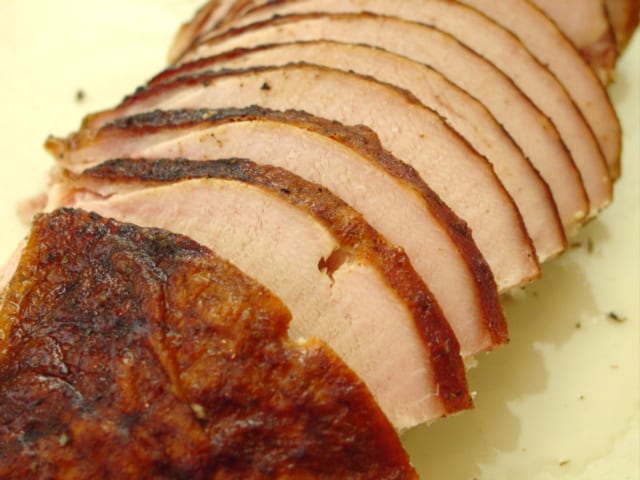
The meat was very moist, tender, and flavorful throughout, especially the breast meat. The Creole spices provided just a little bit of heat, and the skin was nice to eat thanks to the high cooking temperature.
Collecting Pan Drippings For Gravy
There are three common ways to collect pan drippings when smoking a turkey:
- Cook the turkey in a shallow, disposable foil pan.
- Cook the turkey on the top cooking grate. Place an empty foil pan on the bottom grate to catch the drippings.
- Cook the turkey on the top cooking grate. Line the water pan with wide, heavy duty aluminum foil, but suspend the foil 1-1/2″ above the bottom of the pan so it does not touch. This prevents the drippings from burning.
Here’s an example of lining the water pan with foil and catching the drippings:
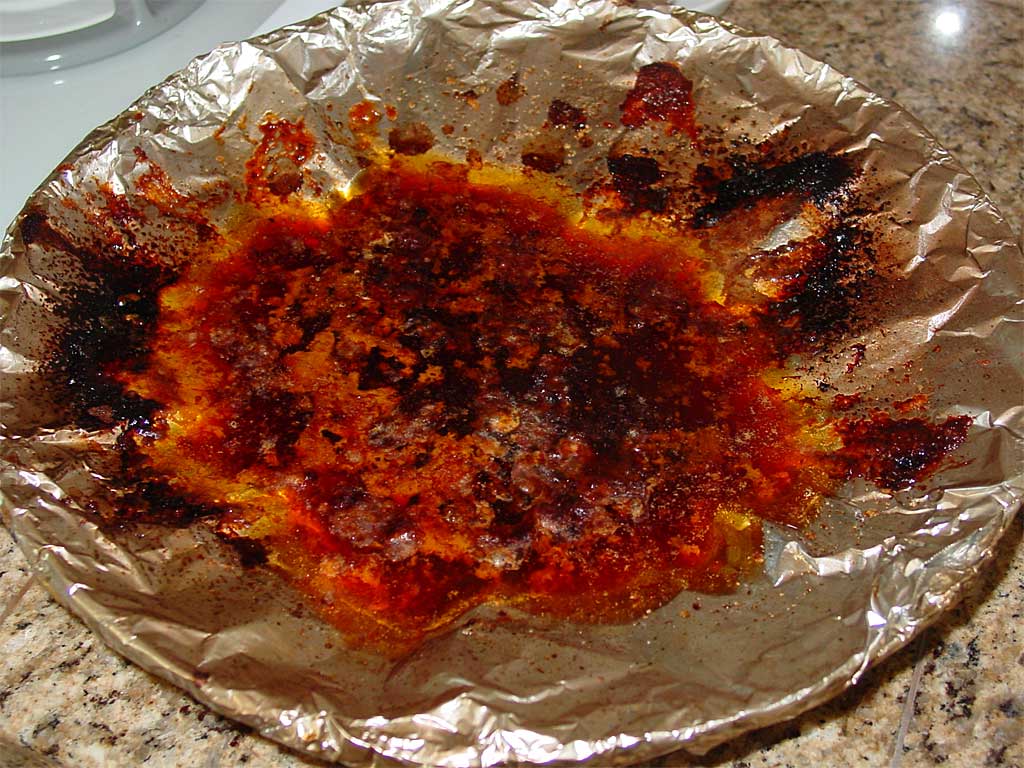 Assuming you don’t over-smoke the turkey, the drippings will be perfect for making gravy—in fact, they’re already seasoned by the salt applied to the turkey.
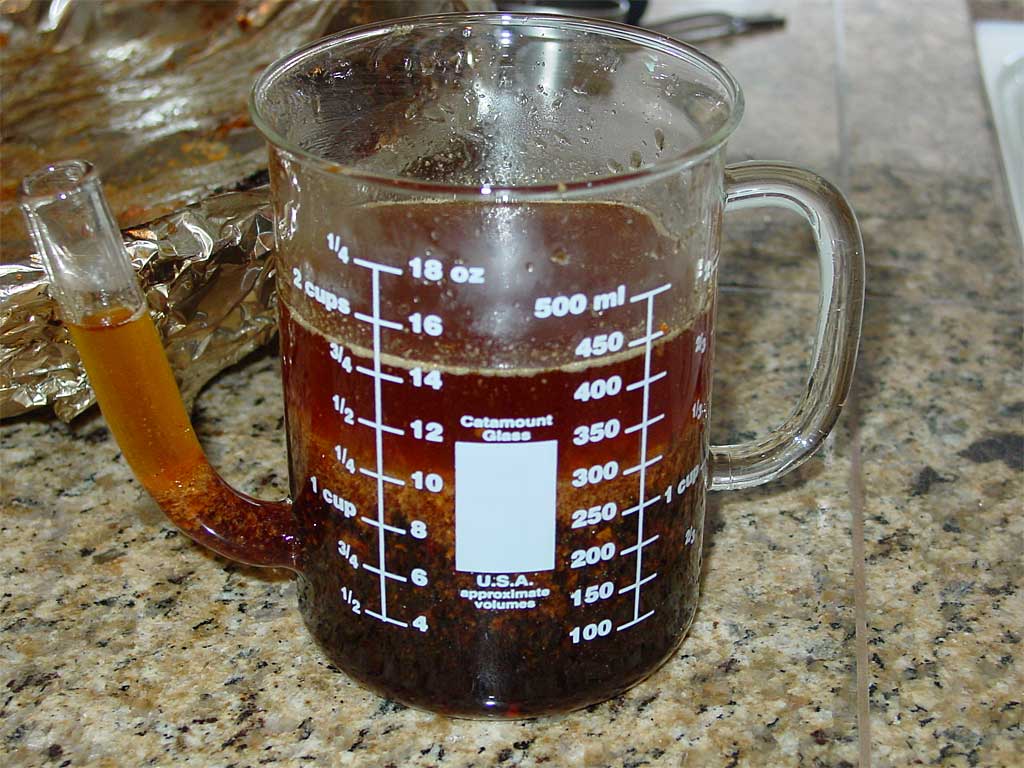
As you remove the turkey from the cooker, pour any accumulated juices inside the body cavity into the pan. You can also use the juices left in the bottom of a rimmed baking sheet pan after letting the turkey rest before carving.
You’ll typically end up with about 1-1/2 cups of drippings.
If you don’t have any drippings, make the delicious turkey giblet gravy described on The Virtual Weber Bulletin Board using the giblets, aromatic vegetables, chicken stock, white wine, and seasonings.
-
More Turkey Links On TVWB
- Whole Turkey – Self-Basting
- Whole Turkey – Brined Butterball Self-Basting
- Whole Turkey – Apple Brine
- Whole Turkey – Honey Brine
- Whole Turkey – Salted aka Dry Brined
- Butterflied Turkey – Salted
- Turkey Breast – Bone-In
- Turkey Breast – Boneless & Skinless
- Turkey Breast – Central Texas Style
- Giant Texas Turkey Legs: The Easy Way
- Turkey Selection & Preparation
- All About Brining
- All About Dry Brining (Salting) Meat
- Video: Turkey Carving Demo
- Transcript: Turkey Chat With TVWB & Weber’s Kevin Kolman – November 2013
- Countdown to Thanksgiving: 30 Tips For Your Best Thanksgiving Ever
- Turkey Talk Forum At The Virtual Weber Bulletin Board
- Turkey Recipes At The Virtual Weber Bulletin Board
 Don’t Cook Your First Turkey On Thanksgiving Day
Don’t attempt to cook your first whole turkey on Thanksgiving Day. Who needs the pressure? Instead, cook a practice turkey a week or so before the big day. This way, you’ll be confident in your abilities and in your recipe, and you’ll look like a seasoned pro when you pull the perfect smoked turkey from the WSM and present it to your family and friends.


