Summary
- Buy the small end (ribs 10-12) of a standing rib roast.
- Dry age the roast in the refrigerator at 34-36°F for three days.
- Season the roast and smoke at 225-250°F.
- Remove from cooker 10-12°F below the final internal temperature desired.
- Reverse-sear in a 500°F oven for 5-10 minutes.
- Cover loosely with foil and let rest 30 minutes before carving.
Beef is dry aged to make it more tender and flavorful. During dry aging, enzymes in the meat go to work on the connective tissue and muscle fibers, resulting in increased tenderness. Also, a significant amount of moisture evaporates from the meat, resulting in more intense flavor. At the end of this article, I’ve included links to more information about aging meat that you might find interesting.
I was inspired to dry age a standing rib roast after watching Alton Brown do one on Good Eats on the Food Network. Experts like Brown and Cook’s Illustrated magazine say that you can safely dry age beef in your refrigerator at home for 3-7 days, while others like Bruce Aidells suggest that you leave dry aging to professional butchers.
If you choose to dry age a standing rib roast, you accept the risk of ruining an expensive cut of meat, or that you won’t like the resulting flavor. Some people who are not familiar with the taste of dry aged beef describe it as “gamy” or “musty”. Others call it “buttery” or “rich”. In the end, it’s all a matter of personal preference.
In any event, you’ll need to start with a high-quality standing rib roast. You’ll find info on how to choose a good one in the Standing Rib Roast Selection & Preparation article.
Here are some pictures I took when I prepared this roast on December 6, 2003.
Three-Rib, Small-End Standing Rib Roast
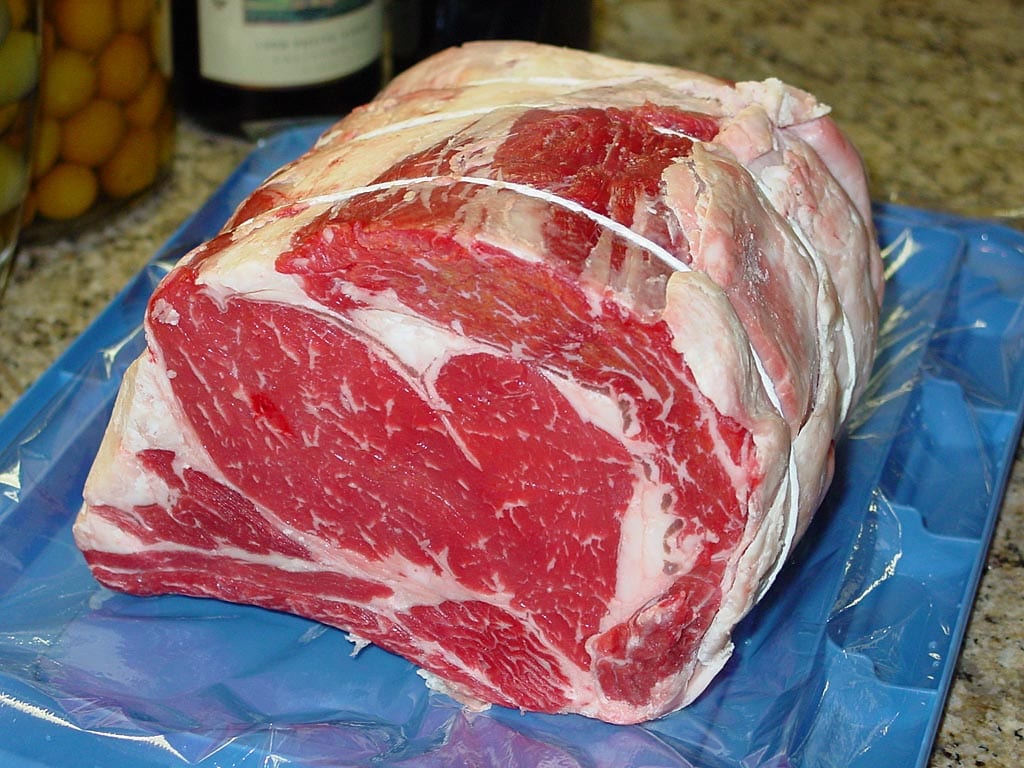
This is a three-rib USDA Choice standing rib roast cut from the small end (ribs 10-12), weighing 7.73 pounds. It came already tied by the butcher, and I left it that way during aging.
- When buying a bone-in rib roast, figure on 1 to 1-1/4 pounds pre-cooked weight per serving.
- Buy a roast with the rib bones attached. They provide better moisture retention and flavor, act as a natural roasting rack, and are good to eat.
- It’s not necessary for the roast to be tied during dry aging, but it should be tied at each bone before cooking. This prevents the spinalis dorsi muscle, also known as the “rib eye cap”, from separating from the outer edge of the roast during cooking. Tying also keeps the roast in a round shape for more even cooking. Place the roast bone-side down. Cut a length of kitchen twine, loop it around the roast parallel to the first bone, bringing the two ends to the top of the roast. Pull snug and tie with whatever kind of knot you like, then repeat at each bone.
- Don’t bother cutting the ribs off and tying them back on before cooking. They’re easily removed once the roast is cooked.
To learn more about standing rib roasts, see the Standing Rib Roast Selection & Preparation article.
This video demonstrates how to tie a roast. Click on the video to play.
Dry Age The Roast
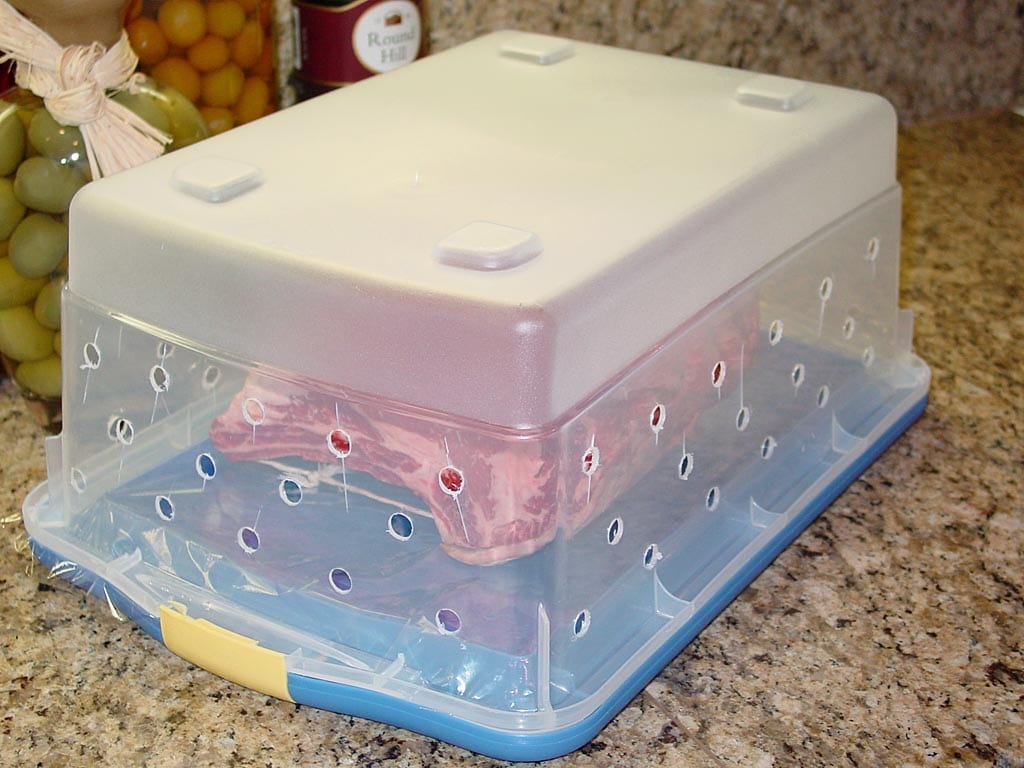
On Good Eats, Alton Brown drilled holes in a Rubbermaid storage container to create a “prolifically perforated plastic bin”. This allows air to circulate around the meat and protects it from spills and other contaminates, while protecting your fridge from any juices that might seep from the roast. Place the roast bone-side down on the lid and put the bin over the roast, as shown in the photo.
Alternatively, Brown suggests placing the roast bone-side down on a rack over a rimmed baking sheet pan and covering loosely with a dry towel, changing the towel daily.
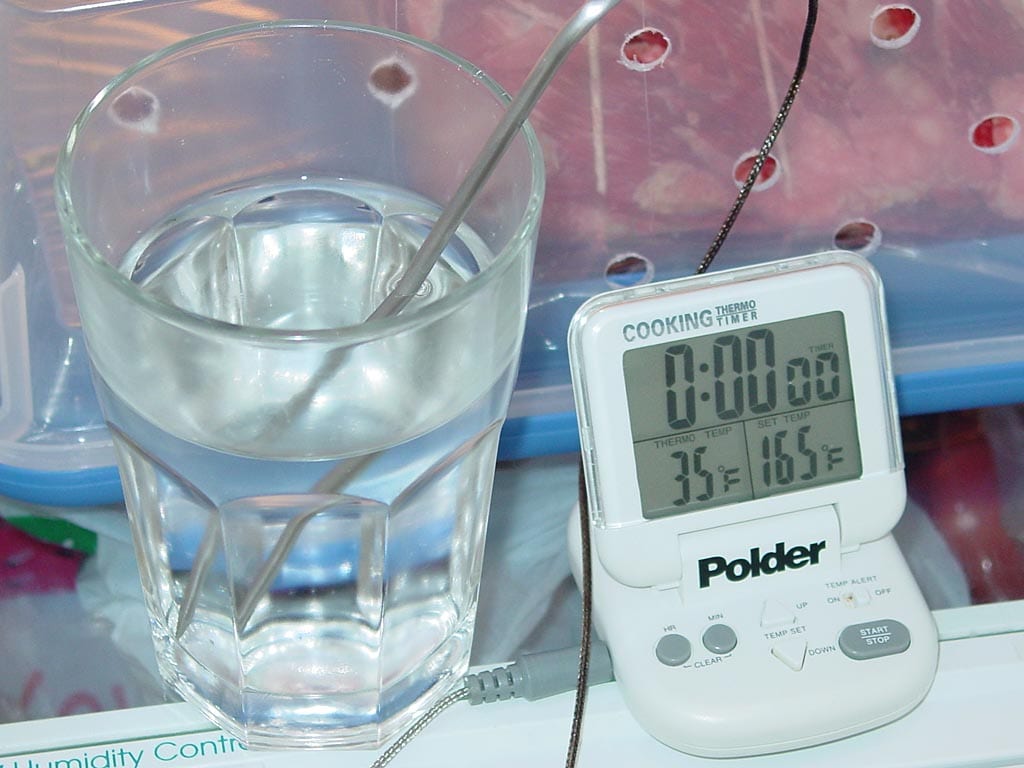
When dry aging beef, your refrigerator should be impeccably clean and free of any items that produce strong odors, as the exposed meat may absorb these odors.
Place the roast at the back of the lowest shelf in your refrigerator, which should be the coldest location. Lower the refrigerator setting to achieve a temperature of 34-36°F. Measure the temperature near the roast using a refrigerator thermometer, or place a probe thermometer in a glass of water situated next to the roast.
I followed Brown’s advice and dry aged this roast for three days.
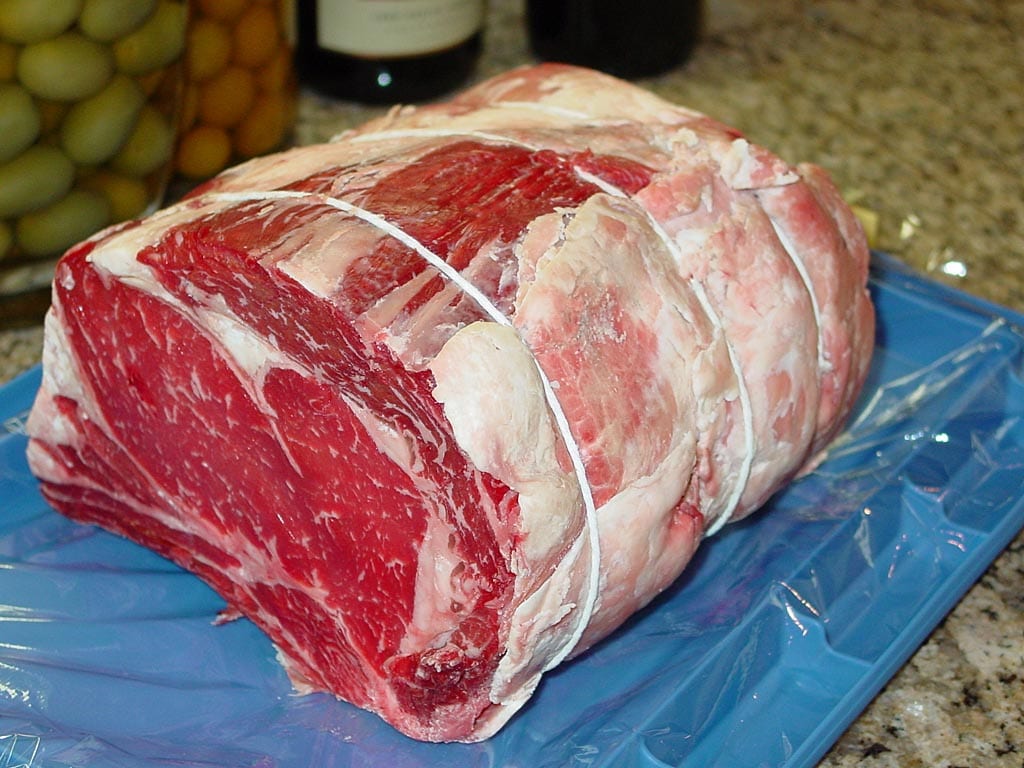
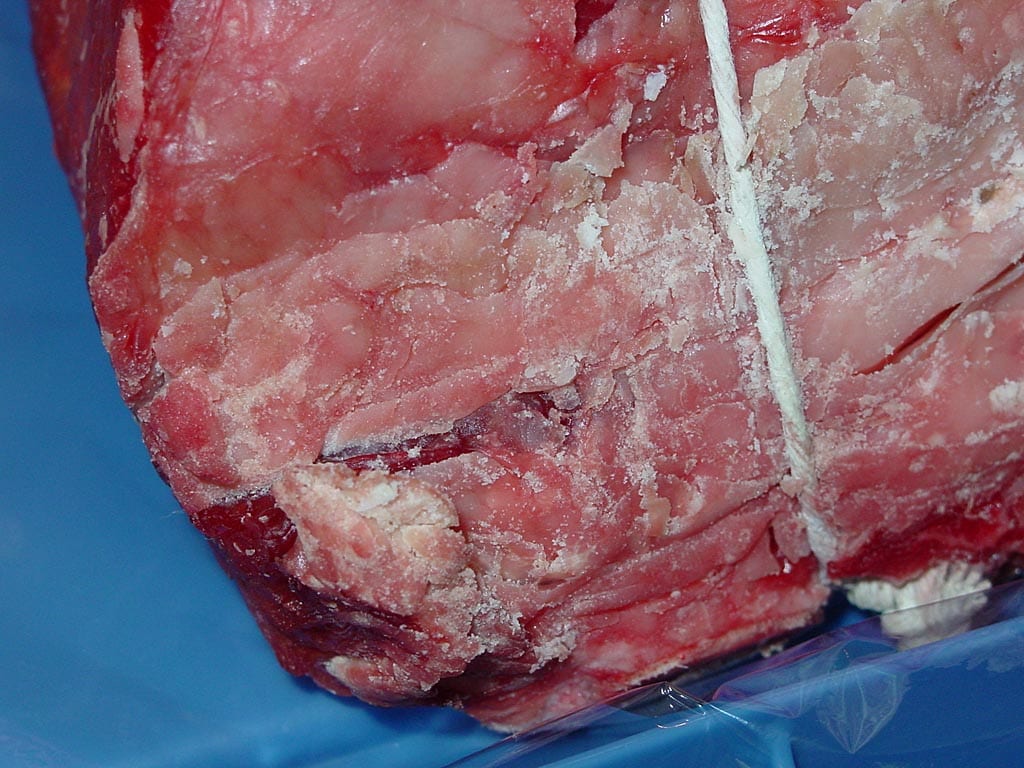
The third photo above shows how the roast looked after three days in the perforated bin. At first glance, it doesn’t look much different, but the fourth photo shows that some of the edges have begun to dry out.
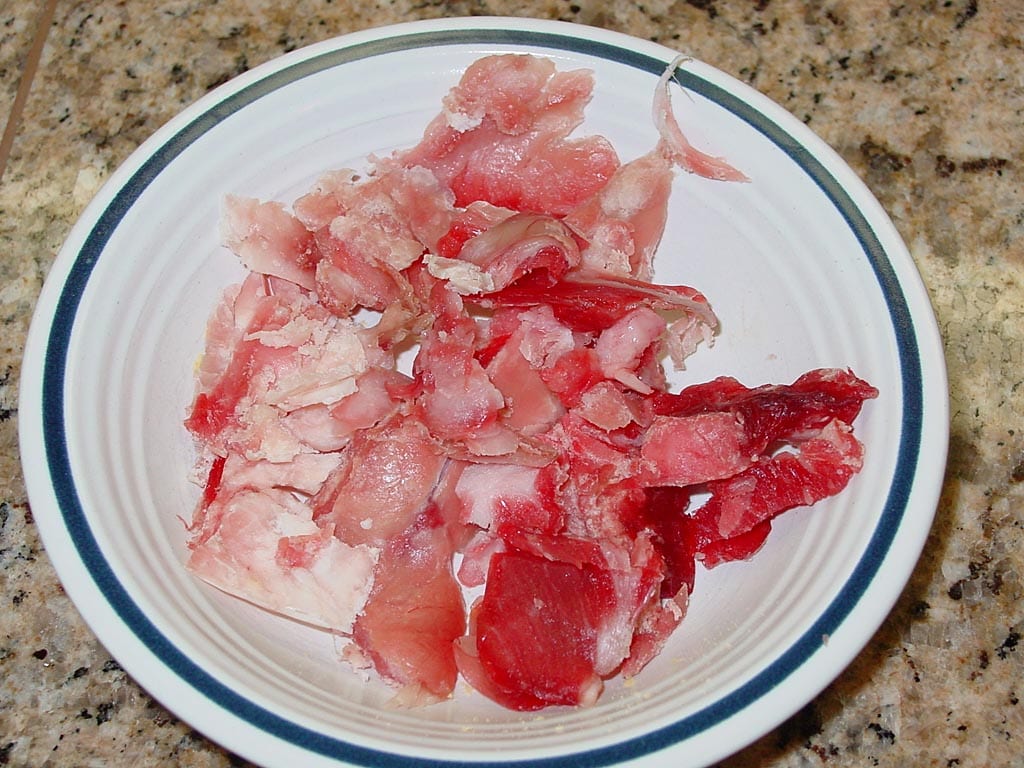
Use a sharp knife to shave off any dried or leathery spots on the roast. The fifth photo above shows how much I trimmed from this roast. Brown says, “You may also notice a slightly funky aroma. That’s OK. The smell of success.”
With the roast trimmed, tie at each bone using kitchen twine to prevent the outer layer of meat from pulling away from the rib eye during cooking.
Season The Roast
At this point, you could season the roast and cook it any way you like. You could use the seasonings described in the Prime Rib – Herb Crusted article or the Standing Rib Roast – Montreal Steak Rub article, or any other approach that you like.
For this roast, I used a simple preparation adapted from a recipe by Ann Willan demonstrated on Martha Stewart Living that lets the flavor of the aged roast shine through.
Standing Rib Roast Seasoning
- 4 teaspoons Coleman’s Dry Mustard
- 4 teaspoons Dijon mustard
- 4 teaspoons granulated sugar
- Kosher salt
- Freshly ground black pepper
Combine the dry mustard, Dijon mustard, and sugar to make a paste. Apply a thin layer of paste over the meat and fat surfaces of the roast, then sprinkle generously with kosher salt and freshly ground black pepper. There’s no need to apply the paste or seasoning to the bone side of the roast.
Cover loosely with plastic wrap and let sit at room temperature while you fire-up the cooker.
Select The Smoke Wood
Use a modest amount of mild smoke wood to compliment the natural flavor of the meat. I used two medium-sized chunks of dry cherry wood, pecan, apple, or another fruit wood can be used if oak is not available.
There is no need to soak the wood or remove the bark before use.
Fire-Up The Cooker
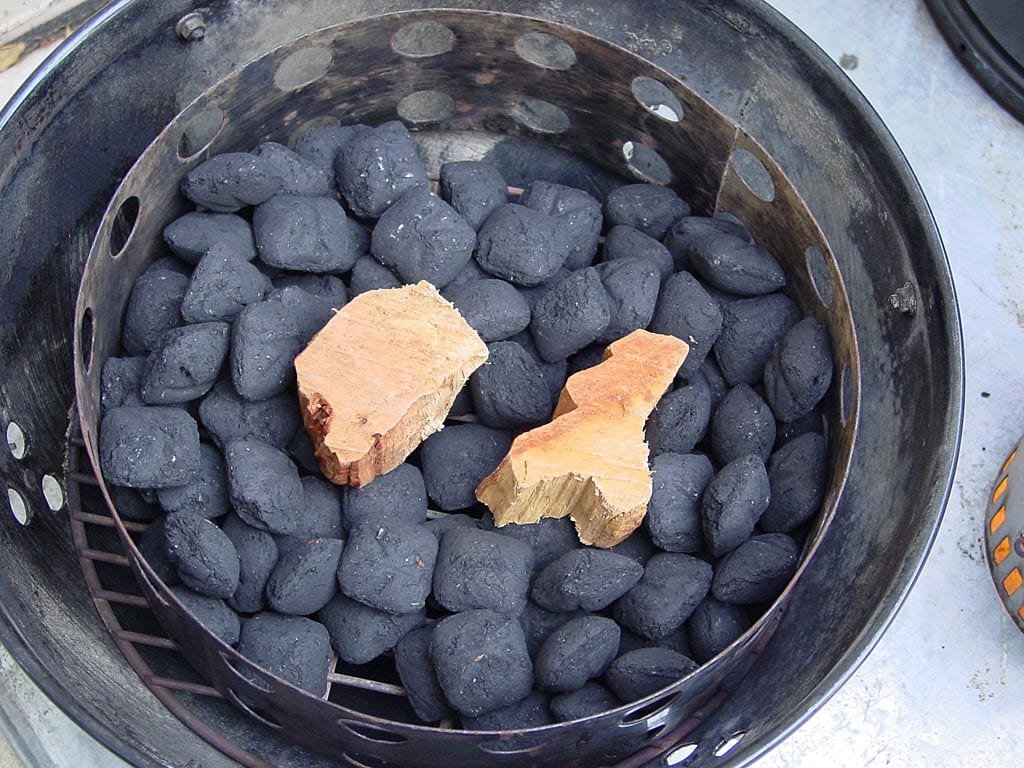
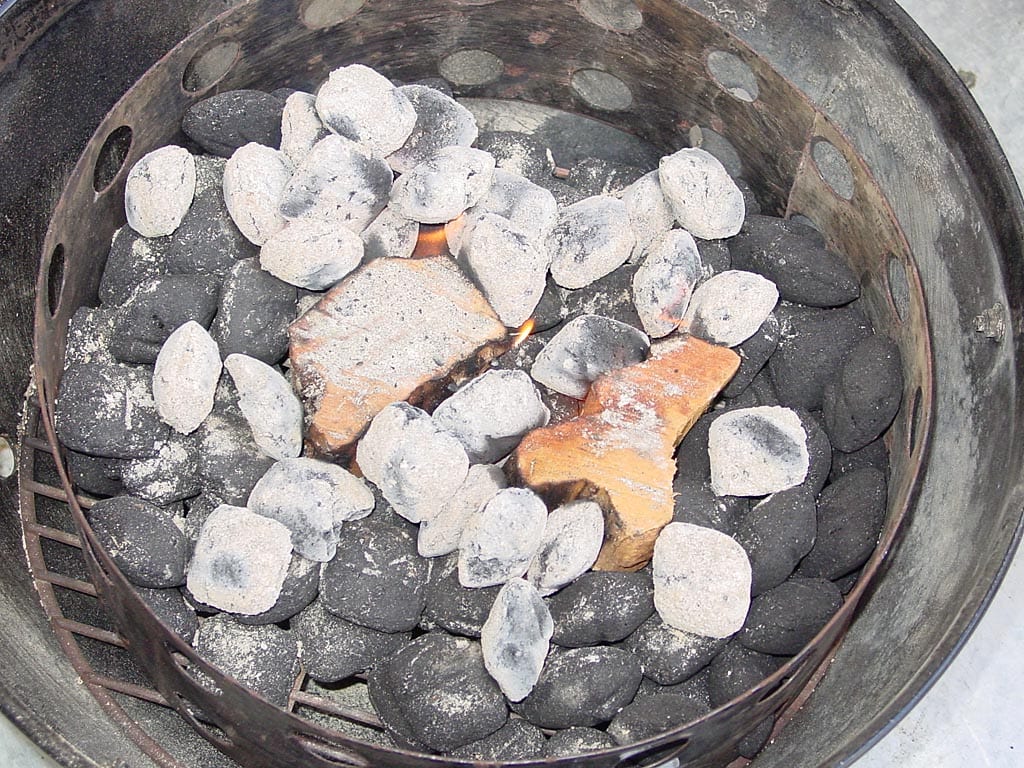
Fire-up the cooker using the Minion Method—one full Weber chimney starter of unlit Kingsford Charcoal Briquets in the charcoal bowl with 30 lit coals spread on top of the unlit coals.
Use Water In The Water Pan
Fill the water pan with cold water at the beginning of the cook to keep the cooker temperature low throughout the cooking process. There’s no need to add more water during the cook.
Smoke The Rib Roast
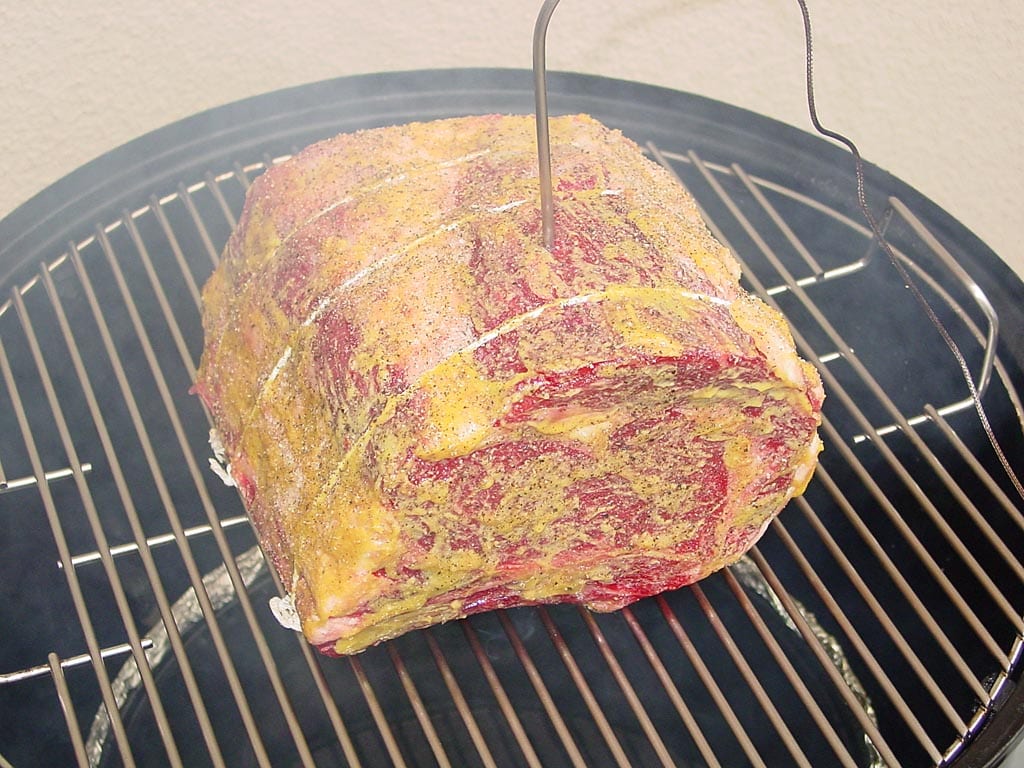
Assemble the cooker and place the roast bone-side down on the top grate. Insert a probe thermometer in the center of the roast to monitor the internal meat temperature during cooking.
Place the lid on the cooker. Add the smoke wood to the hot coals.
Set the three bottom vents to 100% open. Open the top vent fully and leave it that way throughout the entire cook. As the cooker approaches 200°F, begin to partially close all 3 bottom vents to maintain 225-250°F. Adjust the bottom vents as needed to maintain this temperature range throughout the cooking process.
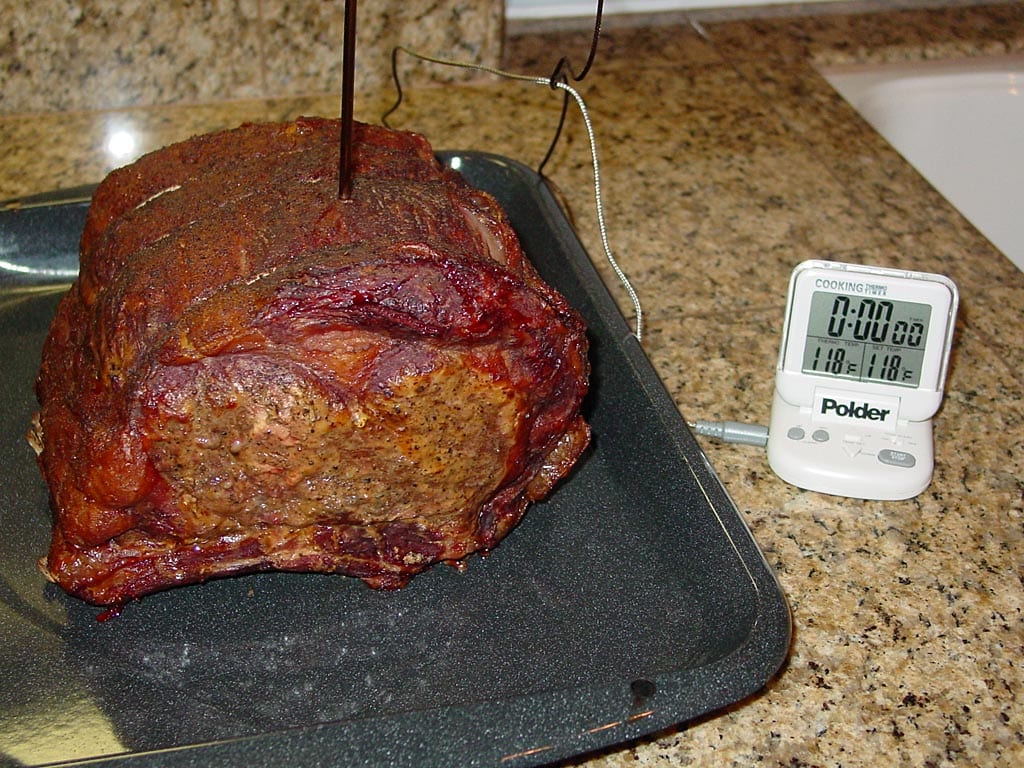
Cook the rib roast to 10-12° below the final internal temperature you want to achieve, then remove it from the cooker. For example, I wanted a final temp of 130°F for medium-rare, so I removed this roast at 118°F.
There’s no need to baste or turn the meat during cooking.
Here’s how the cooker and internal meat temperatures went during the cooking process.
| Time | Lid Temp | Meat Temp | Vent 1 % | Vent 2 % | Vent 3 % |
| 1:30 pm | – | 35 | 50 | 50 | 50 |
| 1:45 pm | 215 | 37 | 100 | 50 | 50 |
| 2:00 pm | 250 | 39 | 50 | 0 | 0 |
| 2:15 pm | 249 | 41 | 0 | 0 | 0 |
| 2:30 pm | 225 | 48 | 50 | 0 | 0 |
| 2:45 pm | 240 | 57 | 20 | 0 | 0 |
| 3:00 pm | 235 | 62 | 20 | 0 | 0 |
| 3:15 pm | 232 | 71 | 20 | 0 | 0 |
| 3:30 pm | 227 | 78 | 50 | 0 | 0 |
| 3:45 pm | 232 | 87 | 50 | 0 | 0 |
| 4:00 pm | 234 | 93 | 50 | 0 | 0 |
| 4:15 pm | 230 | 104 | 50 | 0 | 0 |
| 4:30 pm | 224 | 107 | 100 | 0 | 0 |
| 4:45 pm | 230 | 111 | 100 | 0 | 0 |
| 5:02 pm | 232 | 118 | 100 | 0 | 0 |
Note that the vent percentages represent the way I set the vents at the time indicated.
Reverse-Sear The Roast
When the roast hits the desired temperature, remove it from the cooker, transfer it bone-side down to a roasting pan, and cover loosely with foil.
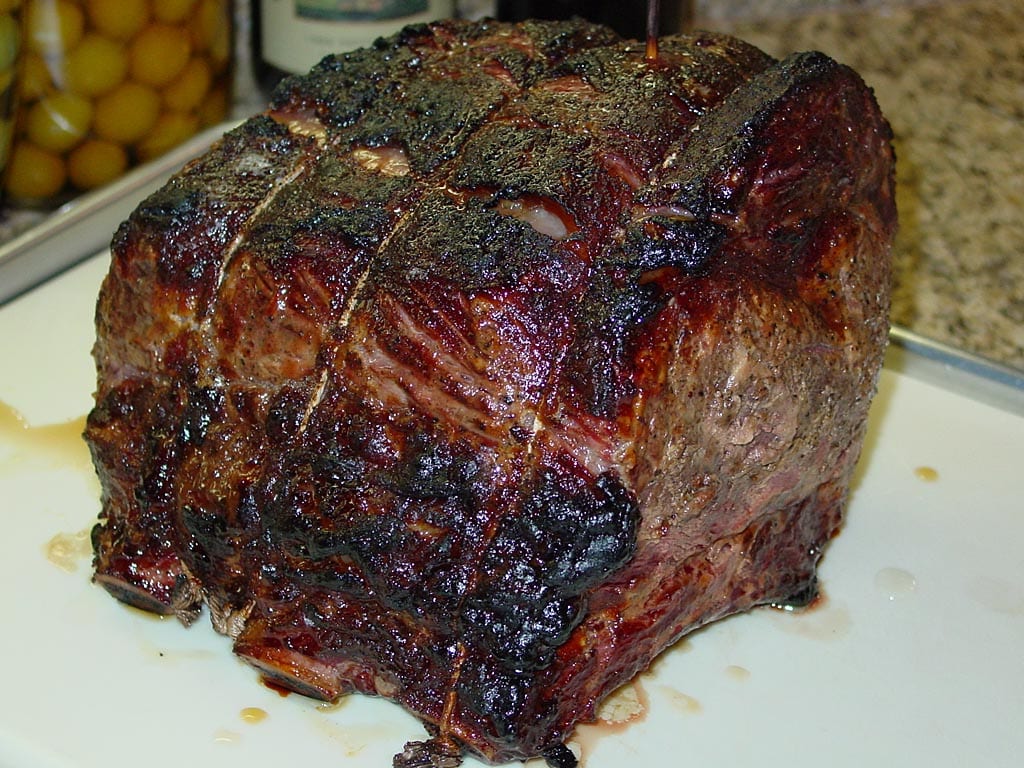
As the roast sits, preheat your oven to 500°F. When the oven is hot, remove the foil, put the roast in the oven, and sear for several minutes until there’s a nice roasted color and crust on the surface of the meat. My roast spent 15 minutes in the oven, which turned out to be too long—5 minutes would have been enough. This reverse-sear process may create a lot of smoke in the kitchen, so open some windows and turn on the ventilation fan.
Note: If you used a probe thermometer to measure internal meat temperature during cooking in the WSM, check the specs for your unit to make sure the probe can withstand a 500°F oven. Better units often come with high-temp probes that can withstand 700-750°F, but lesser probes will burn-out at temps approaching 400°F. If you remove the probe from the roast, you may want to insert a wooden skewer in its place to prevent juices from spurting out of the probe hole.
Rest, Carve & Serve The Roast
After searing, remove the roast from the oven and cover loosely again with foil. Let the meat rest for 30 minutes before carving.
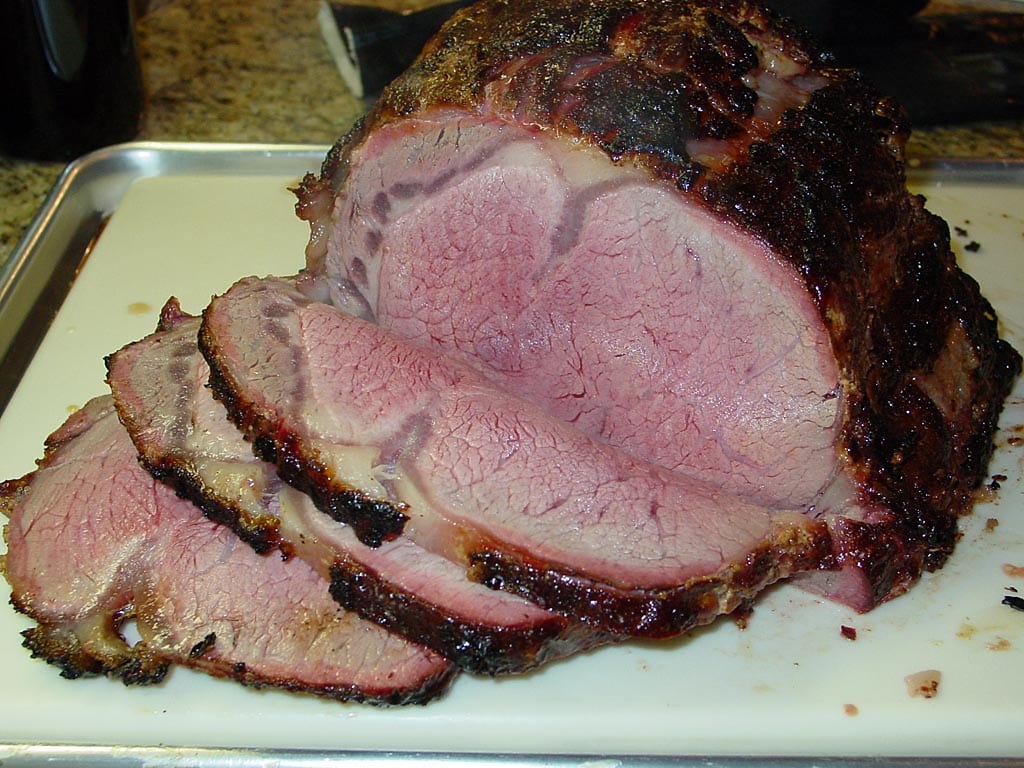
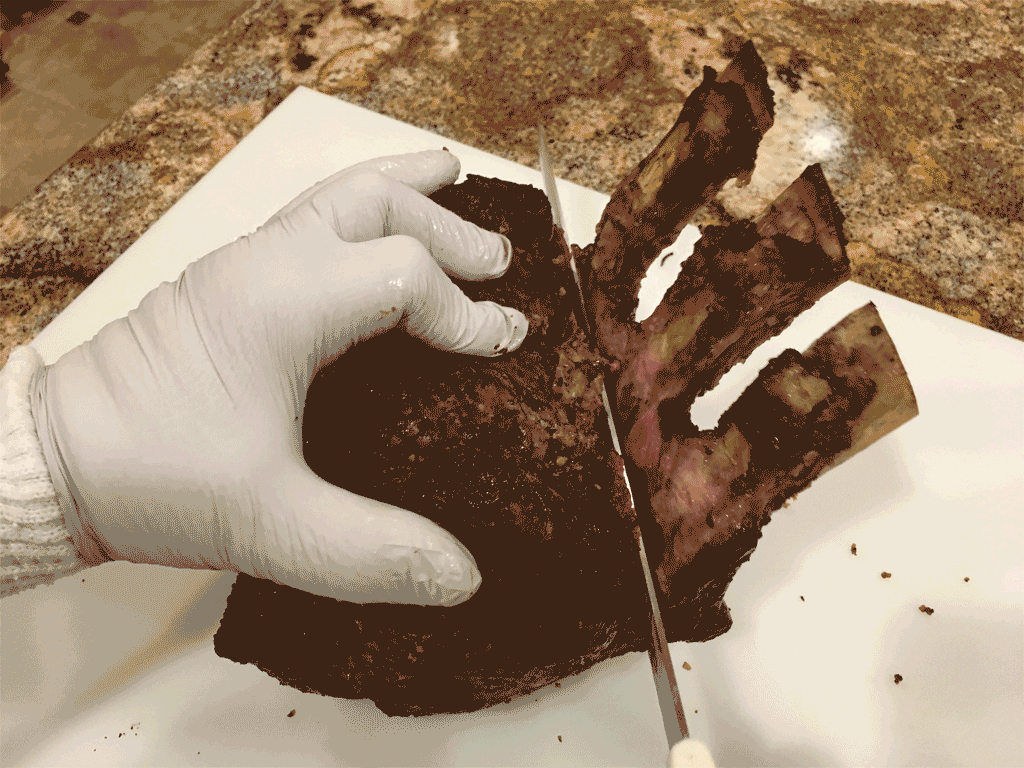
To carve, remove the twine and roll the roast onto its side so the bones are pointing straight up. Using the bones as a handle, cut downward close to the bones using a sharp boning knife or an electric carving knife to remove the bones. Click here to see the cutting process as a GIF.
Next, place the roast flat on the cutting board and carve slices 1/2″ thick or to your liking. Cut the bones into individual pieces and serve them along with the roast…or save them for yourself!
In my cooking log, I noted that the meat had moderate smokiness and the crust had good flavor. The roast had a smoke ring about 1/4″ wide. The meat was evenly cooked inside, thanks to the low temperature in the WSM. And of course, the roast was tender as could be.
Did dry aging improve the flavor of this roast? Yes, I think it did, but it’s hard to say how much without doing a side-by-side comparison. This roast seemed to have a richer, beefier flavor than others I’ve done.


