Summary
- Trim large areas of external fat from two boneless pork butts.
- Apply Hi Mountain Buckboard Bacon Cure and let meat cure in refrigerator for 10 days, turning over once after 5 days.
- Soak meat in cold water for two hours, then rinse thoroughly and pat dry. Tie with kitchen twine to achieve a good shape. Let sit at room temperature for 1 hour before cooking.
- Smoke at 200°F to an internal temperature of 140°F.
- Let cool at room temperature for 90 minutes, then refrigerate overnight.
- Slice to desired thickness and pan fry in a non-stick skillet.

Buckboard bacon is made by curing fresh, boneless pork butt, then smoking it just to a food-safe internal temperature. It is then sliced and pan fried in a skillet similar to bacon. Hi Mountain Seasonings makes a very popular curing mix for buckboard bacon which many members of The Virtual Weber Bulletin Board rave about online.
Here are some pictures I took on February 8-18, 2006 when I cured and cooked buckboard bacon on the WSM.
Order The Dry Cure

You can order Buckboard Bacon Cure at Amazon.com or directly from Hi Mountain Seasonings.
A 16-ounce box costs around $10 and cures 25 pounds of pork butt. It contains salt, brown sugar, white sugar, maple sugar, sodium nitrite (a curing agent) and glycerine (an anti-caking agent).
Select & Prepare The Pork Butts
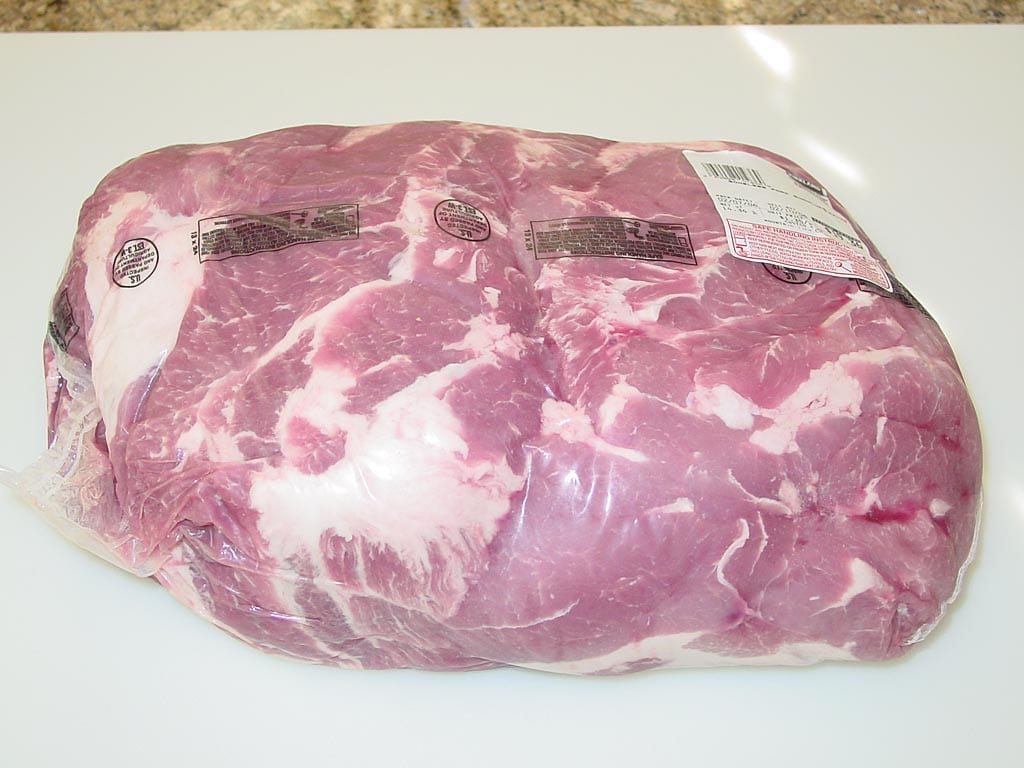
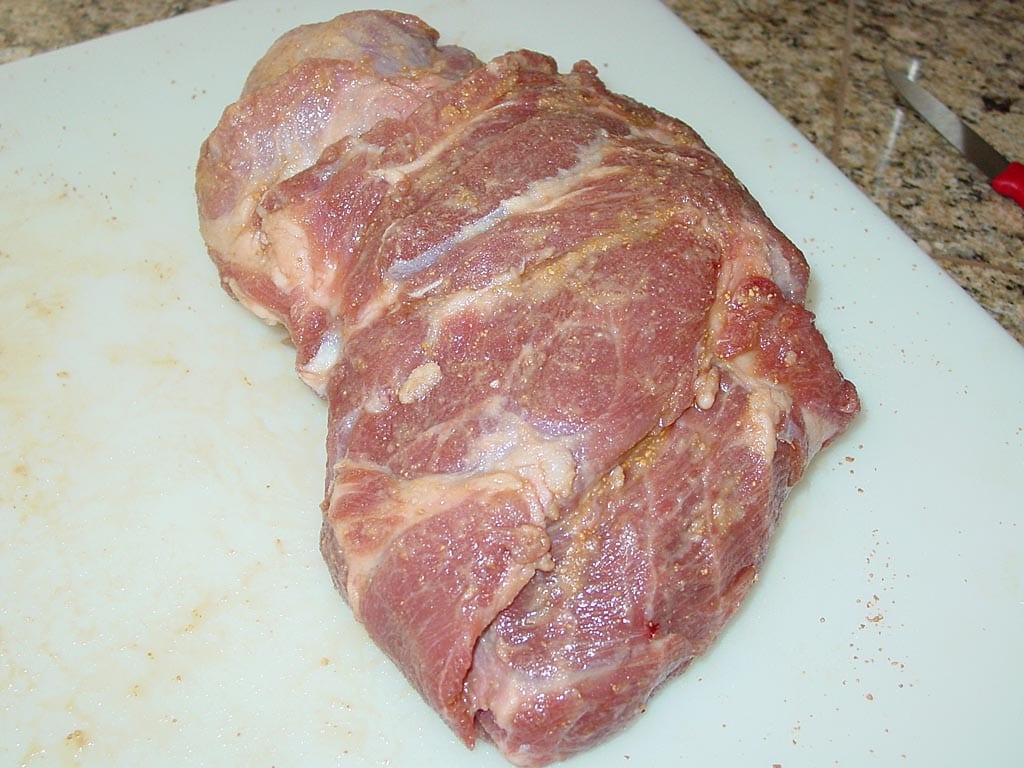
Buy two boneless pork butts in Cryovac packaging weighing about 14 pounds. Trim all large areas of external fat and anything that doesn’t look edible. You will be left with about 11-12 pounds of trimmed meat.
Hi Mountain says that the curing process works best when the meat is 3″ to 3-1/2″ thick. Trim off some meat or butterfly thick areas to achieve the suggested thickness.
This photo shows two boneless pork butts in Cryovac packaging weighing 14.34 pounds.
This photo shows the two butts after trimming 3.25 pounds of external fat and scrappy bits, leaving 11.09 pounds of pork goodness. Notice that the butt on the left is bigger and thicker than the one on the right. I made a series of cuts in the thicker areas to butterfly the meat so it was no more than 3-1/2″ thick.

Apply The Dry Cure
Hi Mountain says to use 1 Tablespoon + 1-1/4 teaspoon of cure for each pound of meat. To keep things simple, just use half of the 16 ounce box for 11-12 pounds of trimmed pork butt.
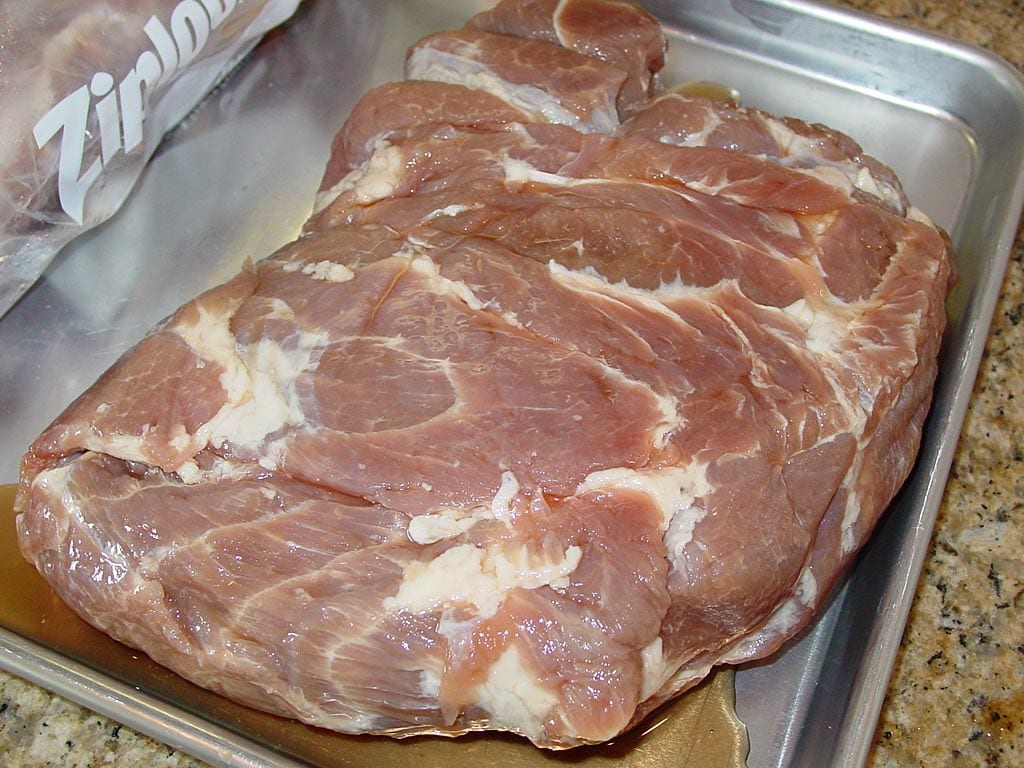
Apply the cure evenly to all surfaces of the meat, including the cavity where the bone was removed. Make sure to rub the cure into all the nooks and crannies. The salt and sugars are very fine and will dissolve quickly. Eight ounces of cure may seem like too much, but it’s not—use it all, leaving any excess on the meat.
Place each piece of meat into a 2-gallon Ziploc storage bag or in a non-reactive container with a cover (or use plastic wrap to cover). Scrape up any excess cure from the work surface and put it in with the meat.
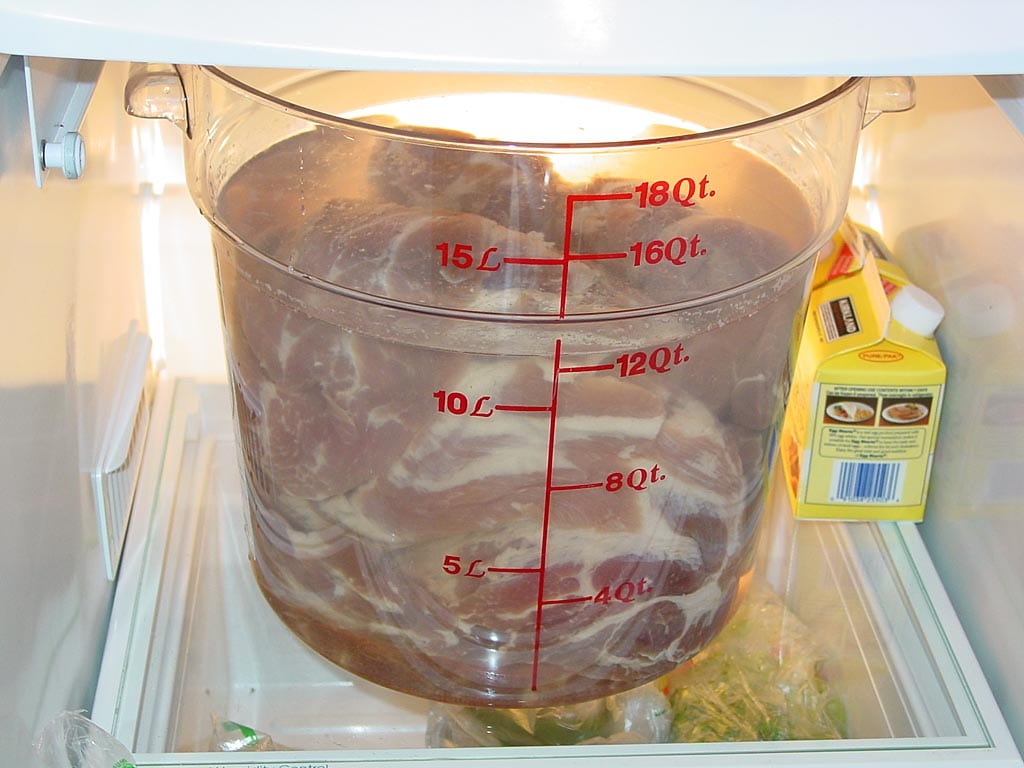
Cure The Pork Butts For 10 Days

Cure the meat in the refrigerator for 10 days, turning over once after 5 days. There is no need to remove the liquid that accumulates in the bag or container.
Soak & Rinse The Pork Butts
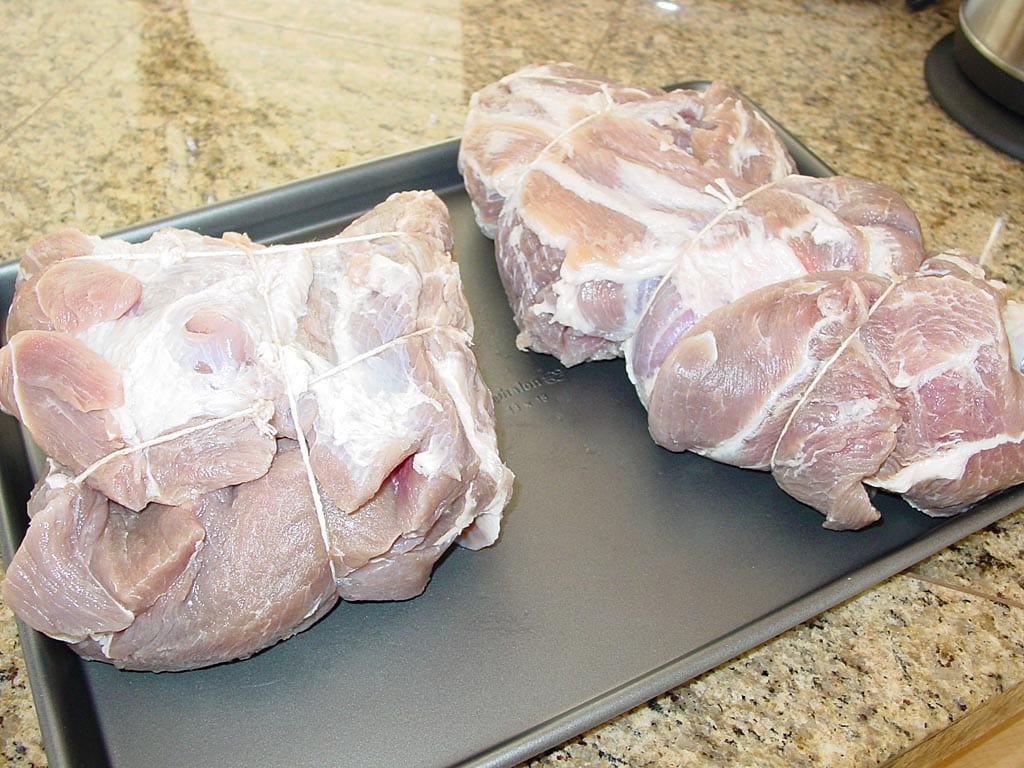
The first photo above shows how the pork butt looks after curing for 10 days.
Place the meat in a large container and cover with cold water. Refrigerate for two hours. Discard the water and rinse the meat thoroughly under running water, making sure to rinse out the bone cavity and all the nooks and crannies.
Pat the meat dry with paper towels. Tie in several places with kitchen twine to give the meat a compact shape. Cover with plastic wrap and let sit at room temperature for 1 hour before cooking.
Fire The WSM
The instructions for Hi Mountain Buckboard Bacon seem to be written for an electric smoker. They suggest that you cook the meat at 150°F for 45 minutes without smoke, then at 200°F with smoke to an internal temperature of 140°F, then “turn off heat” and leave the bacon in the smoker for 1 hour to cool.
Here’s how I simplified the process:
Light the cooker using the Minion Method. Fill the charcoal chamber half full with unlit Kingsford Charcoal Briquets. Light 20 briquettes using a Weber chimney starter and spread them over the unlit briquettes. Place a small amount of dry smoke wood on the lit coals. You don’t need to use much—several small pieces equivalent of a single fist-sized chunk is sufficient. A mild wood like apple is a good choice.
Assemble the cooker and fill the water pan from above immediately with cold tap water. Foil the water pan before use for easy cleanup later.
Put the pork butts into the cooker on the top grate. Insert a probe thermometer into the center of one of the pork butts and put the lid in place.
Smoke The Pork Butts
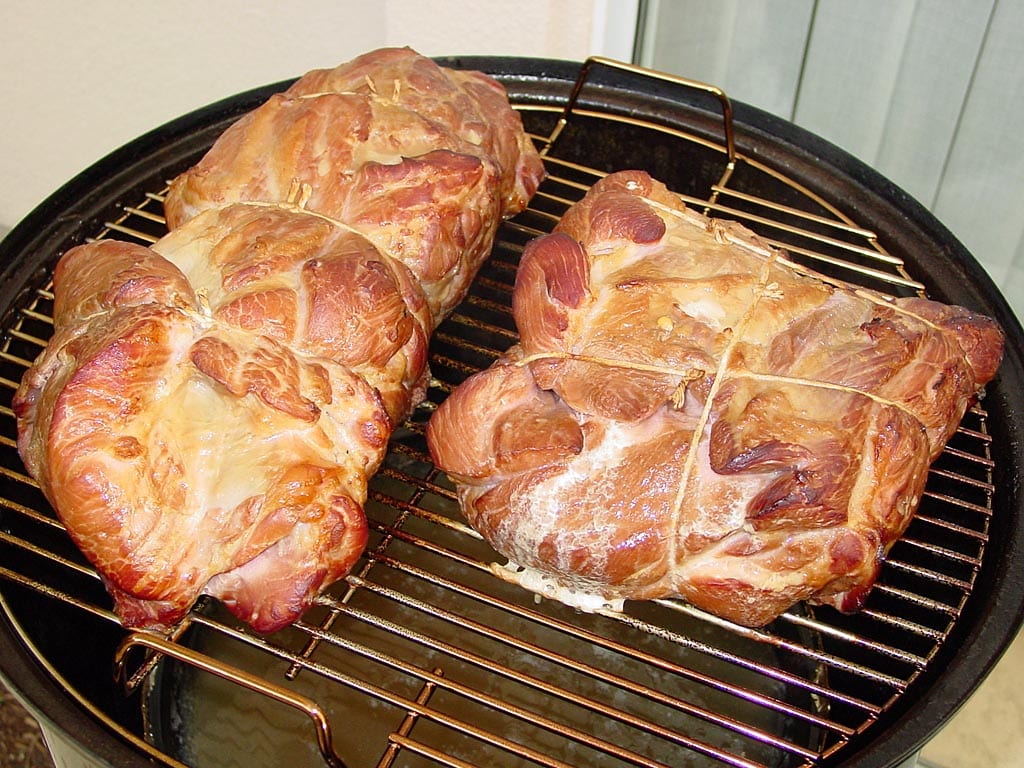
Set the top vent 100% open and leave it that way throughout the entire cooking session. Start with all three bottom vents 100% open. When the cooker temperature approaches 190°F measured at the lid, close two of the bottom vents and set one vent to 25% open. Allow the cooker to come up to 200°F, adjusting the bottom vents as necessary to maintain 190-210°F.
Cook to an internal temperature of 140°F measured in the center of the meat.
Here’s how the cooker temperatures and vent settings went during the cook:
| Time | Lid Temp | Meat Temp | Vent 1 % | Vent 2 % | Vent 3 % |
| 1:00 pm | – | 53 | 100 | 100 | 100 |
| 1:15 pm | 194 | 62 | 25 | 0 | 0 |
| 1:23 pm | 198 | 71 | 25 | 0 | 0 |
| 1:30 pm | 200 | 77 | 10 | 0 | 0 |
| 1:45 pm | 195 | 89 | 10 | 0 | 0 |
| 2:00 pm | 180 | 100 | 25 | 0 | 0 |
| 2:15 pm | 201 | 107 | 10 | 0 | 0 |
| 2:30 pm | 200 | 116 | 10 | 0 | 0 |
| 2:45 pm | 198 | 123 | 10 | 0 | 0 |
| 3:00 pm | 180 | 129 | 50 | 0 | 0 |
| 3:15 pm | 215 | 132 | 10 | 0 | 0 |
| 3:30 pm | 210 | 136 | 10 | 0 | 0 |
| 3:45 pm | 196 | 135-140 | 0 | 0 | 0 |
| 4:00 pm | 180 | 140 | 0 | 0 | 0 |
Note that the vent percentages represent the way I set the vents at the time indicated.
At 3:45 pm, I checked the internal temperature of the meat in several spots with an instant-read thermometer. I got readings of 135-140°F, so I closed all the bottom vents and let the meat cook for another 15 minutes. I checked the temps again and this time got readings of at least 140°F.
Cool & Refrigerate The Bacon
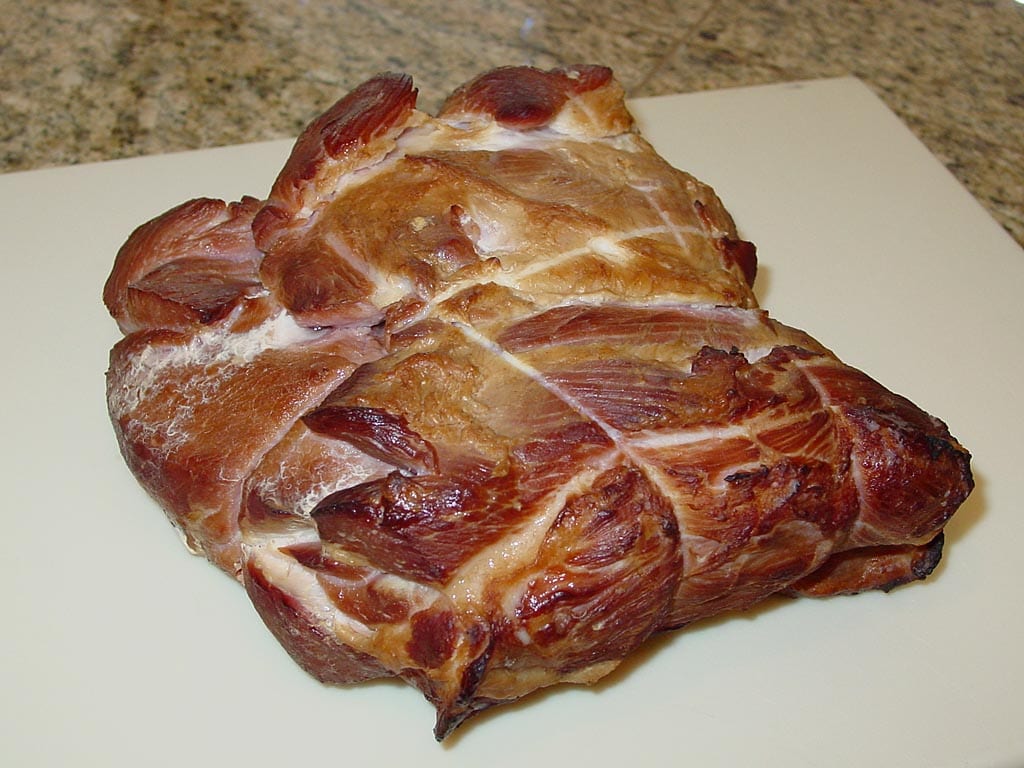
Remove the bacon from the cooker. Let cool at room temperature for 90 minutes, then wrap with foil or plastic wrap and refrigerate overnight.
Slice & Pan-Fry The Bacon
Remove the kitchen twine. Slice to desired thickness using a sharp slicing knife, an electric knife, or an electric meat slicer.
Hi Mountain says that thin-sliced buckboard bacon will cook twice as fast as regular bacon. I found it hard to cut thin slices using an electric knife, so I ended up with the thicker slices shown in these photos.
The meat is extremely lean compared to regular bacon. I tried cooking it in a cast iron skillet, but the meat stuck like crazy to the pan. For the next batch I used non-stick cooking spray, which helped. Later, I used a non-stick skillet, which worked the best.
The texture and taste of the cooked product reminds me a lot more of ham than bacon. Since the meat is so lean, it does not fry in its own fat like regular bacon does.
Cut the remaining buckboard bacon into slices or chunks and freeze for future enjoyment.
More Pork Butt Links On TVWB
- Pork Butt – Smoke & Spice The Renowned Mr. Brown
- Pork Butt – Slathered With Mustard & Rub
- Pork Butt – Chris Lilly Big Bob Gibson Championship Injection
- Pork Butt – Harry Soo Slap Yo’ Daddy Injection
- Pork Butt – Untrimmed Direct Heat
- Pork Butts In Foil Pans
- Pulled Pork Butt Servings Calculator
- Pork Butt Selection & Preparation


