Summary
- Select meaty slabs with good meat coverage over and between the bones.
- A full slab will have 7-8 bones.
- Remove the membrane from the bone side of the slab, as you would with pork ribs.
- Smoke at 225-250°F for 4 hours and check for doneness. Ribs should be tender after 4-6 hours of cooking. Turn and baste several times during cooking.
- When the ribs are done, baste again before serving.
Beef back ribs are often the subject of disparaging comments like “not very meaty”, “greasy”, “tough”, and so one. I’m not sure why they get such a bad rap, but they definitely seem to be the poor step-cousin to pork ribs.
Maybe people just don’t know how to pick ’em and prep ’em right. If you go to the effort to find good quality, meaty beef ribs, and take the time to remove the tough membrane from the bone side, then smoke patiently for 4-6 hours, you’ll end up with some of the best barbecue you’ve ever eaten.
Here are some photos I took on June 21, 2003 when I barbecued beef back ribs.
Choosing And Prepping Beef Back Ribs
Beef back ribs correspond to loin back ribs on a pig, but of course they’re much larger in size. The extremely tender rib roast sits right on top of the back ribs, so you know these suckers are going to be tender and delicious if prepped and cooked properly.
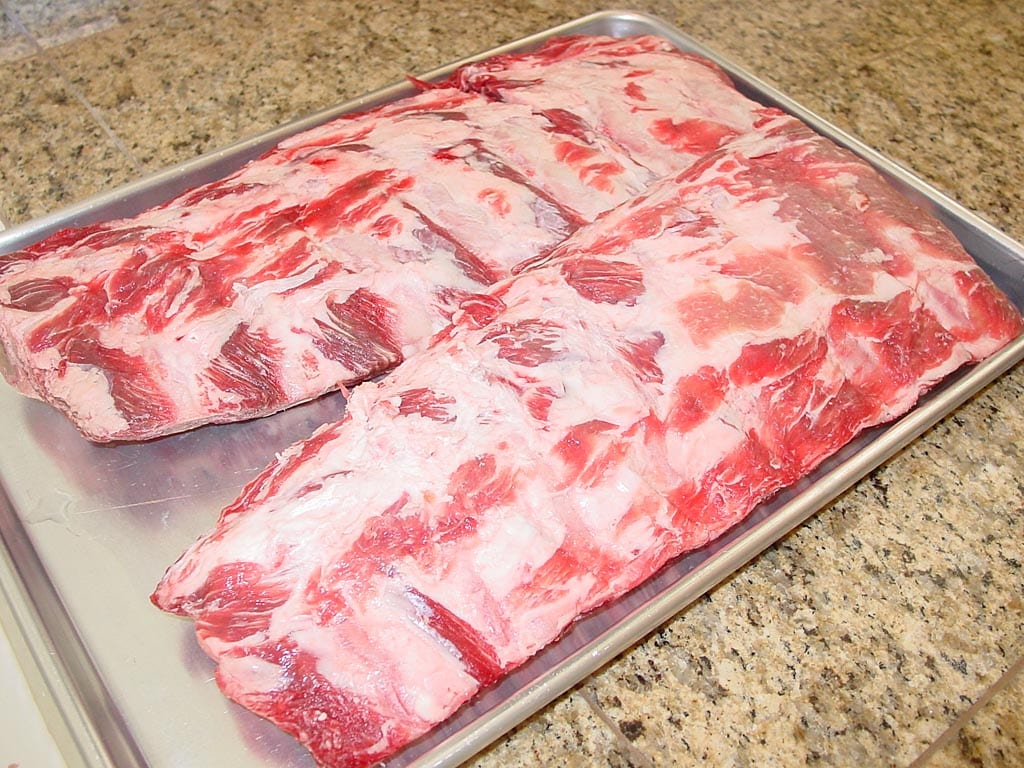
Beef back ribs can be hard to find in stores. This picture shows two slabs that I picked up at a high-end meat market. One was slightly larger than the other; together, they weighed a total of 6.33 pounds.
Examine beef back ribs carefully before purchasing them. Look for meaty slabs with good meat coverage over and between the bones. I’ve seen stores selling slabs in which the meat has literally been carved out from between the bones—don’t buy those ribs. Also, count the number of bones. A full slab of beef back ribs will contain 7-8 bones.
Prepping beef back ribs is about the same as prepping pork ribs. Remove the membrane from the bone side using a butter knife and paper towel, as described in the Pork Loin Back Rib Preparation article. The membrane on beef ribs is much thicker and may put up more of a fight than on pork ribs, but the process is the same.
After removing the membrane, scrape away any large areas of fat on the bones, then flip the slab over and trim away any large areas of fat from the meat side. You don’t have to be too fussy, just trim away what makes sense to you.
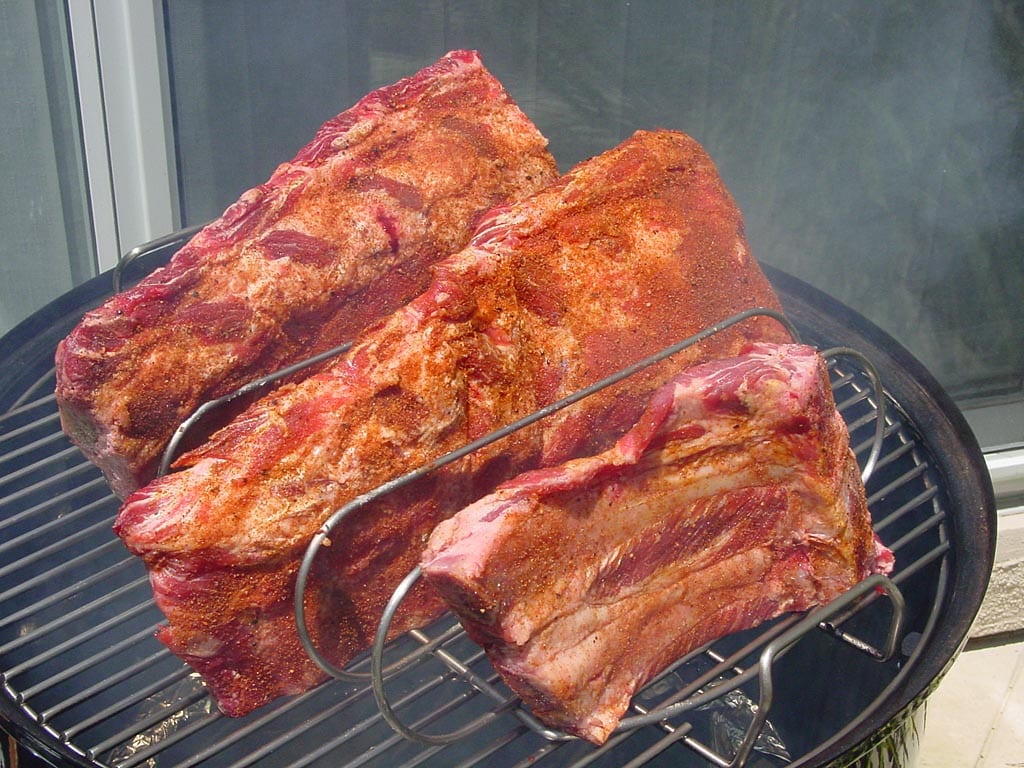
The last step is to figure out how you’re going to fit these monsters into the cooker. These ribs are not as long as a full slab of pork loin back ribs, but much wider and with much thicker bones, which makes fitting them into a rib rack difficult. They also don’t like to roll into a circle like pork ribs do.
I was able to fit the smaller slab as-is into a rib rack, but had to trim off two of the long bones from the larger slab. Those two bones are propped up against the front of the rib rack in the pictures further down this page.
Rubbing The Ribs
Any rub that you would use on brisket or other cut of beef will work with these ribs. I used a rub recipe posted by Kevin Taylor on The Virtual Weber Bulletin Board. Kevin says it’s a clone of the steak seasoning used at Outback Steakhouse.
Yum Yum Steak Seasoning
- 4 Tablespoons non-iodized table salt
- 2 Tablespoons paprika
- 1 Tablespoon black pepper, coarsely ground
- 1-1/2 teaspoons onion powder
- 1-1/2 teaspoons granulated garlic powder
- 1-1/2 teaspoons cayenne pepper
- 1/2 teaspoon ground coriander
- 1/2 teaspoon turmeric
Combine all ingredients and mix thoroughly. Makes about 1/2 cup.
Apply a moderate amount of rub to both sides of each slab.
After sprinkling on the rub, my ribs sat at room temperature for an hour while I got the cooker going. If you like, you can take the ribs straight from the refrigerator, apply rub, and put them into the cooker immediately, or apply the rub, refrigerate overnight, and cook the next day.
Fire The WSM
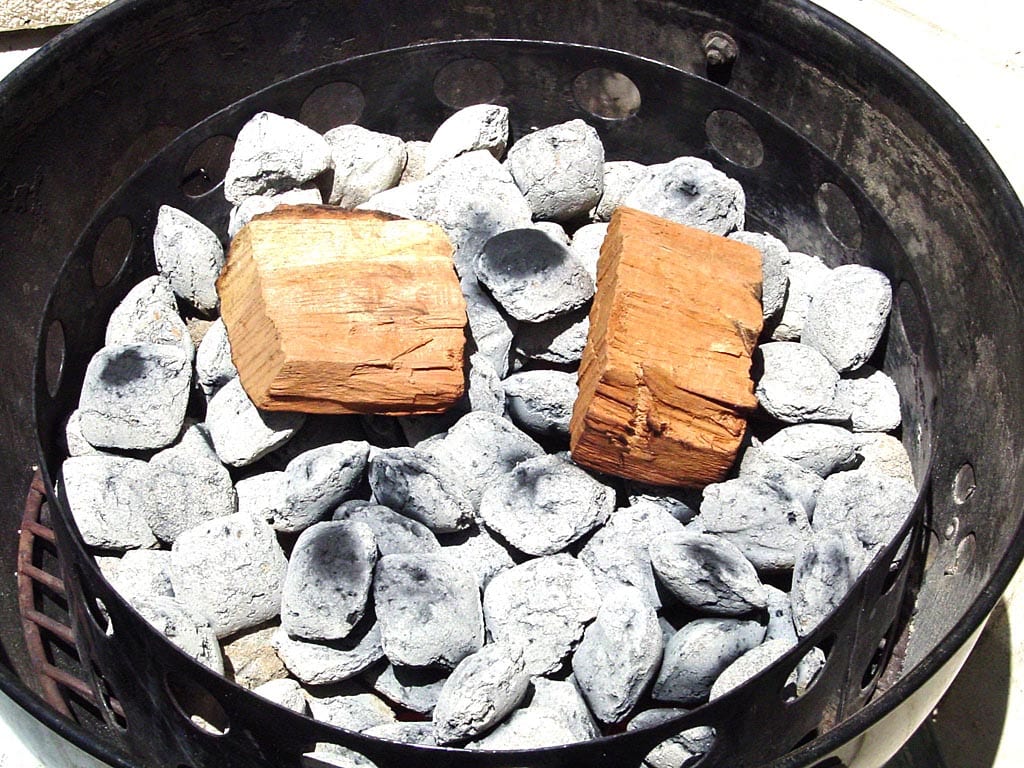
Light the cooker using the Standard Method. I filled a Weber chimney starter all the way to the top with Kingsford charcoal, got the coals good and hot, spread them in the charcoal chamber, and poured another heaping chimney of unlit Kingsford over the hot coals.
When all the coals were lit, I placed two large chunks of dry cherry smoke wood on the fire and assembled the cooker. Since this would be about a 6 hour cook, I used the larger Brinkmann water pan so I wouldn’t have to refill the pan during cooking. (Those of you with WSMs made since 2009 may also want to look into this alternative water pan.) Put the middle cooking section in place with the water pan already inside, then fill the pan with cool tap water from above.
Put the lid on the cooker, set the lid vent to 100% open and close the three bottom vents completely. I waited about 30 minutes before putting the ribs into the cooker, which allowed the cooker temperature and the smoke coming out of the cooker to settle down a bit. You can place the meat in the cooker immediately, if you wish, especially if you’re loading the cooker with a lot of cold ribs straight from the refrigerator, as this will help drive the cooker temperature down.
The ribs went in a rib rack on the top grate and the lid went back on the cooker.
Leave the lid vent 100% open throughout the cook. When the cooker dips down to around 225°F, start opening the bottom vents to maintain 225-250°F.
Details Of The Cook
Barbecue the beef back ribs at 225-250°F for 4 hours and then check for doneness. The ribs should be tender after 4-6 hours of cooking—these ribs took 6 hours. Turn and baste as you would a pork rib. Replenish the water pan with hot tap water during the cook, as you feel necessary.
I put these ribs in the cooker at 2:00pm and they were finished at 8:00pm. They just weren’t tender after 5 hours and needed that additional hour in the cooker. I turned and basted the ribs at 5:00pm and 6:30pm with a tomato-based barbecue sauce that I thinned with apple cider vinegar.
When I tried to flip the ribs over, I found that one side of each slab was so thick that it wouldn’t fit into the rib rack! So, I had to improvise, as you can see in this photo. I just laid one slab on top of the rack, and the other I leaned against the back of the rack.
Here’s how the cooker temperature went during the 6-hour cook:
| Time | Lid Temp | Meat Temp | Vent 1 % | Vent 2 % | Vent 3 % |
| 2:00 pm | 329 | – | 0 | 0 | 0 |
| 2:30 pm | 240 | – | 0 | 0 | 0 |
| 3:00 pm | 240 | – | 0 | 0 | 0 |
| 3:30 pm | 240 | – | 0 | 0 | 0 |
| 4:00 pm | 240 | – | 0 | 0 | 03 |
| 4:30 pm | 239 | – | 0 | 0 | 0 |
| 5:00 pm (t)(b) | 227 | – | 33 | 33 | 33 |
| 5:30 pm | 262 | – | 33 | 33 | 0 |
| 6:00 pm | 240 | – | 33 | 33 | 0 |
| 6:30 pm (t)(b) | 250 | – | 33 | 33 | 0 |
| 7:00 pm | 265 | – | 33 | 0 | 0 |
| 7:30 pm | 248 | – | 33 | 0 | 0 |
| 8:00 pm | 240 | – | 33 | 0 | 0 |
(t) turned ribs over and end for end
(b) basted ribs with sauce mixture
Note that the vent percentages represent the way I set the vents at the time indicated.
As you can see from the chart, this was an uneventful cook. And no, that’s not a mistake—the cooker was rock-solid at 240°F for almost 2 hours with all bottom vents closed.
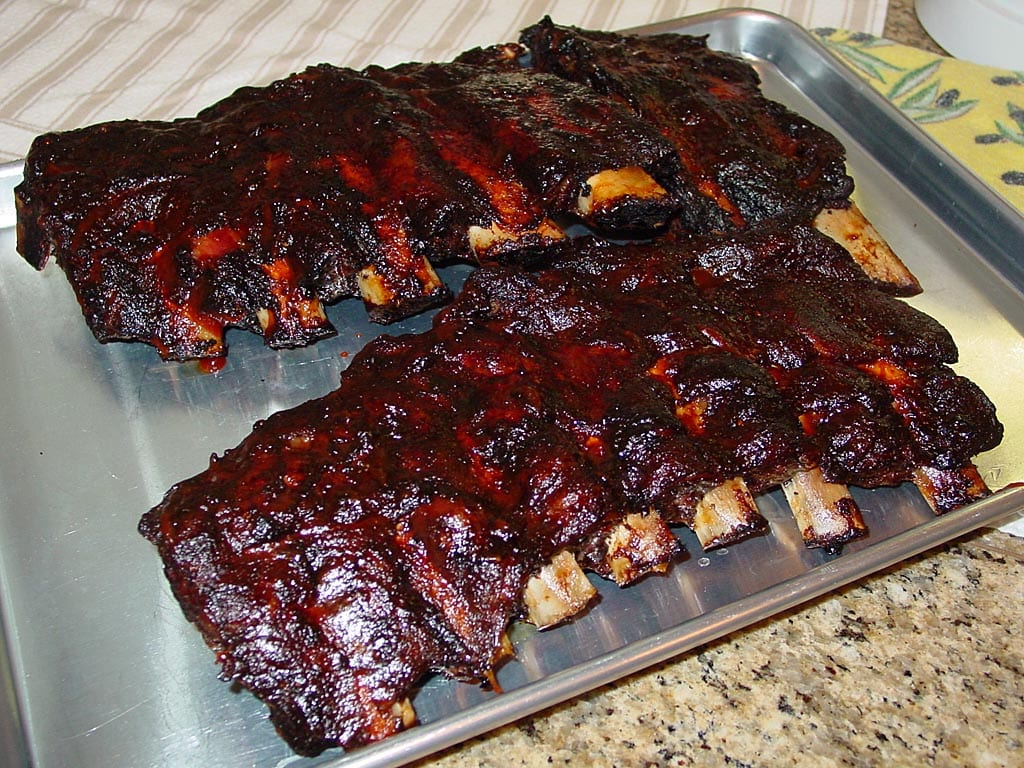
Rib Roast On A Stick
After cooking for 6 hours, I checked the ribs for tenderness by pulling on two adjacent bones. The meat offered just a little resistance before tearing easily, so I knew they were done.
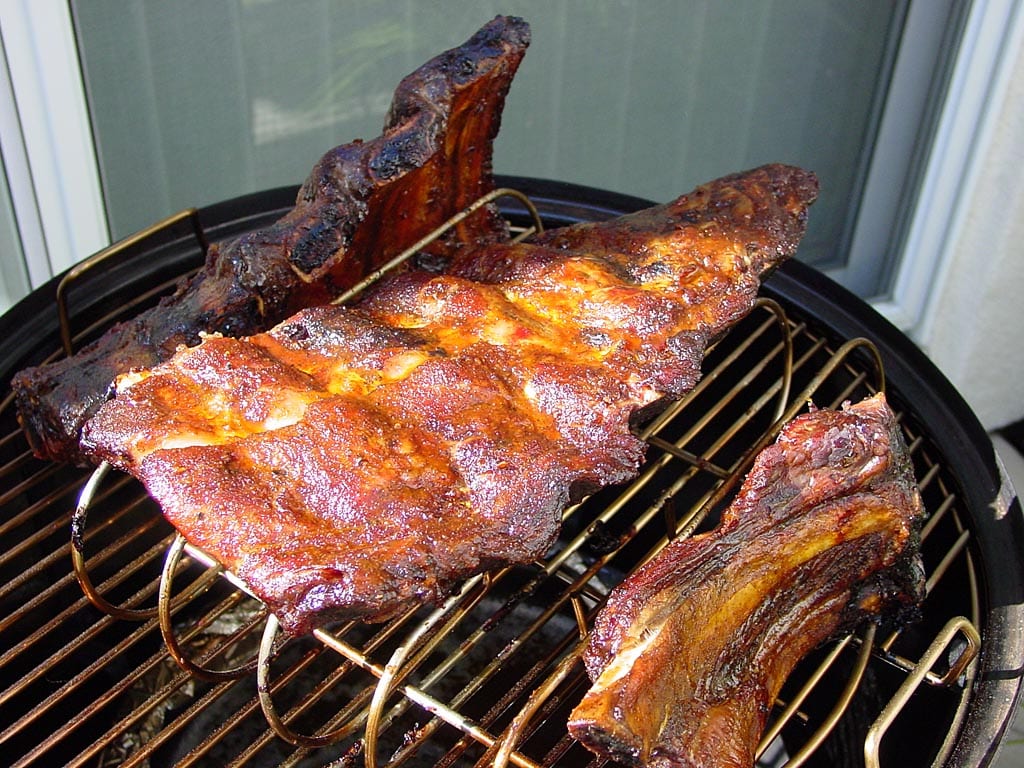
The ribs came out of the cooker and were basted with barbecue sauce (not the thinned mixture used earlier in the cook). Sorry I don’t have more photos of the finished product, but they were devoured so fast I was lucky to get this shot!
The ribs were tender, moist and succulent, and the seasoning and smoke were just right. The color was dark on the outside and brown on the inside with a moderate smoke ring, just like brisket. The ribs were very meaty and not at all fatty.
“Fabulous”, “far-out”, “rich”, “beefy”, and “satisfying” were but a few of the words used to describe these ribs. Perhaps most telling was the comment, “One of the best things you’ve ever made!”


