Summary
- Choose well-trimmed, USDA Choice tri-tip roasts.
- Season with a simple salt, garlic, and pepper rub shortly before cooking.
- Use oak smoke wood for authentic flavor.
- Cook at 350-375°F to an internal temperature of 125-135°F, depending on desired doneness.
- Finish directly over hot coals for 5 minutes to sear the meat.
- Remove to a foil-covered platter, let rest 10 minutes, and slice across the grain.
Tri-tip is a roast cut from the bottom of the sirloin primal. There is only one tri-tip per side of beef, a total of two per animal.
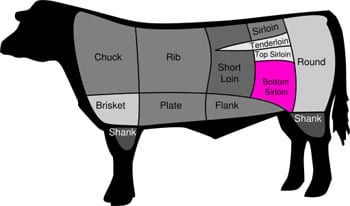
Diagram indicating tri-tip location
Tri-tip also goes by the name “bottom sirloin butt” and “triangle roast”, due to its triangular shape. In many parts of the country, your butcher will look at you funny if you ask for tri-tip…they have no idea what you’re talking about. Try taking this document titled Cuts From The Bottom Sirloin to your butcher and ask them to order or cut a tri-tip for you.
Tri-tip is nicely marbled, tender, and one of the most flavorful cuts of beef you’ll find. As a whole, untrimmed roast, tri-tip may weigh about 5 pounds.
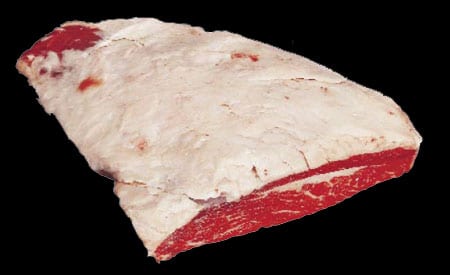
Whole, untrimmed tri-tip roast
The tri-tips you’re likely to find at the supermarket will weigh 1-1/2 to 2-1/2 pounds and measure 2-3″ thick.
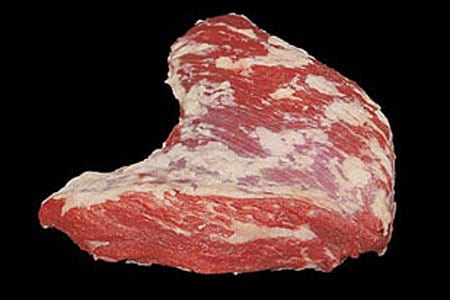
Trimmed tri-tip roast
In The Complete Meat Cookbook, authors Bruce Aidells and Denis Kelly write, “In the old days, when butchers cut their meat from the whole beef, they cut sirloins with the bone in, and the tri-tip portion, a triangular chunk of bottom sirloin, ended up as a nondescript part of sirloin steak. Nowadays the sirloin is boned out whole at the packing plant, and the two tri-tips are separated, boned, and sold to butchers whole, thereby creating a new and tender cut.”
Most tri-tip is shipped to the Western U.S. where it is very popular with consumers. Tri-tip is even included in some West Coast barbecue competitions as an optional category. It is often associated with California’s central coast region and the Santa Maria Valley in particular, where “Santa Maria-style” tri-tip is the meat of choice. In a tradition going back to the days of Spanish rancheros, the meat is heavily seasoned with salt, pepper and garlic, cooked slowly over a red oak fire, then sliced across the grain and served with fresh salsa, cooked pinquito beans, guacamole and warm tortillas.
I originally published this article in 1999, but have updated it based on a cook of two USDA Choice tri-tip roasts I did on August 29, 2003.
Prepping The Tri-Tips
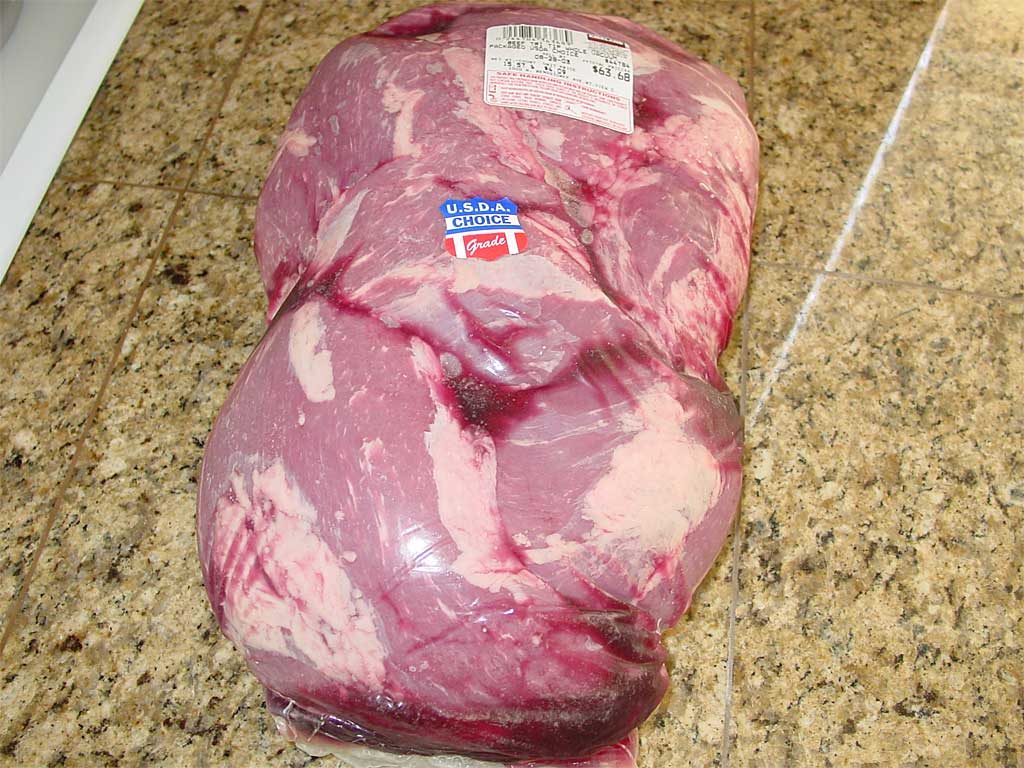
This photo shows a Cryovac of USDA Choice tri-tip roasts from a wholesale warehouse store. This package contained 7 roasts totaling 15.57 pounds. I cooked two roasts and vacuum-packed and froze the others.
This photo shows a typical tri-tip roast. You’ll notice that on the shorter side of the roast, the grain of the meat runs straight up and down, but on the longer side, the grain runs at an angle to the rest of the roast. You need to take this change of direction into account when slicing a tri-tip roast across the grain for serving.
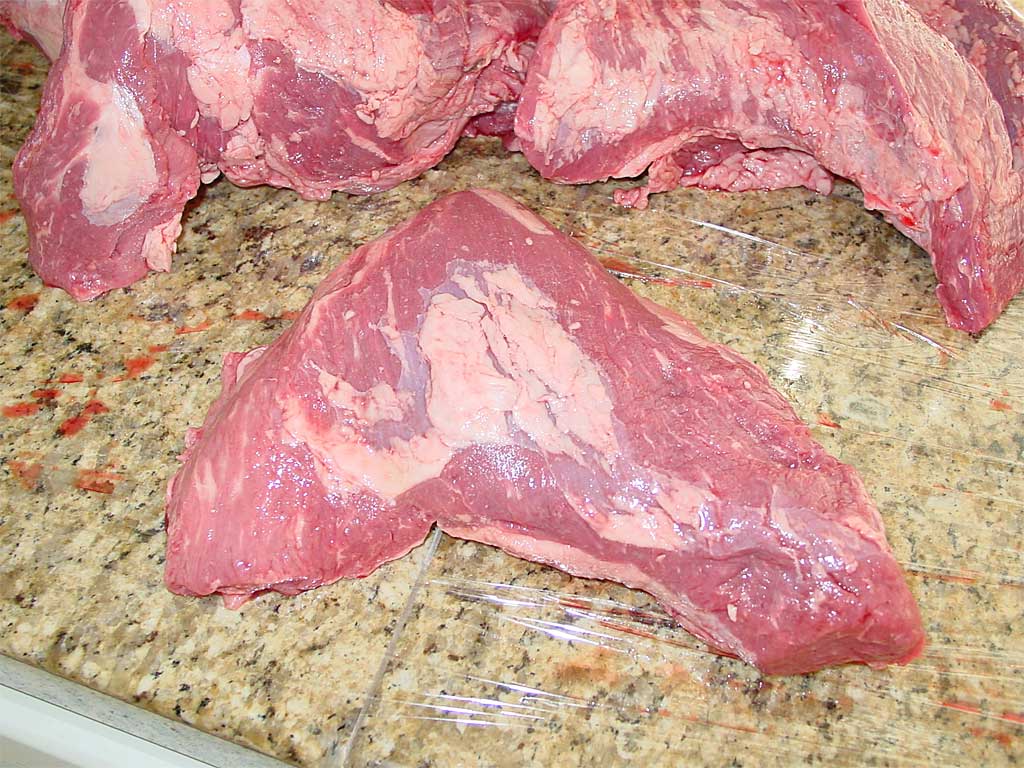
As you can see, these roasts come well-trimmed right out of the Cryovac, just the way I like them. They don’t require much, if any, prep. Simply trim off anything that doesn’t look appetizing and pat dry with paper towels.
A lot of tri-tip recipes call for an untrimmed roast with a thick fat layer on one side, and there’s the question of whether to start the roast fat-side up or fat-side down. Not only can untrimmed roasts be hard to find, but frankly I don’t think the fat adds anything to the cooking process. Tri-tip is not like brisket—it’s a naturally tender cut of meat that doesn’t require “low and slow” cooking and doesn’t need the protection of a fat cap. Since you’re just going to trim away the fat before serving, I think you’re better off using a well-trimmed roast.
If your tri-tips come with the fat layer intact, you can leave it as-is, or trim it to 1/4″ thick, or trim most of it off as you see here. If you leave the fat on, the only differences will be the length of cooking time and the amount of trimming you’ll have to do before slicing. And frankly, I don’t think it matters whether you start it fat-side up or down.
My favorite tri-tip seasoning is Susie Q’s Original Santa Maria Valley Style Seasoning, a blend of salt, garlic, black pepper, MSG, and parsley. If you can’t find this seasoning, make a simple rub using the same ingredients.
Tri-Tip Seasoning
- 3 Tablespoons non-iodized table salt
- 1 Tablespoon granulated garlic powder
- 1/2 teaspoon dried parsley
- 1/4 teaspoon black pepper, medium grind
- 1/4 teaspoon Accent (MSG)
Chop the parsley or crush it between your fingers to make it small enough to mix well with the other ingredients. Combine all ingredients and mix thoroughly.
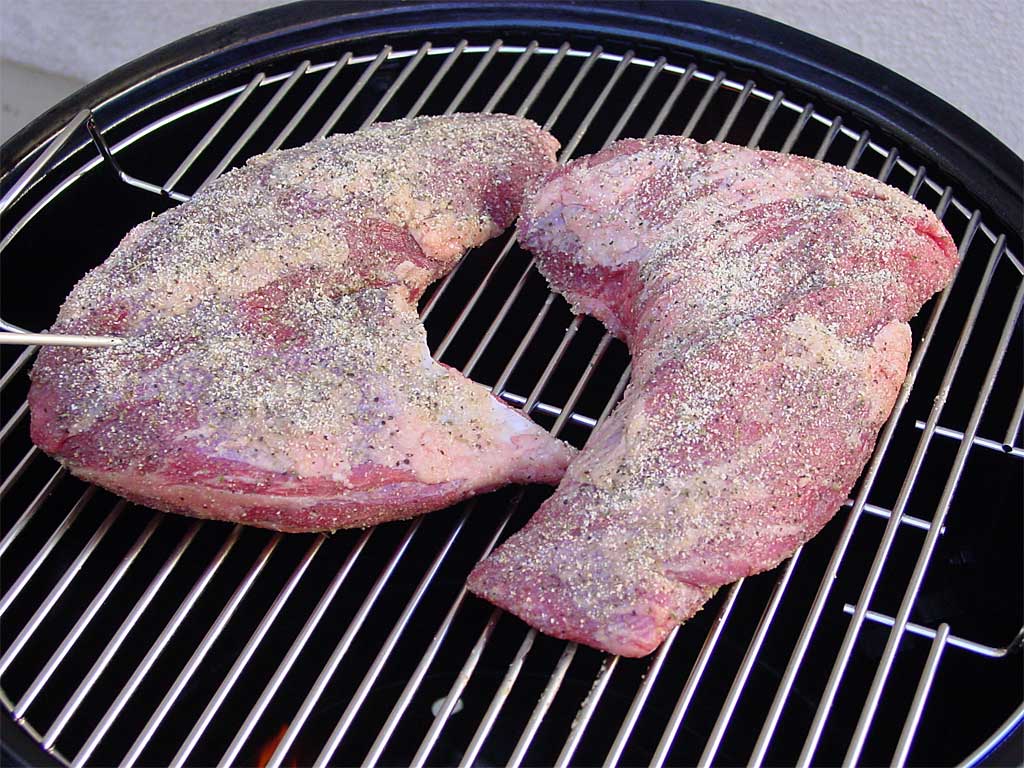
Pat the tri-tip dry with paper towels and apply a heavy sprinkling of seasoning all over the meat. There’s no need to do this hours before cooking—season right after you start the fire in the cooker and let the meat sit at room temperature until you’re ready to cook.
Use Oak Smoke Wood For Authentic Flavor
Tri-tip is traditionally cooked over red oak, but any variety of oak is an acceptable alternative.
My white oak chunks were kind of puny, so I used 2 handfuls, thinking that this would be equivalent to 2 large chunks.
There’s no need to soak the wood before putting it in the cooker.
Firing-Up The Weber Bullet
Fire-up the Weber Bullet using the Standard Method—light a Weber chimney starter full of Kingsford Charcoal Briquets, and when they’re good and hot, spread them out in the charcoal chamber and add another 1/2 chimney of unlit coals on top. When all the coals are covered with gray ash, put the smoke wood on the coals and assemble the cooker. Do not put the water pan into the cooker.
Open the top vent fully and leave it that way during the entire cook. Start out with all three bottom vents closed, but open them later as much as needed to maintain a cooking temperature of 350-375°F.
Allow smoke to billow from the cooker for about 15 minutes, then place the meat in the cooker.
Cooking Process Described
This photo shows two seasoned tri-tips on the upper grate. Note that the larger one has a probe thermometer inserted into the thickest part of the roast.
Adjust the bottom vents to maintain a cooking temperature of 350-375°F. Cook the meat on one side for about 20 minutes, then turn it over and cook to an internal temperature of 125-135°F, depending on the doneness you prefer.
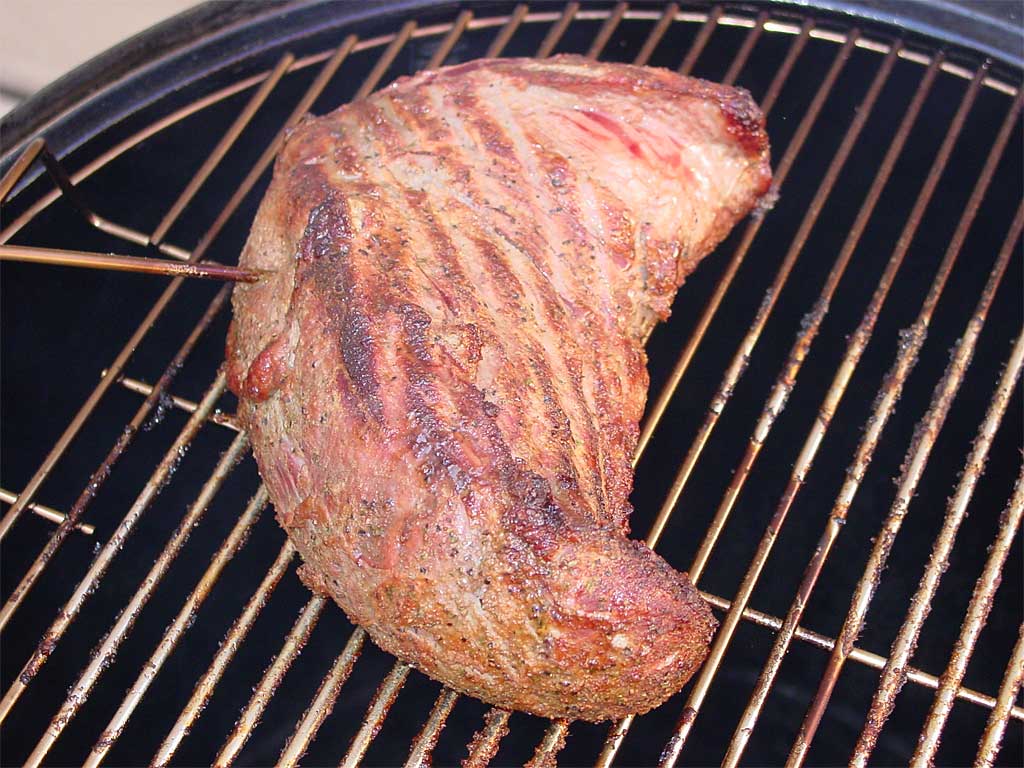
When the meat hits the target temperature, place the grate right over the hot coals in the charcoal bowl and sear the roasts for about 5 minutes, turning several times to ensure even browning.
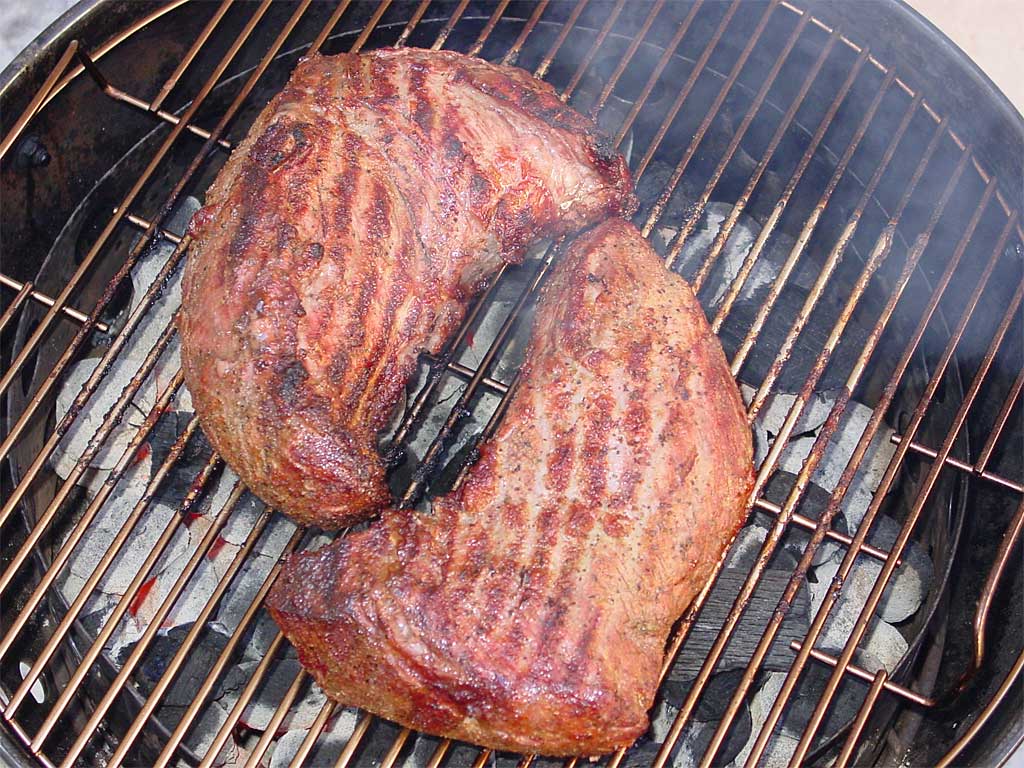
After searing, remove the meat to a rimmed baking sheet pan, cover with foil, and allow to rest for 10 minutes before slicing thin across the grain. See Letting Meat Rest After Cooking to understand the importance of this step.
Here’s how the temperature and vent settings went during this cook:
| Time | Lid Temp | Meat Temp | Vent 1 % | Vent 2 % | Vent 3 % |
| 8:45 am | – | 45 | 0 | 0 | 0 |
| 9:00 am | 340 | 71 | 100 | 0 | 0 |
| 9:05 am (t) | 335 | 82 | 100 | 0 | 0 |
| 9:15 am | 351 | 109 | 100 | 0 | 0 |
| 9:23 am | 374 | 125 | 100 | 0 | 0 |
(t) turned meat over and end-for-end
Note that the vent percentages represent the way I set the vents at the time indicated.
I wanted these roasts to end up medium-rare, so I chose 125°F as my target internal temperature. After a 5 minute sear and a 10 minute rest, they would achieve 135°F, smack-dab in the middle of the medium-rare range.
If you’re cooking two or more tri-tip roasts, it’s likely that the weight and thickness of each roast is different. Remember that smaller, thinner roasts will cook faster than larger, thicker ones. Check the internal temp in the thickest part of each roast using an instant-read thermometer and remove to a foil-covered rimmed baking sheet pan those that hit the target temperature. Let sit at room temperature until the larger roasts are done, then reunite all the roasts to sear over the hot coals.
If cooking on both the top and bottom grates, the roasts on the bottom will cook faster because they’re closer to the fire. Put the larger, thicker roasts on the bottom grate, the smaller, thinner ones on top. Monitor the bottom roasts carefully to avoid burning. As described above, check the internal temp of each roast and remove those that hit the target temperature early, then reunite all the roasts over the hot coals at the end.
If you cooked tri-tip roasts with the thick fat layer intact, trim off the fat before slicing.
Beef…It Satisfies!
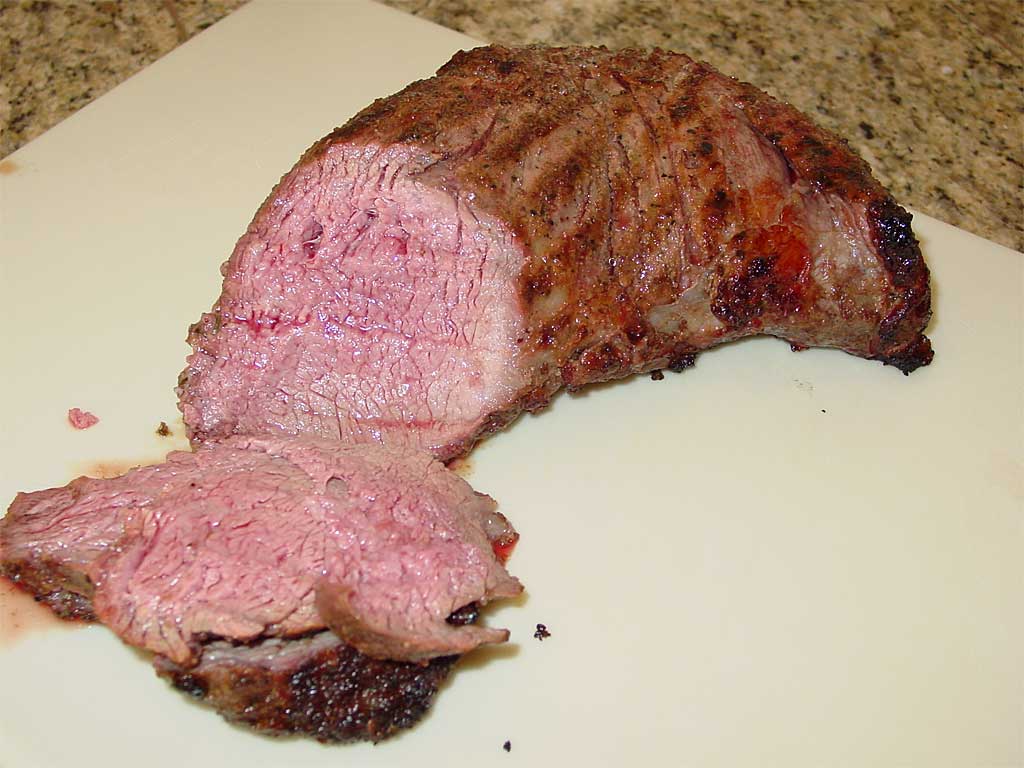 After a 10 minute rest, the meat measured 135°F, a perfect medium-rare. The exterior color of the tri-tip was reddish-brown with good grill marks. I sliced the roast across the grain and found juicy, tender pink meat with just a slight smoke ring. The meat had a medium smoky flavor that complimented the garlic and pepper flavor of the rub.
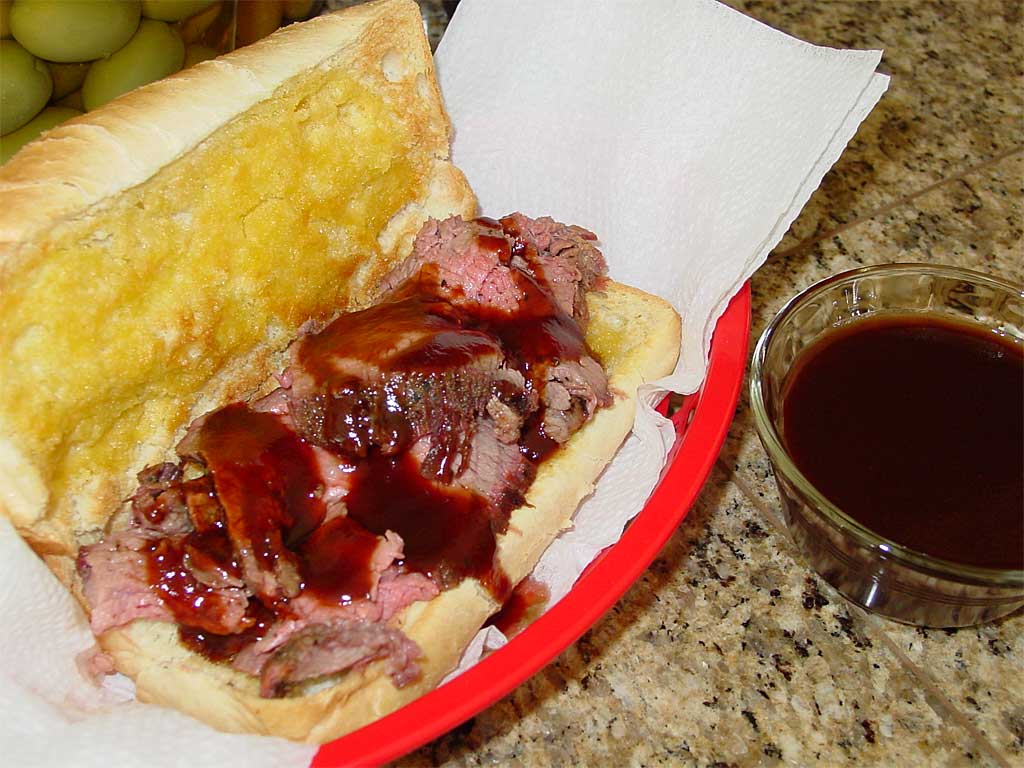
You can slice tri-tip and serve it on a plate with side dishes, but my favorite way to enjoy tri-tip is on a sandwich. Spread garlic butter on a sweet French roll and toast it under the broiler. Slice the tri-tip thinly across the grain, pile it high on the roll, and drizzle with a favorite barbecue sauce. Those are some good eats!
How To Carve A Tri-Tip Roast
Tri-tip can be tricky to carve because the grain of the meat runs in a couple of different directions. Here’s a video to help you understand the basics of carving tri-tip across the grain.
What About Cooking “Low & Slow”?
You can cook tri-tip “low & slow” at 250-275°F, if you prefer. Cook to the same internal temperature of 125-135°F and finish directly over the hot coals to sear the meat, as described above. It may take an hour or more for the meat to reach your target internal temp.
More Tri-Tip Links On TVWB
Bottom sirloin diagram: 2009 by JoeSmack from Wikipedia Commons
Photographs of sample tri-tip roasts: 2003 by USDA Institutional Meat Purchase Specifications


