Summary
- Buy the small end (ribs 10-12) of a USDA Prime standing rib roast.
- Have the butcher tie the roast, or tie it yourself at each bone.
- Leave the bones intact for better moisture retention and flavor.
- Apply herb paste and allow roast to sit at room temperature for two hours before cooking.
- Smoke at 325-350°F.
- Remove from cooker 5-10°F below the final internal temperature desired.
- Cover loosely with foil and let rest 30 minutes before carving.

Standing rib roast is a special treat that will impress your friends and family, and it couldn’t be easier to cook in the WSM. Best of all, you’ll achieve a smoky flavor that surpasses most of the prime rib you’ve ever eaten in restaurants.
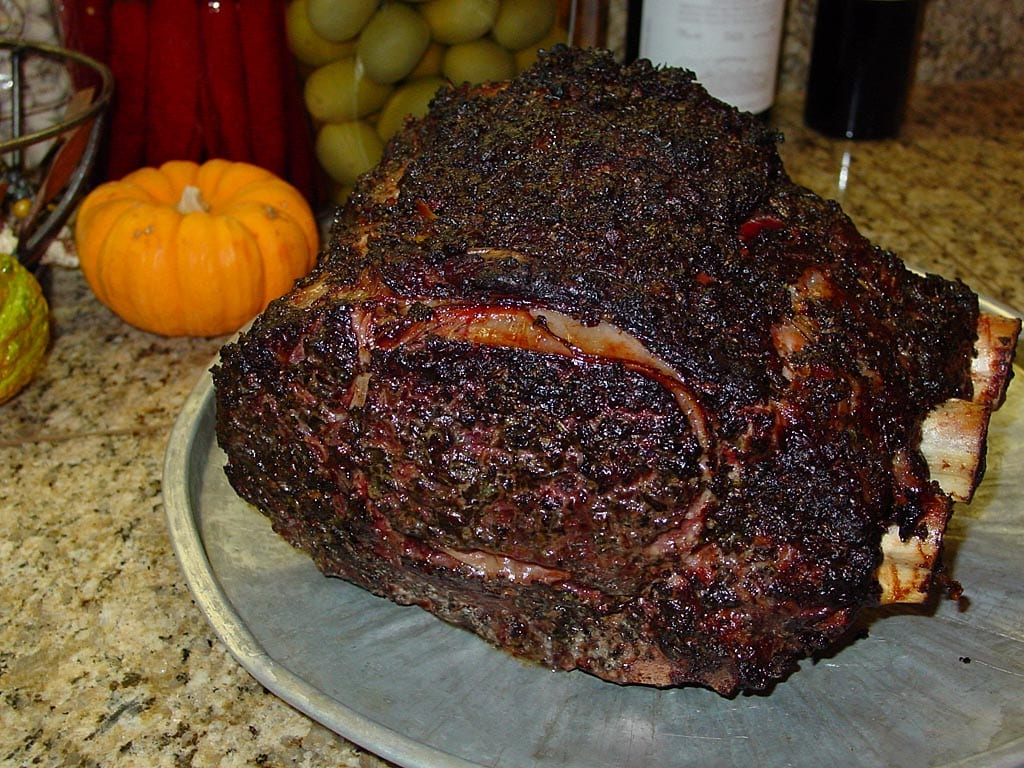
Here are some pictures I took when I prepared three-bone standing rib roasts using the Weber Bullet on November 25, 2000 and November 27, 2004.
Splurge On USDA Prime Meat
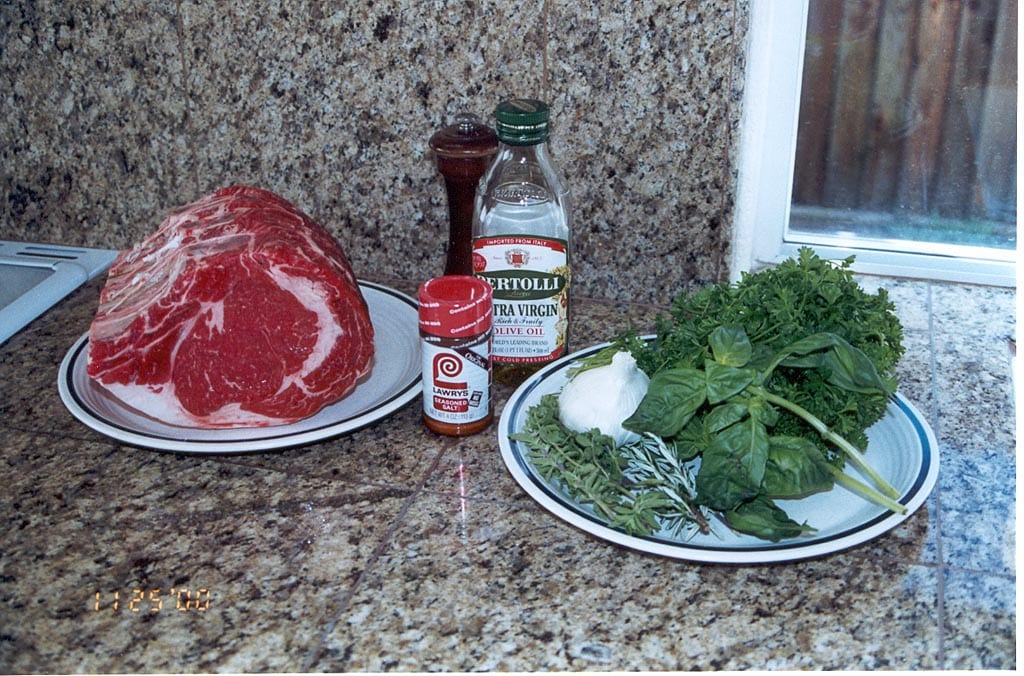
Buy a three-bone USDA Prime standing rib roast, preferably the “small end” (ribs 10-12). One advantage of buying such an expensive piece of meat is that it should already be trimmed and tied perfectly by your butcher, so there’s no prep to do when you get this beauty home.
At the time of this writing, it’s common to find USDA Prime rib roasts at wholesale warehouse stores like Costco, and at very reasonable prices, but these roasts tend not to tied.
This photo shows the 6.5 pound USDA Prime standing rib roast that I purchased from a high-end market. I was a bit disappointed that I couldn’t get a roast from the small end—this one was cut from ribs 6-8—but it was still very, very good.
- When buying a bone-in rib roast, figure on 1 to 1-1/4 pounds pre-cooked weight per serving.
- Buy a roast with the rib bones attached. They provide better moisture retention and flavor, act as a natural roasting rack, and are good to eat.
- After trimming fat (optional), tie the roast at each bone. This prevents the spinalis dorsi muscle, also known as the “rib eye cap”, from separating from the outer edge of the roast during cooking. Tying also keeps the roast in a round shape for more even cooking. Place the roast bone-side down. Cut a length of kitchen twine, loop it around the roast parallel to the first bone, bringing the two ends to the top of the roast. Pull snug and tie with whatever kind of knot you like, then repeat at each bone.
- Don’t bother cutting the ribs off and tying them back on before cooking. They’re easily removed once the roast is cooked.
To learn more about standing rib roasts, see the Standing Rib Roast Selection & Preparation article.
This video demonstrates how to tie a roast. Click on the video to play.
Prepare The Herb Paste
I adapted this herb paste from a recipe in the Weber Grill Out Times newsletter, Volume 6, Issue 2 in Fall 2000. It makes a beautiful, dark crust on the prime rib as it cooks.
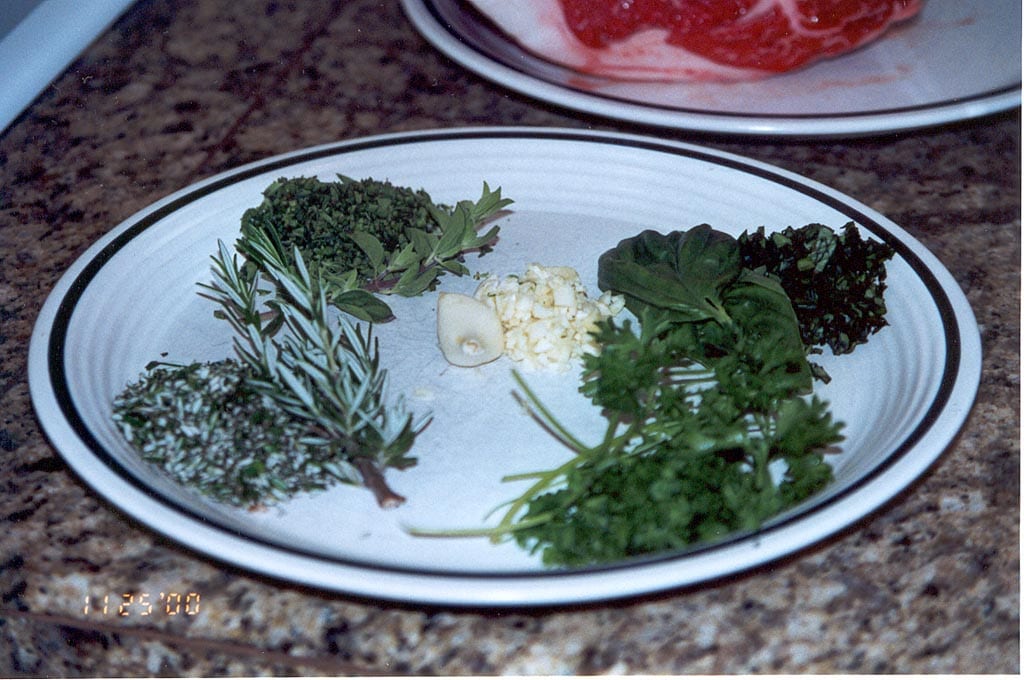 Make sure to use fresh herbs, not dry ones. I must admit that I don’t cook often with fresh herbs, and as I chopped these and smelled the strong aroma they produced, I wondered if they would taste too strong. Don’t worry, they won’t. The herbs and seasonings blend together and mellow during cooking in a way that’s really delicious.
Herb Paste For Standing Rib Roast
- 1 Tablespoon fresh garlic, finely chopped
- 2 Tablespoons fresh basil, finely chopped
- 2 Tablespoons fresh oregano, finely chopped
- 2 Tablespoons fresh Italian parsley, finely chopped
- 2 Tablespoons fresh rosemary, finely chopped
- 1-1/2 Tablespoons Lawry’s Seasoned Salt
- 1 Tablespoon freshly ground black pepper
- 4 Tablespoons olive oil
Mix all ingredients to make a paste.
Rub the paste over all surfaces of the meat, including on the ends of the roast and on the bones.
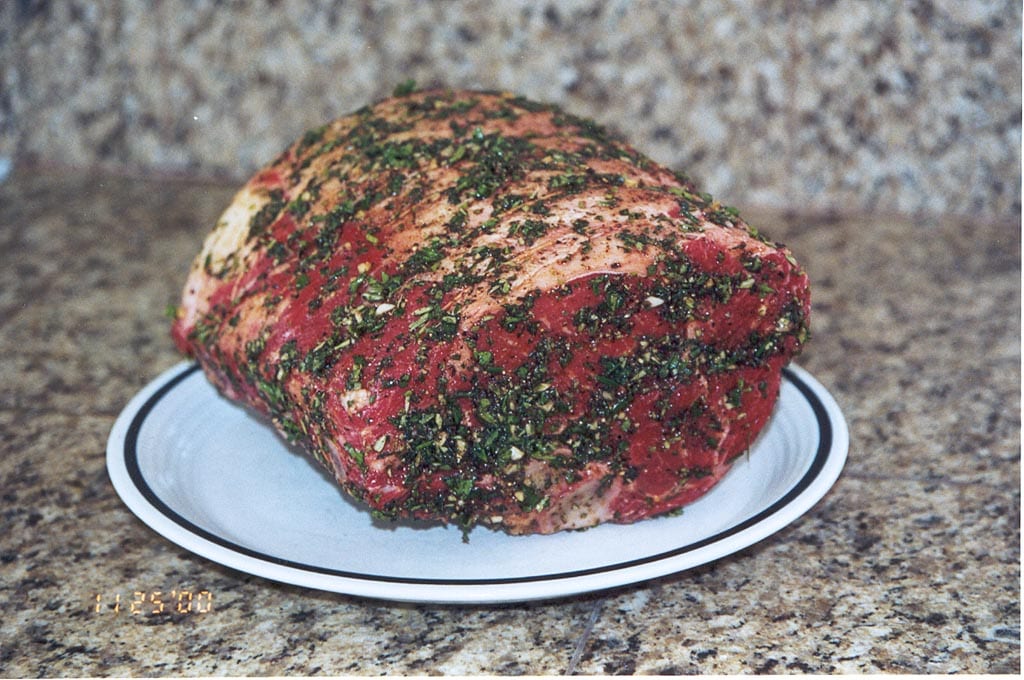
Cover loosely with plastic wrap and let sit at room temperature while you fire-up the cooker.
Select The Smoke Wood
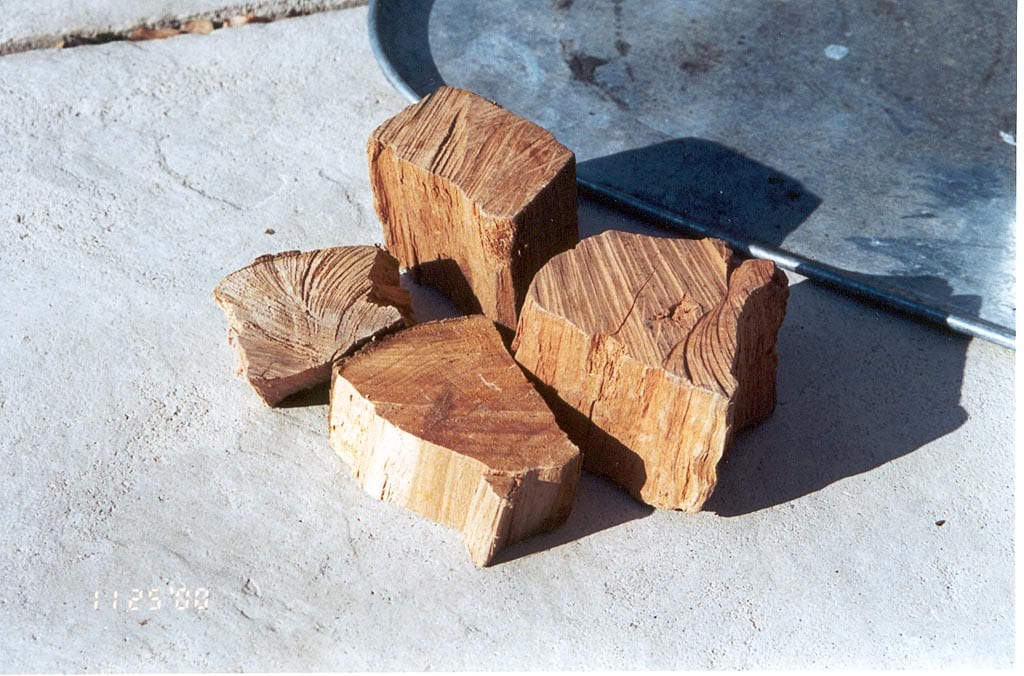
Given the cost of this meat, the last thing you want to do is ruin it by using a smoke wood that’s too strong or by applying too much smoke. I recommend that you use a mild fruit wood, and that you use it sparingly.
I chose modest-sized chunks of dry apple wood and cherry wood, two each. The dry wood provides a quick but effective burst of smoke during the relatively short cooking time of this roast.
There is no need to soak the wood or remove the bark before use.
Fire-Up The Cooker
Fire-up the cooker using the Standard Method—one full Weber chimney starter of hot Kingsford Charcoal Briquets in the charcoal bowl, followed by another full chimney of unlit Kingsford, allowing all coals to become fully lit before cooking.
If you have two chimneys, you can fill and fire both simultaneously.
Foil The Empty Water Pan
Cover the inside and outside of the water pan with wide, heavy duty aluminum foil. Place the pan inside the cooker, but leave it empty.
Smoke The Prime Rib
When all the coals are covered with gray ash, assemble the cooker and place the roast bone-side down on the top grate. Insert a probe thermometer in the center of the roast to monitor the internal meat temperature during cooking.
Place the lid on the cooker. Add the smoke wood to the hot coals.
Set the three bottom vents to 100% open. Open the top vent fully and leave it that way throughout the entire cook.
Adjust the bottom vents as necessary throughout the cooking process to maintain a temperature of 325-350°F measured at the lid.
Cook the rib roast to 5-10° below the final internal temperature you want to achieve. Residual heat in the meat will cause the internal temp to rise 5-10°F during a 30 minute rest after cooking.
There’s no need to baste or turn the meat during cooking.
I like my prime rib somewhere between medium-rare and medium—pink, but not bloody—so I picked 125°F as the internal temperature at which I would remove the roast from the cooker. After a 30 minute rest, I would expect it to reach a final internal temperature of 130-135°F. Going much beyond 135°F risks overcooking the roast, so be careful if you do.
If you want rare prime rib with some medium-rare and medium meat on the ends, remove the roast from the cooker at 115°F so it will reach a final temperature of 120-125°F after the 30 minute rest.
Before removing the roast from the cooker, double-check the internal meat temp by probing in several spots and averaging the results.
Estimated cooking time for a 3-bone rib roast is 13-18 minutes per pound (this roast took about 18 minutes per pound).
There’s no need to turn or baste the roast during the cooking process.
Here’s how the cooker temperatures and vent settings went during my cook on November 27, 2004.
| Time | Lid Temp | Meat Temp | Vent 1 % | Vent 2 % | Vent 3 % |
| 2:45 pm | 400 | 52 | 100 | 100 | 100 |
| 3:00 pm | 382 | 61 | 100 | 100 | 100 |
| 3:15 pm | 365 | 68 | 100 | 100 | 100 |
| 3:35 pm | 366 | 77 | 100 | 100 | 100 |
| 3:45 pm | 363 | 87 | 100 | 100 | 100 |
| 4:00 pm | 360 | 96 | 100 | 100 | 100 |
| 4:15 pm | 360 | 105 | 100 | 100 | 100 |
| 4:30 pm | 360 | 117 | 100 | 100 | 100 |
| 4:45 pm | 360 | 126 | 100 | 100 | 100 |
Note that the vent percentages represent the way I set the vents at the time indicated.
Rest, Carve & Serve The Roast
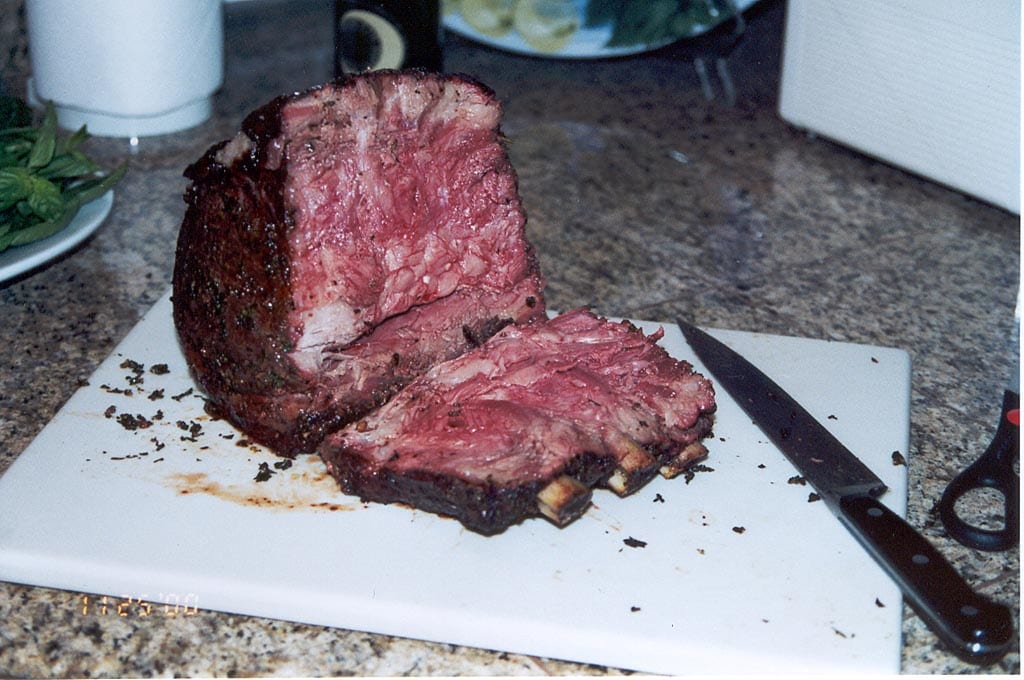
Place the roast on a rimmed baking sheet pan, cover loosely with aluminum foil, and let rest 30 minutes before slicing. This allows the meat to finish cooking and for the juices to redistribute and stabilize within the roast.
Alternatively, you can hold the roast at serving temperature for up to an hour by wrapping it tightly with two layers of foil and placing it in an empty cooler.
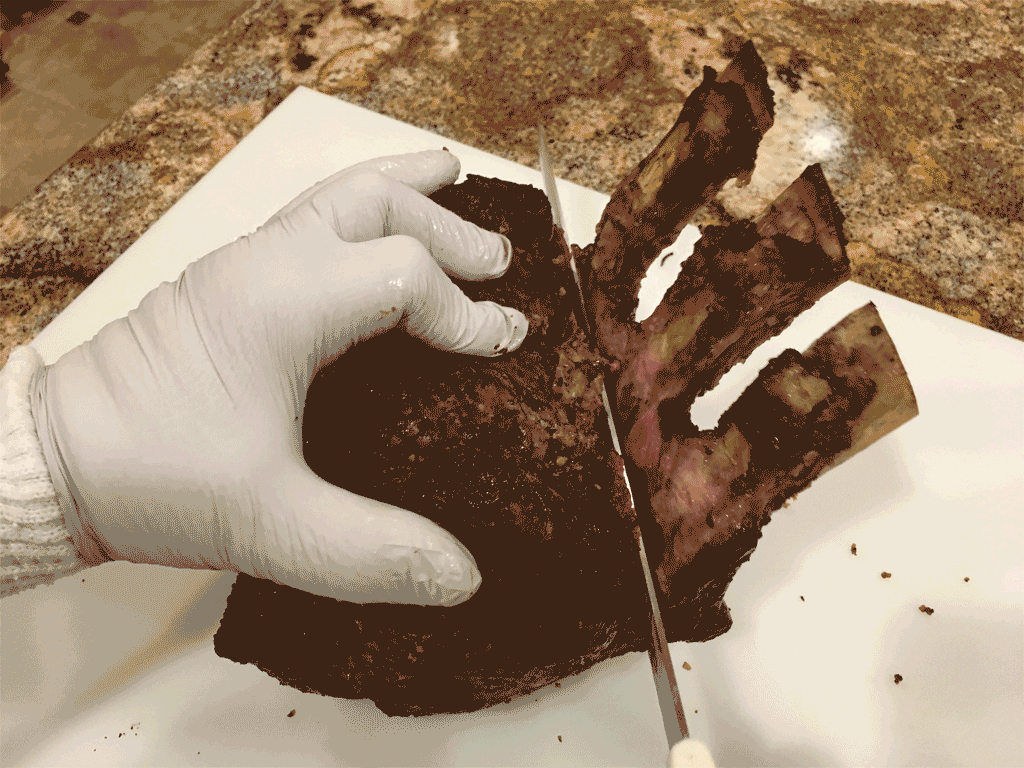
To carve, remove the twine and roll the roast onto its side so the bones are pointing straight up. Using the bones as a handle, cut downward close to the bones using a sharp boning knife or an electric carving knife to remove the bones. Click here to see the cutting process as a GIF.
Next, place the roast flat on the cutting board and carve slices 1/2″ thick or to your liking. Cut the bones into individual pieces and serve them along with the roast…or save them for yourself!
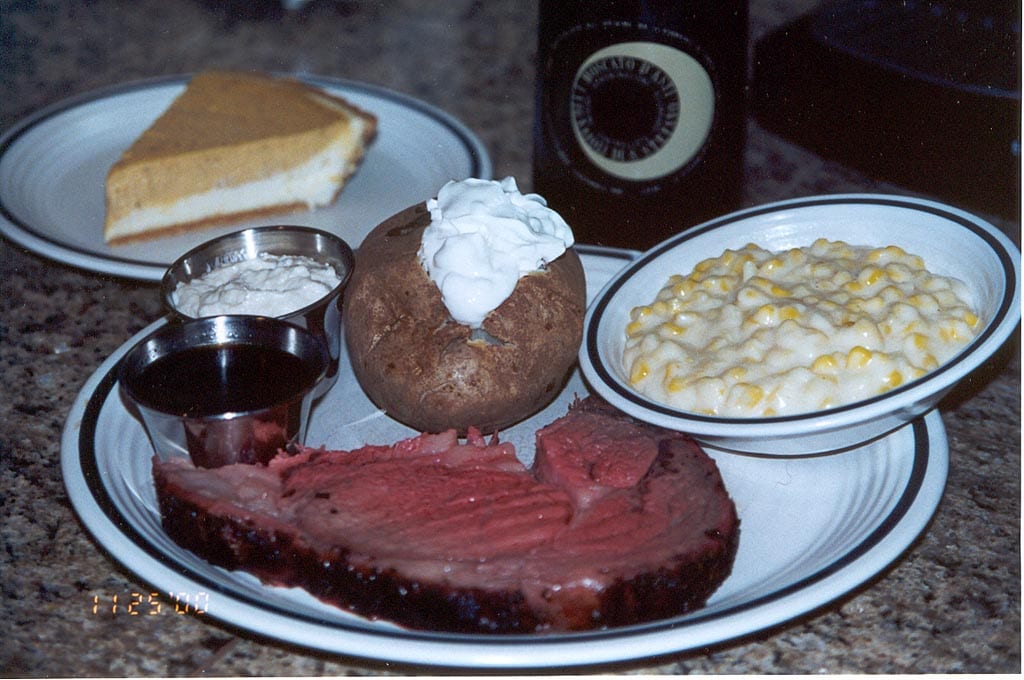
I cut thick slices for dinner and served them with a baked potato, creamed corn, au jus and creamy horseradish sauce on the side, and a slice of pumpkin cheesecake for dessert.
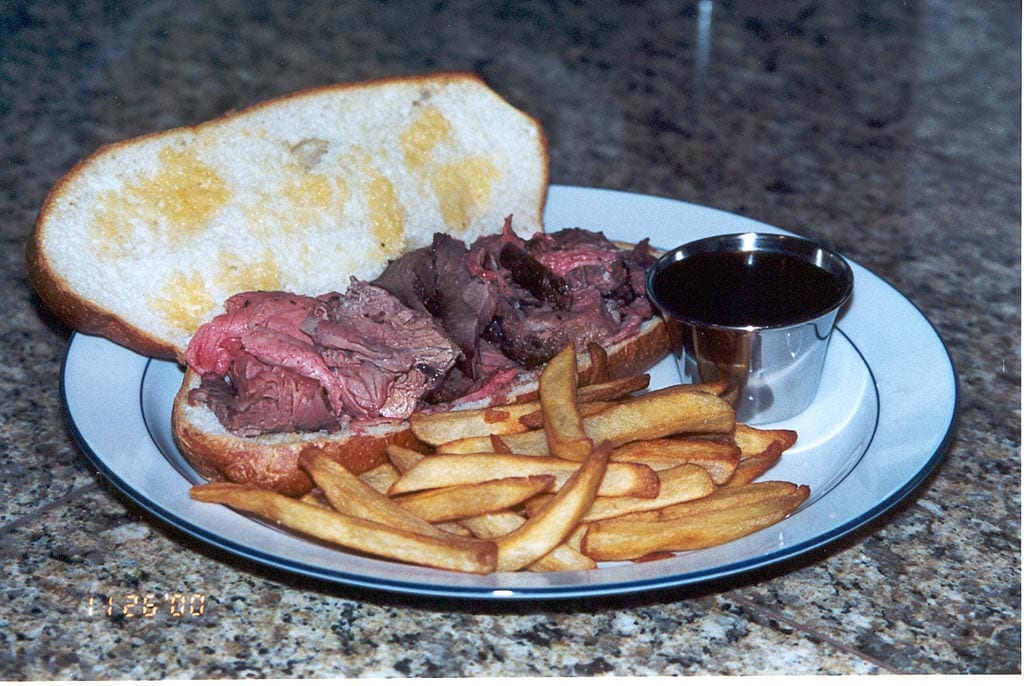
There were plenty of leftovers for prime rib sandwiches served on garlic butter toasted rolls with fries and au jus on the side (I use Lawry’s or Knorr au jus from a packet).
My cooking log notes that the meat looked beautiful, juicy, and well-roasted, with a thin, pink smoke ring around the edge. The herb paste formed a dark crust that looked very appetizing. The aroma was rich and beefy, and the herbs and garlic mellowed nicely during cooking. The meat was extremely tender, as you would expect from USDA Prime meat, and tasted delicious with a great smoky flavor I’ve never experienced in prime rib before. The apple and cherry smoke wood was not too strong, but not too subtle—it was just right.
More Standing Rib Roast Links On TVWB
- Standing Rib Roast – Montreal Rub
- Standing Rib Roast – Dry Aged
- Standing Rib Roast – Salt & Pepper
- Standing Rib Roast Selection & Preparation
 Herb & Spice Storage
According to Penzeys Spices, there are no set rules on how long herbs and spices stay fresh. U.S. Government guidelines for freshness dating are 4 years for whole spices and 2 years for ground spices. Many cooking authorities say that 6 months is the maximum for spice freshness.
Penzeys points out that since most spices are harvested only once a year, it doesn’t make sense to throw away all your spices after just 6 months. However, they feel that 2 years is too long to hold spices. Their suggestion: buy no more than a 1 year supply of herbs and ground spices, and a 1-2 year supply of whole spices.
Spices should be stored properly to protect their flavor. Heat, light, moisture and air are the enemies of fresh spices. They should be held in airtight containers in a dark, cool cupboard or drawer. Glass jars with tight fitting screw-on lids seem to work best, since many plastic bags are not truly airtight. Spices should not be stored near heat sources like the stove, oven, dishwasher, refrigerator, microwave, sink, a heater vent, or in direct sunlight.
What about storing spices in the refrigerator or freezer? Penzeys says that whole, crushed and ground chili peppers, including paprika, will stay fresh and colorful longer in the refrigerator, especially during the summer. With the exception of vanilla beans and extract, the flavor of spices is not harmed by cold storage. The only problem they cite is that cold jars form condensation when opened in a humid kitchen, causing the spices inside to get wet. Their solution: keep small quantities of spices in your cupboard and the backup supply in the refrigerator or freezer.
Penzeys says that spices don’t go bad, they just begin to fade away! When in doubt about a spice, give it a smell…if it smells strong and spicy, use it. Otherwise, throw it away.


