In This Topic
- Why Cold Smoking Is Difficult In The WSM
- Materials List
- Building The Cold Smoker
- Operating The Cold Smoker
- Cold Smoking Tips
- More Cold Smokers From TVWB Readers
Cold smoking is the process of applying smoke flavor to foods without cooking them. Depending on who you ask, cold smoking is said to occur at temperatures ranging from 80-100°F, but certainly no higher than 120°F. Cheese is ideally cold-smoked below 70°F, but certainly no higher than 90°F due to its tendency to melt. Besides cheese, other examples of cold-smoked foods include bacon, country ham, and even hard boiled eggs!
In the topic Smoked Cheese, I used a few charcoal briquettes and a single chunk of apple wood to cold smoke in the WSM. After watching two episodes of the television show Good Eats in which host Alton Brown cold-smoked bacon in a converted gym locker and hot-smoked salmon in a cardboard box, I got inspired to convert the WSM into a true cold smoker.
Using this setup, you can produce cold smoke at 80-90°F for hours on end. I know, it looks like a high school science project, but it really works!
Why Cold Smoking Is Difficult In The WSM
What makes cold smoking a bit difficult in the WSM is that 1) maintaining a small number of hot charcoal briquettes in the bottom of the cooker can be tedious, and 2) the small confines of the cooker make keeping the temperature below 80-90°F difficult.
The solution is to generate smoke in a separate chamber and pipe it into the WSM. This allows the smoke to cool before entering the cooker.
Materials List
Here’s the list of materials you’ll need for this project. You may already have some of these items in your garage or basement.
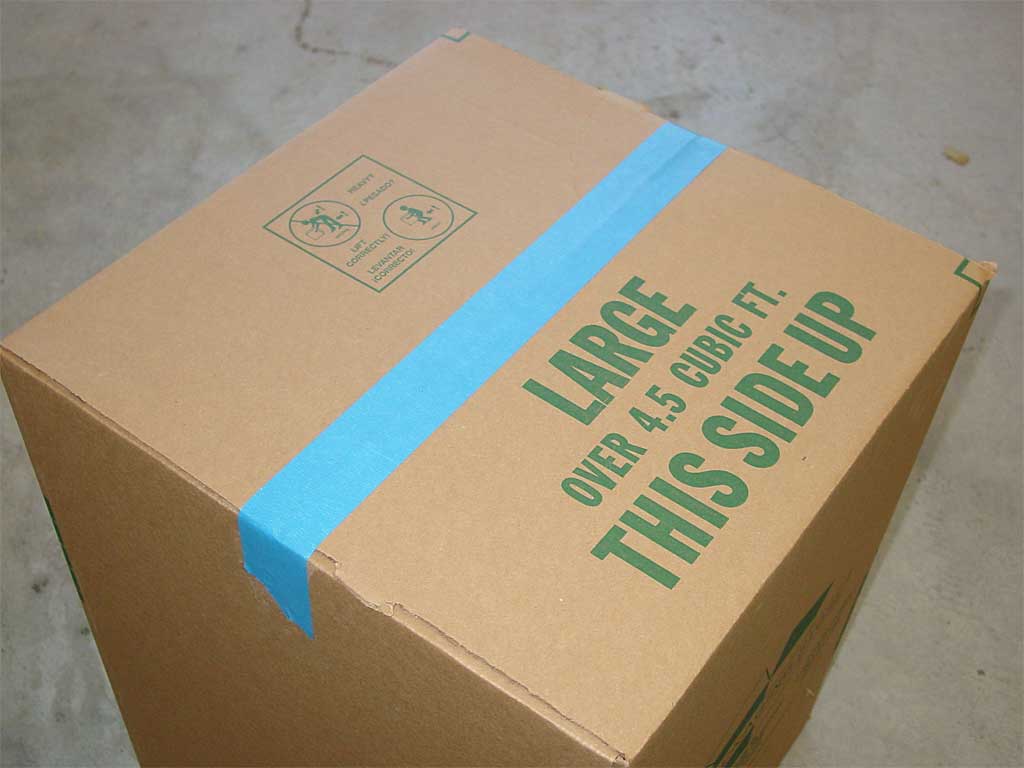
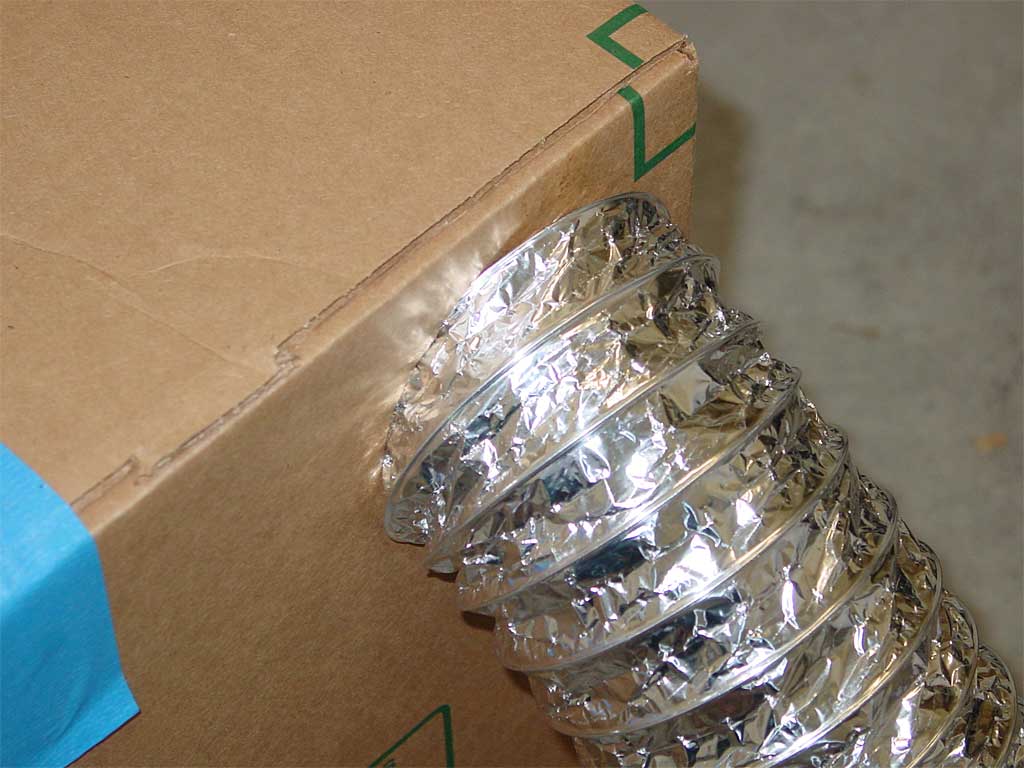
- Large cardboard box, at least 18″x18″x24″
- Piece of cardboard, at least 12″x12″
- Electric hot plate
- Small cast iron skillet or other metal pan or container for heating smoke wood
- Disposable aluminum pie pan
- Two 4″x5′ sections of foil duct tubing
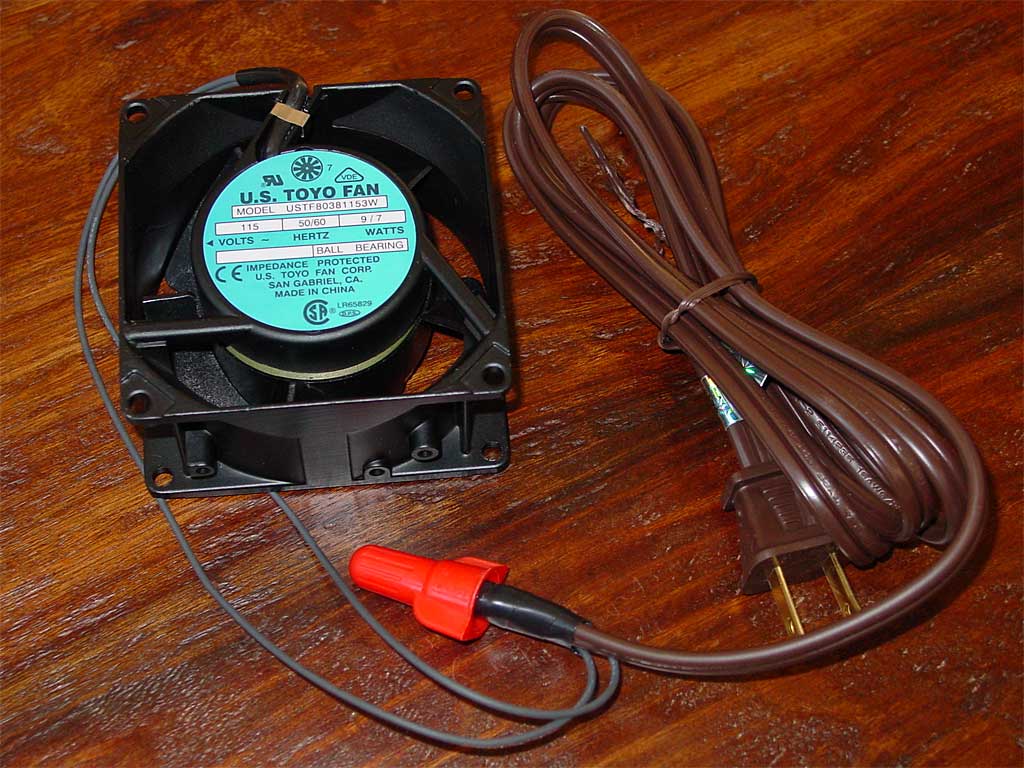
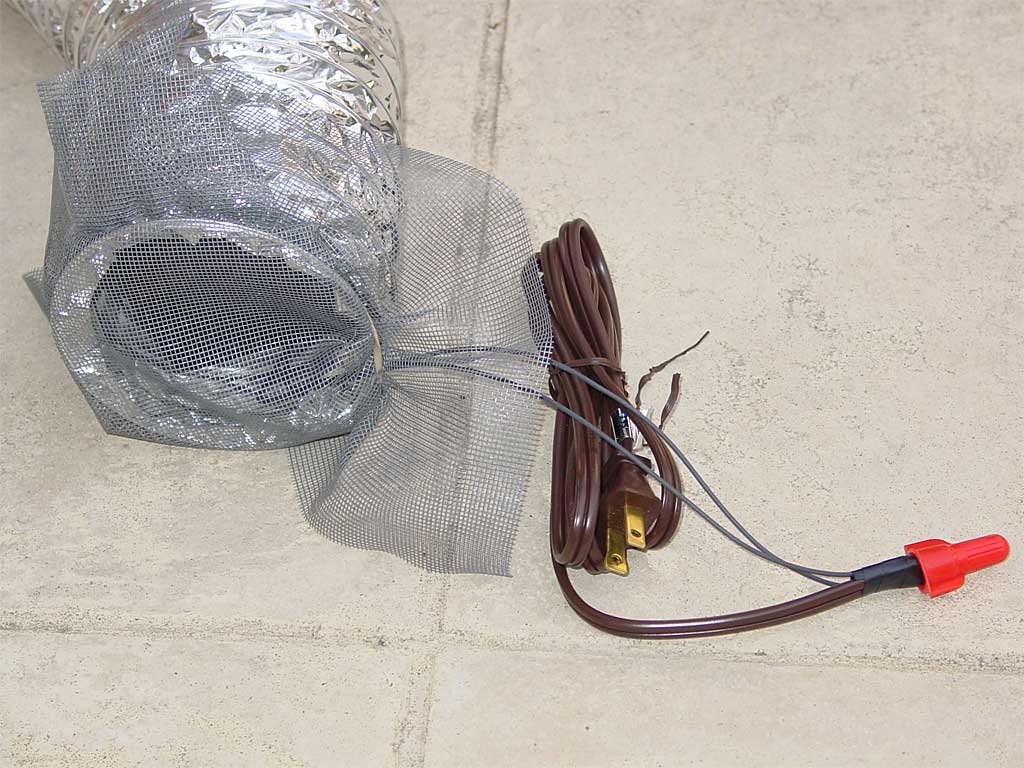
- 3-1/4″ square, 115V AC computer cooling fan
- Piece of screen door material, at least 12″x12″
- Rubber band
- Lamp cord with plug
- Large electrical connector nut
- Duct tape
- Electrical tape
- Wide, low-tack painter’s tape
The computer cooling fan will be inserted into the 4″ foil duct tubing, so the fan must be no larger than about 3-1/4″ square. The one I used measured 3.15″ square and cost $13.39 at a computer parts store.
The foil duct tubing cost about $10 at a hardware store. Avoid vinyl tubing, which is less expensive but has a strong plastic smell.
Building The Cold Smoker
- Setup the cardboard box, taping the flaps with wide, low-tack painter’s tape. Using low-tack tape will allow you to breakdown the box later with minimal tearing, so you can reuse it again and again.
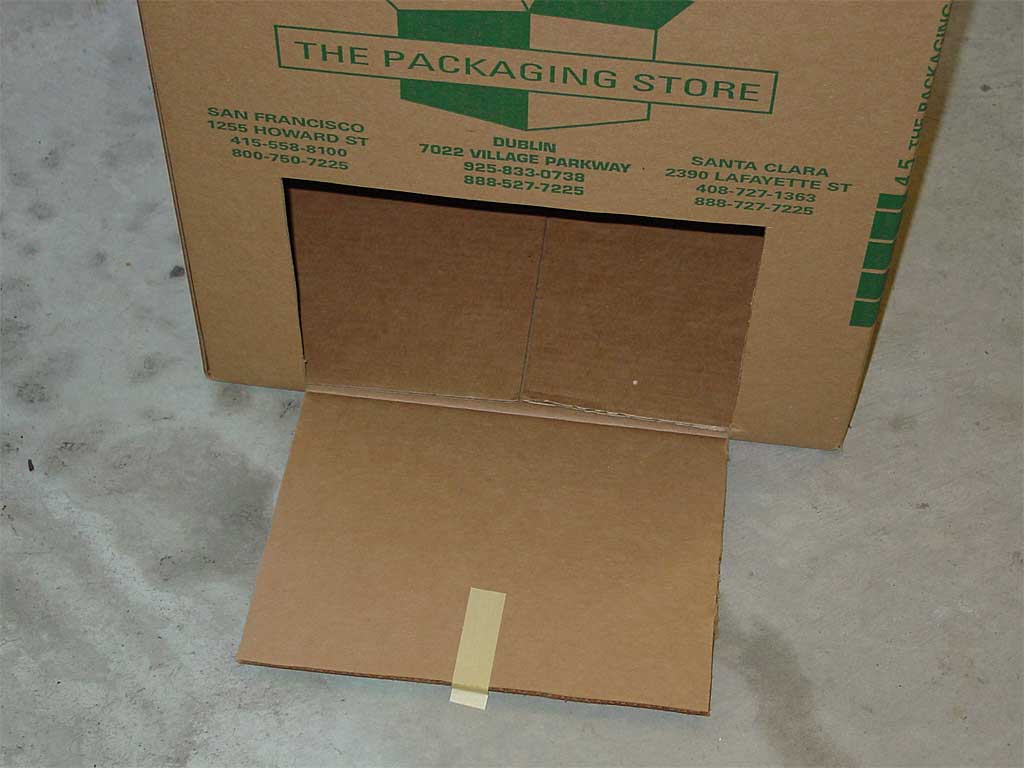
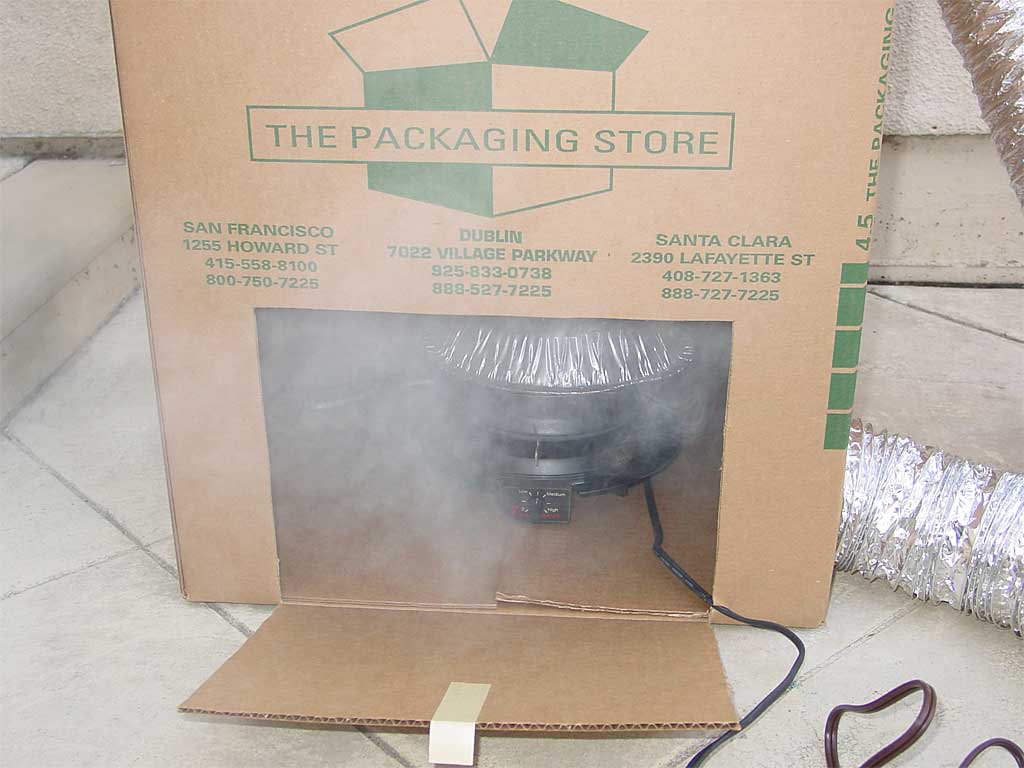
- Cut an access door at the bottom of one side of the box. Make the opening tall enough and wide enough so the hot plate with the cast iron skillet and aluminum pie pan on top will slide in and out easily. Make a “door knob” by sticking a length of tape to the inside of the door, letting the excess stick outside the box.
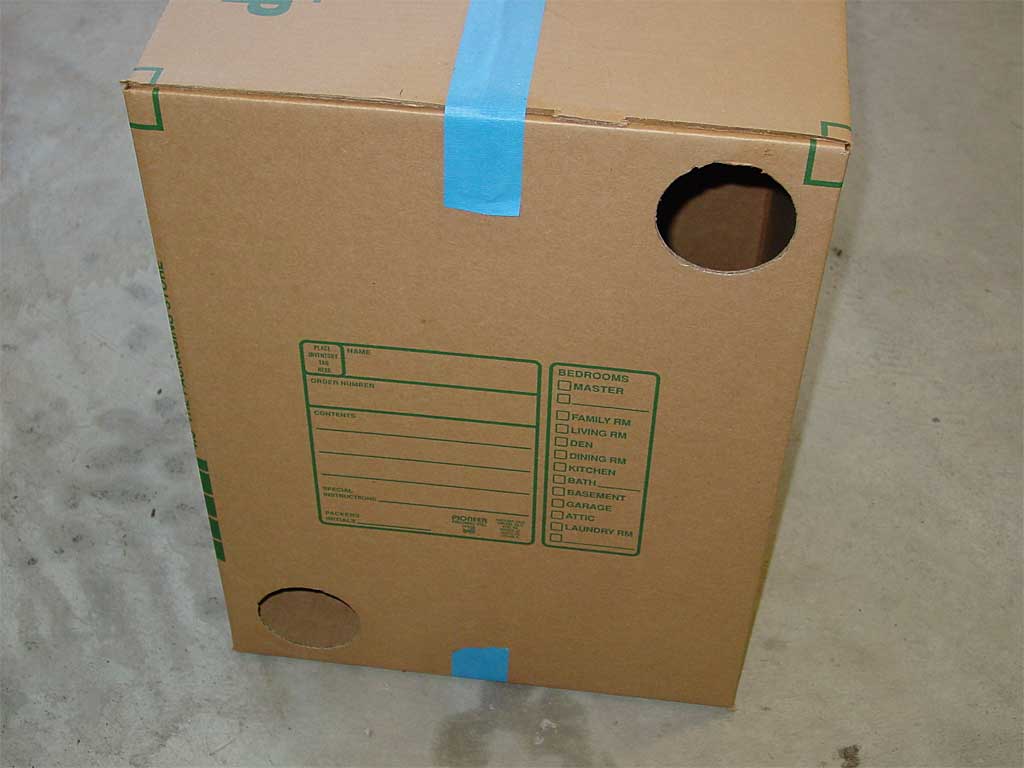
- Cut two 3-1/2″ holes in another side of the box. One hole should be located at the top of the box, the other at the bottom, and the two holes should be in opposite corners. I used a drinking glass measuring 3-1/2″ in diameter to trace the circles on the box.
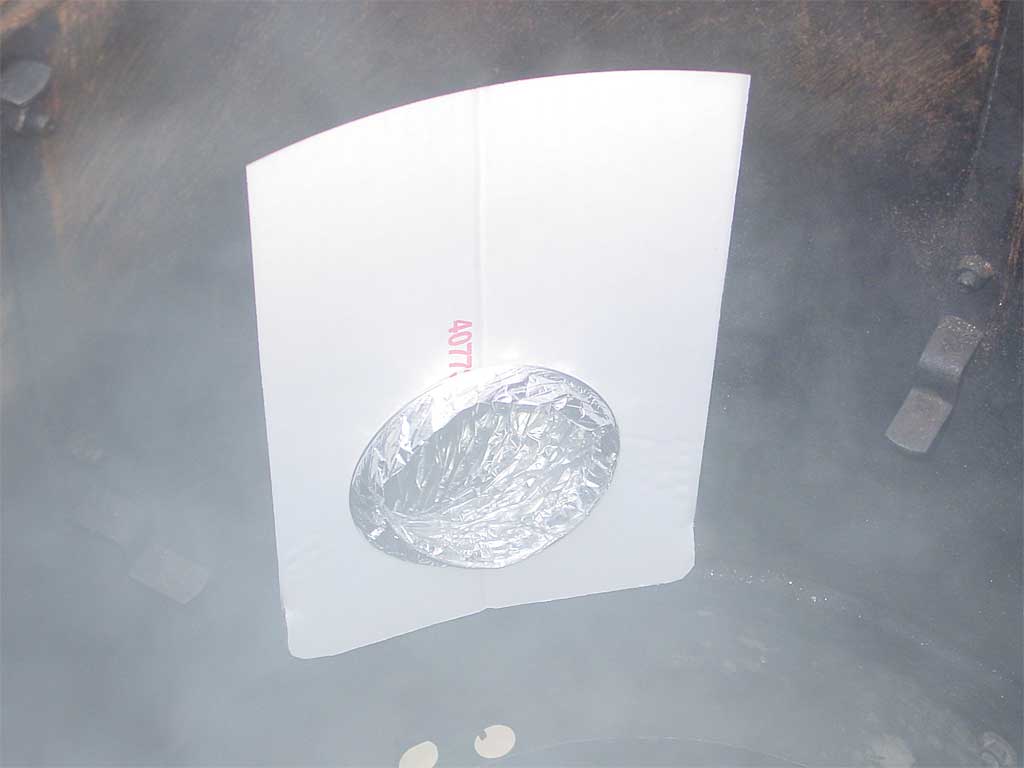
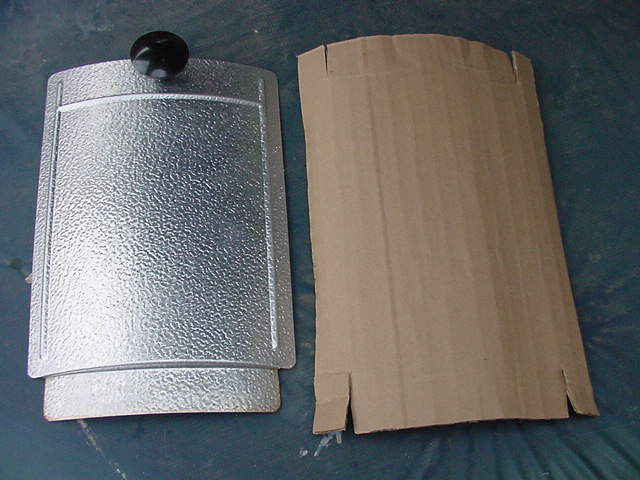
- Fabricate a cardboard access door for the WSM. Press a piece of cardboard against the inside of the WSM door so it conforms to the shape of the door and trace the outline of the door onto the cardboard and cut out the door. Next, cut a 3-1/2″ hole toward the bottom of the cardboard door. The hole must be above the notched area at the bottom of the door.

- Connect the leads from the computer cooling fan to the lamp cord. Wrap the connections with electrical tape and secure with an electrical connector nut.
- Cut an 18″ length of foil duct tubing. Insert the fan a few inches into the tubing. Test to make sure the fan is pushing air out the opposite end of the tube. Cover the intake end of the tube with screen door material and secure with a rubber band. The screen material prevent bugs and debris from being sucked into the cardboard box during operation.
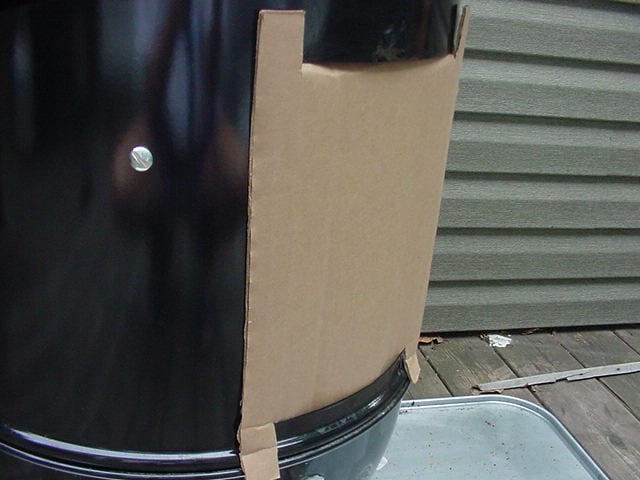
- Join the two remaining lengths of foil duct tubing together and secure with duct tape. Screw one end of the tube into the top hole in the cardboard box. The coiled wire rib inside the tube allows you to screw it right into the hole. Screw the other end into the hole in the cardboard access door. Insert the door notch into the opening in the middle cooking section and secure the door with a length of low-tack painter’s tape. Apply more tape around the edges of the door to prevent smoke leakage. Finally, screw the output end of the computer fan tube into the bottom hole in the cardboard box.
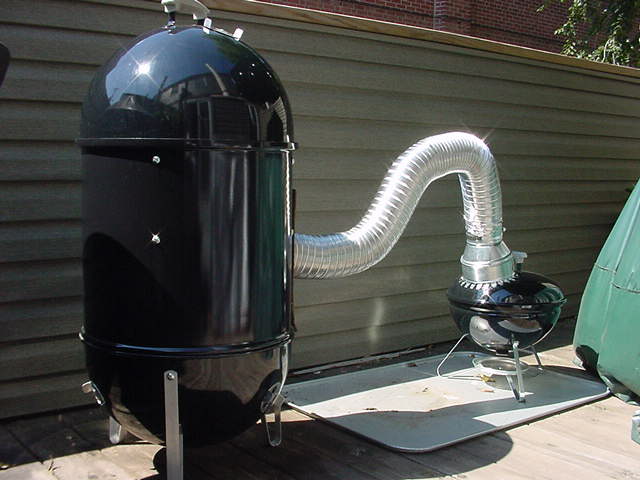
In this next photo, you can see the setup. The fan blows air into the bottom of the box, forcing smoke-laden air out through the top of the box. As the smoke travels through the foil duct tubing, it cools before entering the WSM.
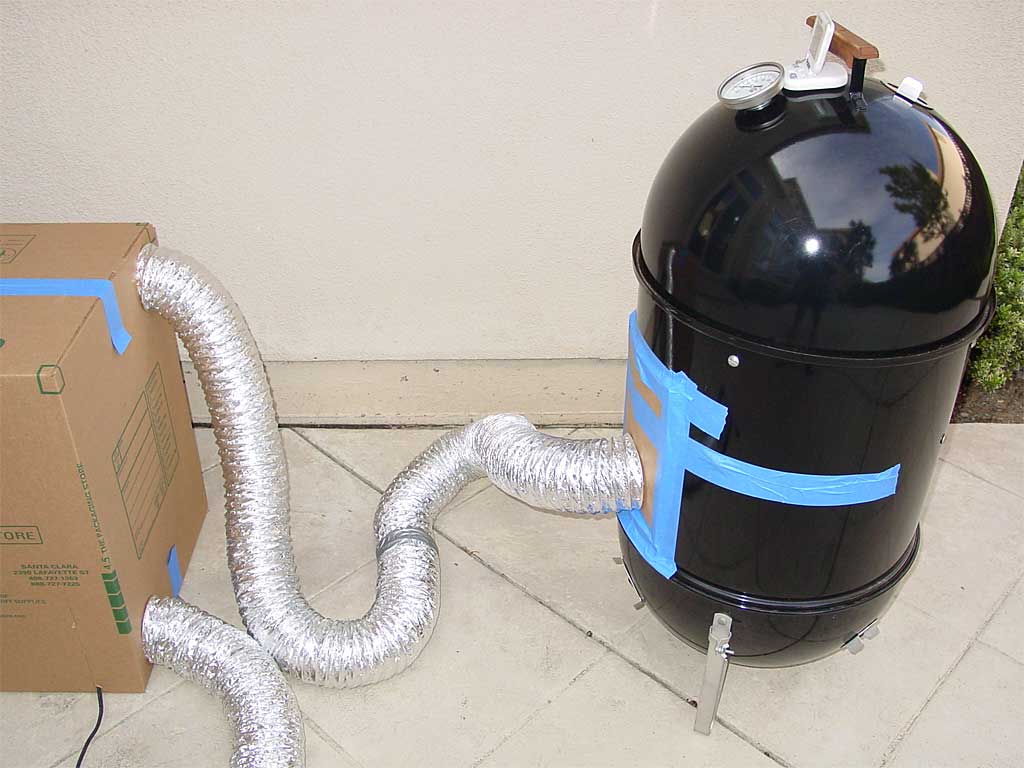
The reason I use the fan to push air into the box rather than pull air out of the box is so the smoke does not pass through the fan, potentially gumming up the motor.
Operating The Cold Smoker
I recommend that you run the cold smoker once without food to drive out any odors from the cardboard box and foil duct tubing.
For best results, operate the cold smoker in cold, breezy conditions. This is probably the only time you want to take advantage of the wind to suck as much heat as possible out of the WSM.
Also, remember that the WSM can reach temperatures well over 100°F when sitting empty in the direct sun, so keep the cooker in the shade when cold smoking. Better yet, do it at night.
Finally, stretch out the tubing between the box and the WSM as far as possible. The greater the distance the smoke travels before entering the cooker, the cooler it will be.
Here’s the process for operating the cold smoker:
- Place the cast iron skillet on the hot plate. Add the desired amount of dry smoke wood chunks, chips, or sawdust to the skillet. Poke a large number of holes in the bottom of a disposable aluminum pie pan and place it upside down on the skillet like a lid. The pie pan will (hopefully) prevent the smoke wood from bursting into flames and burning down the cardboard box. See the note below about having a fire extinguisher handy.

- Center the hot plate and skillet assembly inside the cardboard box. Turn on the hot plate to the highest setting and close the door. Plug in the fan to blow air into the box. After about 5 minutes, the box will begin generating smoke and the fan will push the smoke into the WSM.
- Set all WSM vents, top and bottom, wide open so smoke can circulate inside the cooker and then exit.
- Put the food to be cold smoked into the WSM. Place a probe thermometer in the cooker with the food to monitor temperature. Set the probe thermometer to alarm at 80-90°F.
- If the probe thermometer alarms, set the WSM lid ajar or remove it briefly to help lower the temperature. You can also try adjusting the hot plate to a lower setting that still produces smoke.
- Cold smoke the food for the desired length of time, removing ashes and adding more smoke wood to the pan, as needed. Note that the ashes are very hot, so handle and dispose of them carefully.
- Keep a fire extinguisher nearby at all times. Do not operate the cold smoker near any flammable materials.
Cold Smoking Tips
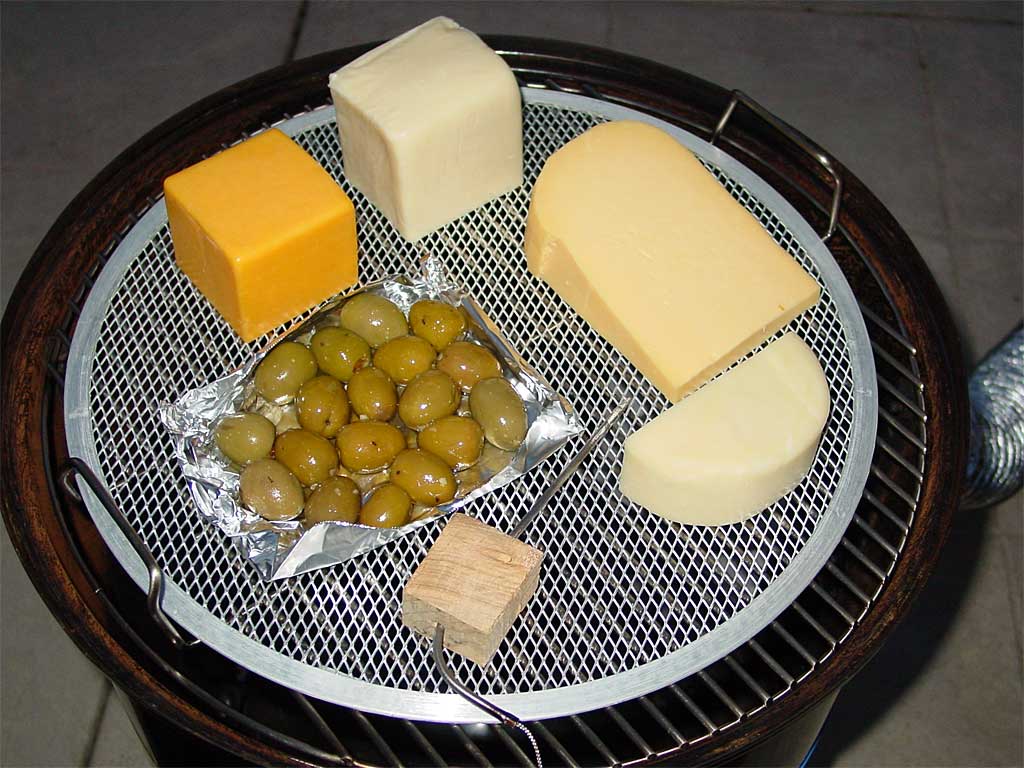
The foods you cold smoke in the WSM will taste stronger than the commercial products you buy at the supermarket. As a result, you should start by cold smoking for short periods of time using mild smoke woods. The cheese and green olives shown above were cold smoked for about 1 hour, and that was plenty of smoky flavor for me. Some folks will cold smoke cheese for up to 2 hours.
When cold smoking cheese, bring it to room temperature (68-72°F) before placing it in the smoker. This reduces the formation of condensation on the surface of the cheese. After smoking, vacuum seal the cheese and refrigerate for 2-4 weeks. This mellows the smoke flavor somewhat.
Mild woods like apple and cherry are ideal for cold smoking. Of course, alder would be a good choice for salmon or any variety of fish.
The amount of color you get on the surface of cold smoked foods will vary. You may get just a hint of color or you may get a more pronounced brown color, depending on the food and the type and amount of smoke applied. For cheese, it’s a good idea to turn it halfway through the process for even smoke flavor and color.
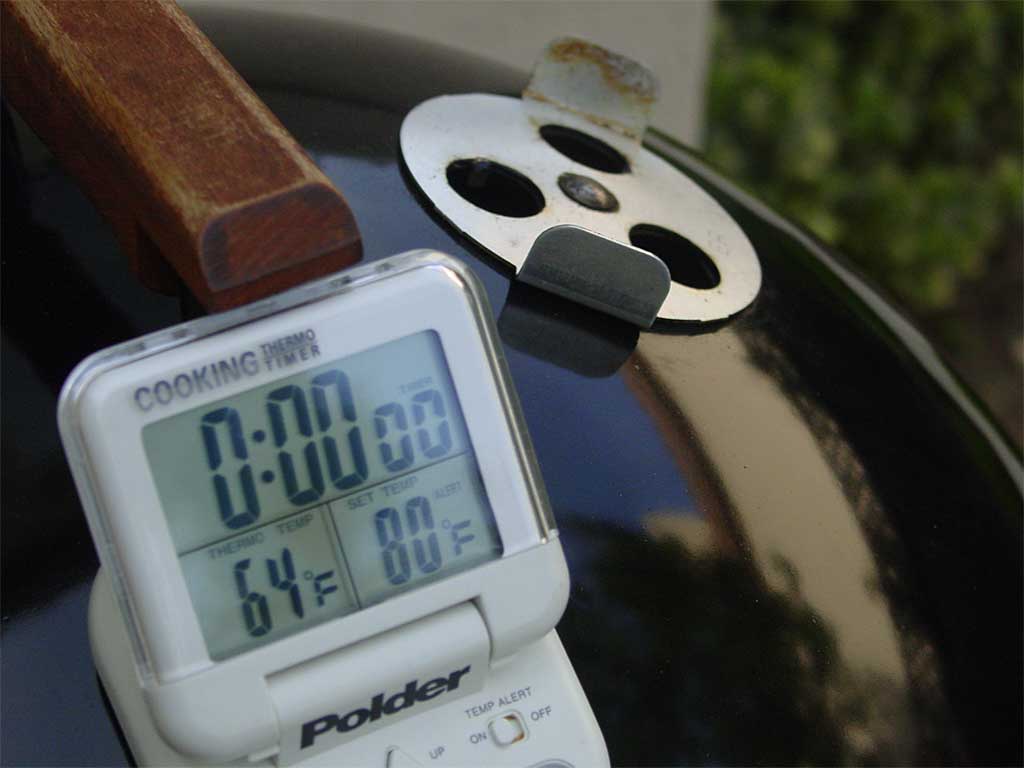
When cold smoking, a temperature below 70°F is best, but operating in the 80-90°F is fine. When I cold-smoked the cheese shown above, it was a cool, breezy evening and the cooker never went over 82°F. If the temperature rises above 90°F and you can’t get it down by manipulating the WSM lid or adjusting the hot plate, move the food into the refrigerator until you get the temperature under control.
My limited experience shows that using a single chunk of dry apple wood measuring 3″x3″x1″ will generate smoke for about 40-45 minutes.
More Cold Smokers From TVWB Readers
WSM / WSJ Conversion

Shao Lin shared this approach for converting a Weber Smokey Mountain Cooker and a Weber Smokey Joe (WSJ) into a charcoal-powered cold smoker.
Materials List
- Weber Smokey Joe (this is the firebox)
- 6″ HVAC duct starter collar
- 6″ to 4″ HVAC duct reducer
- #8-32 x 5/8 inch machine screws and matching nuts (16)
- Screw-tightened duct clamps (2)
- Metal duct for clothes dryer, 4″ diameter
- Dryer vent draft blocker
- Piece of cardboard
- Small metal drill bits or Unibit
The total materials cost is roughly $50 (not including the WSM or drill bits).
Assembly Instructions
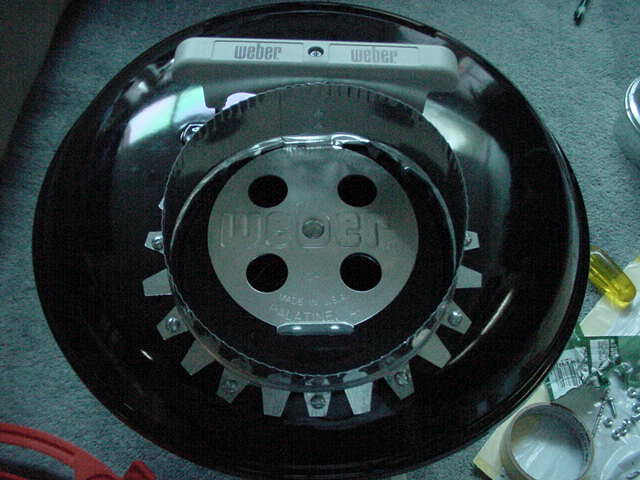
- Starting with the 6″ HVAC starter collar, bend all of the flanges outward.

- Drill a hole in every other flange big enough to accommodate a #8-32 screw.
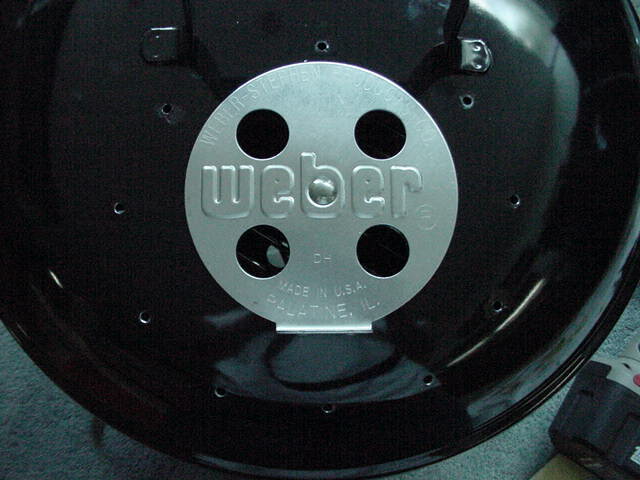
- Place the starter collar over the WSJ lid vent and adjust the flanges so they conform to the shape of the lid.
- Apply masking tape to the WSJ lid where the starter collar will be fastened. Trace an outline of the starter collar onto the tape and mark at each flange hole to be drilled.
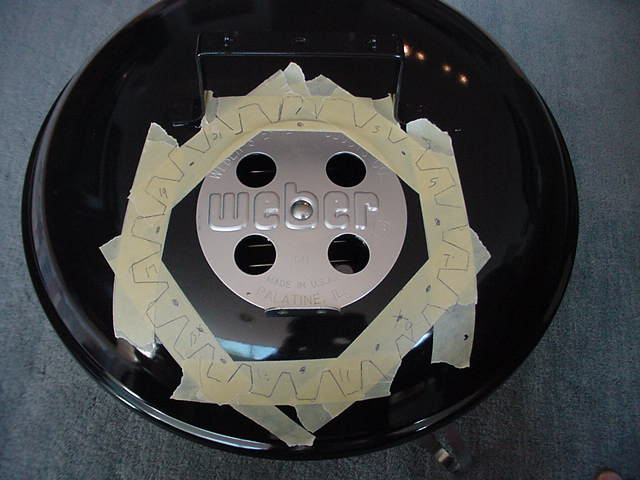
- Remove the lid handle to make room for drilling. Drill small pilot holes at each location, then drill to size to accommodate a #8-32 screw. Remove the masking tape (Photo 17).
- Attach the starter collar with the screws and nuts and replace the lid handle.
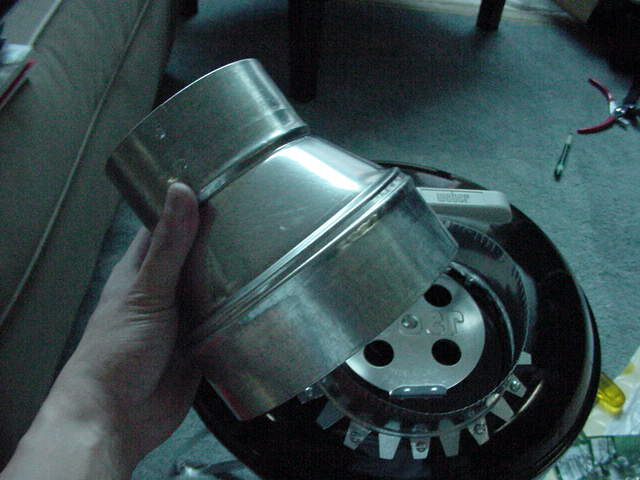
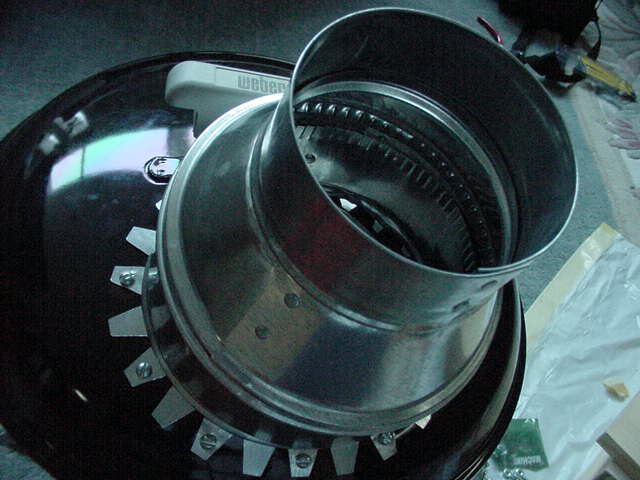
- Slide the 6″ to 4″ duct reducer over the starter collar. Attach one end of the metal duct to the duct reducer and tighten with a duct clamp.
- Measure a piece of cardboard the same width as the WSM access door but approximately 4 inches taller. Cut 2 slits, about 2″ long, at the top and bottom of the piece of cardboard, about 1-2″ inches from the outer edges. This piece should wedge into the access door opening and stay in place without tape.
- Cut a 4″ diameter hole in the center of cardboard. Attach the draft blocker to the hole using screws and nuts. Remove the flapper from the draft blocker—it should just pop out.
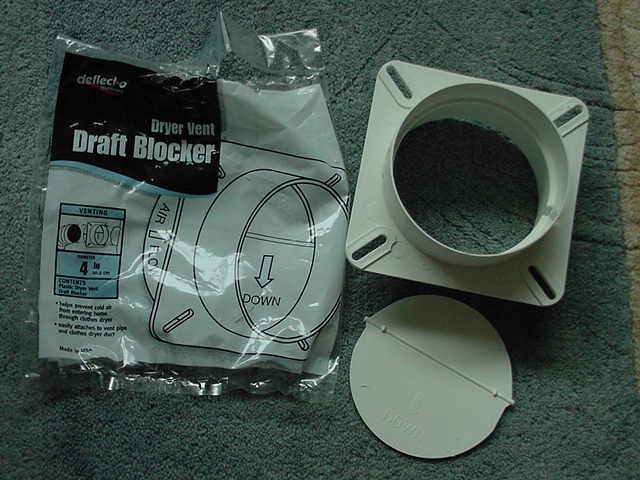

- Attach the other end of the metal duct to the draft blocker with a duct clamp.
Photos of WSM/Smokey Joe cold smoker conversion: 2004 by Shao Lin


