In This Topic
- Why Bake With The WSM?
- Things You’ll Need To Get Started
- Converting The WSM Into A Baking Oven
- Pizza
- Calzone
- Focaccia
- Kolach Bread
- Dough Options
- Making Pizza Dough With A Mixer Or By Hand
- Baking Tips
- More Resources
In May 2001, Dave Stamper sent me a bunch of photos and information about how he had perfected the art of baking pizza, focaccia, and other savory items using the Weber Bullet. “This will open up a whole new world for the owners of this cooker,” wrote Dave. “The WSM will bake bread just as well as cookers costing much more. I sure hope folks will try it…you haven’t lived until you try bread baked over lump or wood.”
It’s great information, and I want to thank Dave for taking the time to share his photos and baking expertise with The Virtual Weber Bullet and with all of you. Great job, Dave!
Why Bake With The WSM?
“The reason I decided to make this one of my winter projects is that I wanted a portable cooker that I could bake with”, says Dave. “It’s nice that a fellow can always find room in the camper for this fine little cooker, and in my opinion, there’s nothing better than bread baked over a lump or wood fire.
“The pictures make this task look pretty easy, but I tried many combinations to get it to work right and to bake pizza, bread, and calzone as well as my expensive wood-fired bread oven does. I’m proud to report that I have reached this goal even better than expected.”
Things You’ll Need To Get Started
Before you can start baking with your WSM, you’ll need a few items:
- Pizza Stone: a 14-15″ round baking disc, usually made of heavy ceramic, used for baking pizza and bread in the oven.
- BGE Grid Extender: a 15-1/2″ extension grate that attaches to a WSM cooking grate to increase cooking capacity. In this instance, the grid extender is used to elevate the pizza stone.
- Large Pie Pan: an 11-1/2″ wide, 2-1/4″ deep pie pan is placed below the grid extender to deflect heat around the bottom of the pizza stone.
- Hardwood Lump Charcoal: pieces of hardwood that are burned down into natural charcoal. Unlike charcoal briquettes, lump is irregular in shape and size, and contains no binders or other substances. It burns very hot and fast.
- Heat-Resistant Gloves and Potholders: you need a good pair of leather gloves when handling the WSM at these high baking temperatures.
- Pizza Peel: a thin metal peel makes it easy to place the pizza or bread on the pizza stone. The back of a round pizza pan can also be used.
- Large Spatula: a large spatula can help loosen pizza or bread from the peel before placing it on the pizza stone.
- Flashlight: a flashlight is used to peek through the lid vent to evaluate the browning of breads and crusts.
- Corn Meal: used to keep pizza and bread from sticking to the pizza peel.
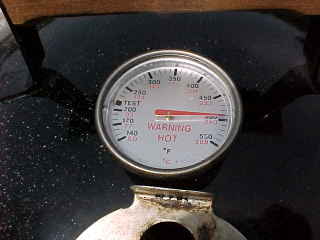
- Fire Extinguisher: you should keep a good quality fire extinguisher on-hand at all times when using the WSM, but especially when baking at temperatures that exceed 500°F.
Of course, you’ll also need some recipes! Dave has provided a detailed pizza recipe that you’ll find later in this article. I have also included links at the end of this article to help you find additional baking recipes on the Internet.
Converting The WSM Into A Baking Oven
Dave starts by placing the charcoal grate and charcoal ring on top of the bottom cooking grate in the middle cooking section. He turns the charcoal grate 90 degrees to the cooking grate so it’s running in the opposite direction. This keeps small pieces of lump charcoal from falling through the grates.
If you’re concerned about the hot coals damaging your bottom cooking grate, use a charcoal grate from a Weber 22-1/2″ kettle grill instead. These grates can be purchased at hardware stores and home centers.
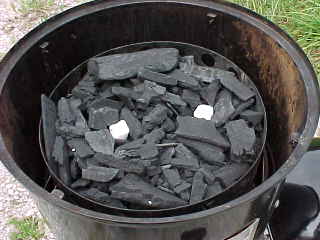
With the charcoal grate and ring in place, Dave fills the ring with hardwood lump charcoal and lights it using two Weber Lighter Cubes. You can also start the lump using a Weber chimney starter.
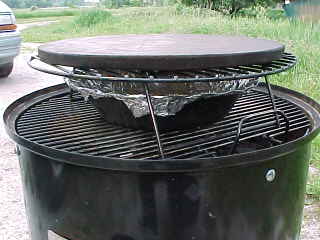
Next, Dave places the foil-lined pie pan on the top cooking grate and mounts the grid extender over the pan, then places the pizza stone on top of the grid extender.
The pizza stone is the surface on which the pizza or bread will bake. The grid extender adds some distance between the lump charcoal and the pizza stone, and moves the stone up into the domed lid where the temperature is higher.
The pie pan shields the pizza stone from the hot flames coming off the lump charcoal, preventing the stone from overheating and burning the bottom of the food. It also deflects heat around the stone and up into the lid for even baking.
Using this setup, Dave is able to bake a variety of pizzas, calzones, and breads ranging from 350-525°F.
Pizza
“This was the real test of baking on the WSM,” says Dave. “In our home, I have to make pizza two different ways. I like a thick, chewy crust, so I bake mine around 425°F for 18-22 minutes. My wife likes a thin, crispy crust and I usually do hers around 525°F for 13-14 minutes.”
Dave baked two pizzas for himself at the lower temp, then one for his wife at the higher temp. “After I got my two pizzas off the cooker, I opened all the bottom vents fully and took off the access door to get the temp up quickly for my wife’s pizza. I went into the house and made the last pizza, which probably took 5-6 minutes. Went back outside and found the cooker at about 550°F. I put on the door and cut the bottom vents back to 50 percent each. I loaded the pizza at 530°F and made no more adjustments. It baked around 500°F for 13-14 minutes.”
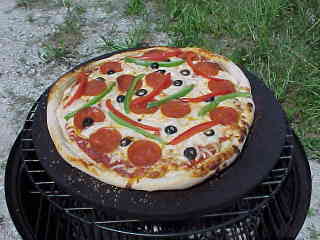
“All three pizzas came out great, and just as good as if I had done them in my bread smoker.”
Here are Dave’s detailed instructions for baking two pizzas in the Weber Bullet.
These instructions assume that you’re using a bread machine to make the dough. If you don’t have a bread machine, there are other ways to make or buy dough. If you’re not using a bread machine, adjust Dave’s process accordingly.
1) Load the charcoal ring full with lump charcoal. Place a couple of the Weber Lighter Cubes on top of the lump. Don’t light the cubes yet.
2) Load the bread machine with the ingredients from the pizza dough recipe that came with the machine. This recipe should contain 2-1/2 to 3 cups of flour and make enough dough for two pizzas. Set the machine for “dough only” and turn it on. The dough will be ready in about 90 minutes.
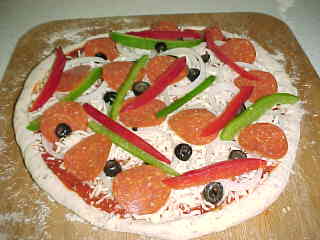
3) While the machine is making the dough, get the pizza toppings ready. Do not load-up your pizza with everything you have in the kitchen! Too many veggies can render too much water during cooking and leave the crust soggy.
Vegetables may be grilled or sautéed before hand to ensure even cooking and eliminate excess moisture.
For each 13-14″ pizza, you’ll need about 7 ounces of sauce and 1 cup of grated Mozzarella cheese. Use no more than 1/3 pound of pre-cooked, drained meat like sausage or hamburger (pepperoni can be used as-is). Finally, pick out 3 of your favorite veggies and add them in small quantities. We like 1/8″ thick onion rings, strips of bell pepper, and sliced black olives.
At this point, if you are a novice with pizza or this is your first bake on the WSM, I would suggest using a second person as a helper for the balance of this two pizza bake.
4) About 20-30 minutes before the dough is due out of the machine, light the two Weber cubes in the cooker. Lid off, vents wide open, and middle door off the cooker. When each cube has a circle of fire going that measures 2-3″ in diameter, put the lid on the cooker and monitor the temp so you won’t overshoot the target temp, which in this case is 450-475°F. Put the door on the middle section when the temp gets up to 325-350°F.
Do not leave the cooker, as it will come up to temp pretty fast. Get it dialed in at about 475°F by adjusting the bottom vents. Leave the top vent wide open. Have gloves, potholders, and a flashlight at the cooker. You are now ready to bake!
5) When the dough is ready, your helper should make up the pizza while you are watching the cooker. Try to have the first pizza ready when the cooker gets up to temp.
6) On a floured work surface, divide the dough in half. You want to shape the first piece of dough to about 1″ larger than your stone. Place the dough in the middle of the work surface and sprinkle with a little flour. If using a rolling pin, roll from the center of the dough out to the edges. If forming the dough by hand, flatten the dough from the center toward the edges using the palm of your hand.
Sprinkle at least 1 Tablespoon of corn meal on the surface of the peel, then place the dough on the peel. If you don’t have a peel, use the back of a round pizza pan. Don’t skimp here, as you need plenty of corn meal to allow the pizza to slide off. Then roll up the edges to form the crust, getting it back in size to where it is about 1-1/2″ less than the size of the stone.
Add the sauce, veggies, and meat, then cover with cheese. Do not get any ingredients onto the edge of the pizza or onto the peel. You don’t want to get anything on the pizza stone that will cause the pizza to stick. Clean up any cheese that might have dropped on the peel.
7) Take the pizza along with a large spatula out to the cooker. Use the spatula to loosen the pizza just before you load it. The longer the pizza sits on the peel, the more likely it is to stick.
The cooker should be near 475°F. Have your helper lift the lid so you can load the pizza.
If you have not done this before, be real careful as it is so easy to shoot one over the side of the stone. Place the end of the peel on the far side of the stone and about 1″ in from the edge. Carefully lift the peel up a little and use the spatula to slide the pizza off the peel and onto the stone, while slowly pulling the peel back toward you. This might be the hardest step to learn with your baking.
8) After the first pizza is loaded, send the peel and your helper back into the house to make the second pizza. It needs to be ready when the first pizza comes off the cooker.
9) Bake the pizza until the crust is starting to brown a little. Do not remove the lid until the pizza is done. Use the flashlight through the top vent to check for doneness. A typical time for this bake will run 13-18 minutes.
10) When the first pizza is done, use the spatula to push it off the stone onto a pizza pan or rimmed baking sheet pan. If you’ve kept the stone clean while loading the pizza, it will slide off real easy.
11) Load the second pizza and bake until done. When finished, close all the vents to extinguish the fire. You can use the remaining lump charcoal for your next bake.
To make one “thick and chewy” pizza and one “thin and crispy” pizza, divide the dough into two slightly uneven pieces.
- For “thick and chewy”, roll the larger piece of dough to 13-14″ in diameter, then roll the edges back to form the crust, resulting in a 10-11″ pizza. This pizza bakes at 400-425°F for 18-22 minutes.
- For “thin and crispy”, roll the smaller piece of dough about 2″ larger than the diameter of your stone, then roll the edges back to form the crust to just about the same size as your stone. This pizza bakes at 475-525°F for 10-14 minutes. Use the flashlight through the top vent to check the crust. You want to get this one a little more brown.
Caution: This cooker running at 450-500°F is extremely hot. Use gloves and potholders to remove the lid or make any adjustments to the vents. Always have a large spatula at the cooker and a fire extinguisher close at hand. Don’t set the cooker close to anything that will burn.
Calzone
Calzone is sort of a pizza folded over on itself, then baked. Dave writes, “Calzones are another great treat that can be baked on the WSM. They can be made small for an appetizer or large for a complete meal. I baked these calzones to serve me and my wife along with two guests.
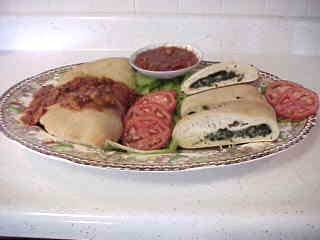
“These two calzones use two different recipes. One was made in the more traditional method, stuffed with chopped spinach that was sautéed in olive oil and garlic. To this, I added grated Mozzarella and Provolone cheese. The second calzone was stuffed with Italian sausage (pre-cooked and drained), pepperoni, mushrooms, bell pepper, onion, and some herbs and spices. To this, I added a little spaghetti sauce and some grated Mozzarella and Romano cheese.
“Most folks make these with basic pizza ingredients, but I like the more traditional recipe using sautéed spinach. They can be stuffed with just about anything. I often use chili or a Mexican dish when I want a change of pace.”
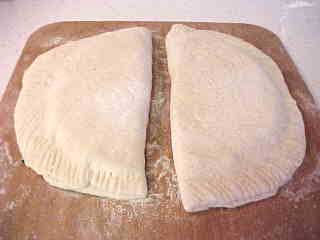
To make calzone, “roll the dough out to about 1″ less than the diameter of your stone. Load the stuffing on one-half of the dough, keeping it 1″ away from the edge of the dough. Brush that 1” wide area with water, then fold the dough over the toppings and line up the edges. Use a fork to press down the edges, sealing the calzone so it won’t leak while cooking.
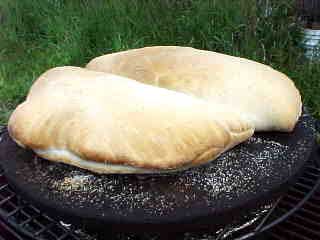
“I bake calzone at 425-475°F for 13-18 minutes. I like to brown them up so the crust has a little crunch to it.”
For the calzones shown in these photos, Dave brought the WSM up to 500°F, then loaded the calzones. They baked at 470°F for about 15 minutes.
Focaccia
At first blush, focaccia looks a little bit like pizza, but it’s really an Italian bread. “This herb bread is a great treat that can be made many different ways, and all recipes are great. I probably don’t make it the same way twice, but all my loaves do contain some basic ingredients that we like and always put into the bread.
“We like dried chives and dried onions and put about 1 teaspoon of each into the dough. Always use 2-3 of your favorite dried herbs in the dough when you make it. This bread can be topped with just about anything, but it must have dried rosemary on top as one of the herbs.
“I might make the bread using the following recipe. For a thick loaf measuring about 2″ high after baking, roll the dough out to 8-9″ in diameter. For a thin loaf measuring about 1″ high after baking, roll the dough to 10-11″ in diameter. Using the handle of a wooden spoon, poke some pockets spaced about 1” apart all over the surface of the dough. Brush on a generous amount of olive oil and sprinkle with sea salt or other coarse salt. Add 1/3 cup of cheese and about 2 teaspoons of dried rosemary. Now add anything else you like. I might use sun-dried tomatoes with black olives or mushrooms or hot peppers (when the wife is out of town).
“This bread bakes at 400-425°F for 16-22 minutes. I pull it when I see just a little browning through the top vent. The WSM had no problems maintaining this baking temperature. After I got it to temp, I had the three bottom vents open at 25 percent each.”

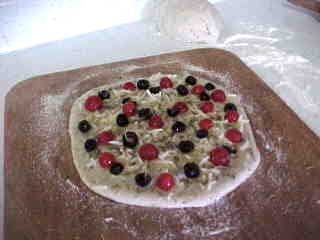
For the focaccia above, Dave mixed chives, onions, and a bit of oregano into the dough, then topped it with rosemary, cheese, olive oil, sea salt, black olives, and grape tomatoes.
Kolach Bread
Kolach is a braided bread popular in Ukraine and Eastern European countries. According to Ukrainian tradition, three large kolach are stacked on top of each other as the centerpiece of the Christmas Eve dinner table. The round shape symbolizes good luck, bountiful life, general welfare and eternity. Kolach are also an important part of other religious and family events.
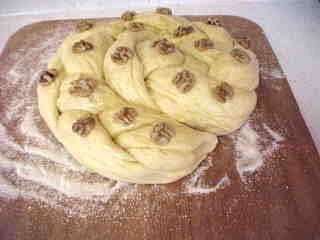
Kolach is a rich bread consisting of flour, water, yeast, sugar, butter, milk, eggs, and salt. After the dough rises, it is divided, braided, and shaped into a round. An egg glaze is applied and poppy seeds are often sprinkled on top. Dave’s kolach is topped with whole walnuts.
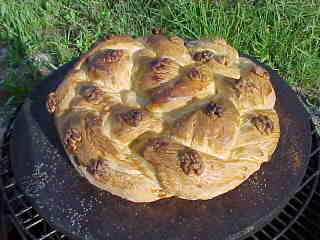
Dave writes, “This bread bakes at 350-360°F for about one hour. This low baking temperature is really a piece of cake. After I got it up to temp, I had the three bottom vents open 20 percent each to maintain the temperature. Note the even browning on the top of the bread as it came off the cooker.”
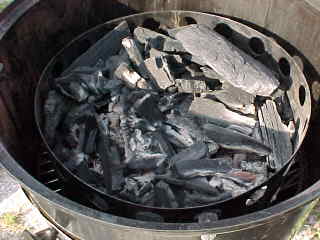
Dave baked two kolach over a 2-1/2 hour period. Photo 13 shows that less than half of the fuel was consumed in the process. All the lump that remains can be extinguished and used in the next cook.
Dough Options
When it comes to baking, Dave says that most of the effort goes into the dough. There are several ways to approach this:
- Make dough using a bread machine.
- Make dough using a KitchenAid stand mixer or other heavy-duty mixer.
- Make dough by hand.
- Buy fresh dough from a pizza parlor, or a deli or store that bakes bread.
A bread machine with a “dough only” cycle does a fantastic job on pizza dough. Just follow the instructions included with your bread machine for a basic pizza dough. A recipe using 2-1/2 to 3 cups of flour should make enough dough for two pizzas, two calzone, or two focaccia in about 90 minutes.
Making Pizza Dough With A Mixer Or By Hand
Here are two methods recommended by Dave for making pizza dough.
Pizza Dough Ingredients
- 1 cup + 2 Tablespoons water (105-115°F)
- 2 Tablespoons olive oil
- 1 teaspoon salt
- 1 teaspoon sugar
- 2-1/2 to 3-1/2 cups bread flour
- 1 packet dry “quick-rising” yeast
These ingredients make enough dough for two 10-14″ pizzas, two calzones, or two focaccia.
Stand Mixer Method
- Warm the mixer bowl under hot running water in the sink, then place the warmed bowl in the mixer.
- Add the warm water and yeast to the bowl. Let sit for 5 minutes.
- Add the salt, sugar, oil, and 2-1/2 cups flour.
- Attach dough hook and mix at low speed for 2 minutes.
- Add remaining flour 1/4 cup at a time until dough is pulling away from the sides of the mixing bowl and starting to form a ball. Depending on conditions, you may not use all 3-1/2 cups of flour to get to this stage.
- Knead dough an additional 5 minutes in the mixer.
- Apply a light coat of non-stick spray or olive oil to the inside of a large bowl. Place the dough in the bowl, cover with plastic wrap, and let rest at room temperature for 25-60 minutes until it has doubled in volume. If it has not doubled after 75 minutes, go ahead and use it as-is.
- Punch the dough down and divide it into two equal-sized pieces.
Hand Method
- Add the warm water and yeast to a bowl. Let sit for 5 minutes.
- Add the salt, sugar, oil, and 2 cups flour.
- Beat with a large spoon for 3-4 minutes.
- Add remaining flour 1/4 cup at a time. Keep working the dough until it gets to a point where you can handle it, but it’s still kind of sticky. When it becomes too difficult to use the spoon, use your hands to finish the job. Depending on conditions, you may not use all 3-1/2 cups of flour to get to this stage.
- Turn the dough out onto a floured counter top and knead by hand for 10 minutes. To knead, place both hands on the dough and press down very hard to spread the dough out, then fold the outside edges to the inside and turn the dough over. Repeat this process for 10 minutes until well-kneaded. (Try this once and you’ll probably run out and buy a mixer or bread machine!)
- Apply a light coat of non-stick spray or olive oil to the inside of a large bowl. Place the dough in the bowl, cover with plastic wrap, and let rest at room temperature for 25-60 minutes until it has doubled in volume. If it has not doubled after 75 minutes, go ahead and use it as-is.
- Punch the dough down and divide it into two equal-sized pieces.
Baking Tips
Here are some final tips from Dave for successful baking with the Weber Bullet:
- The best breads and pizzas are made with the freshest dough.
- Less is always better on a pizza. Keep it simple. Don’t overload your pizza with too many toppings, both in number or quantity.
- Don’t be afraid to experiment. Use your favorite, flavorful ingredients.
- Get organized. Have everything ready in advance.
- Keep a close eye on the cooker. These high baking temperatures can change quickly and you need to be paying attention to the cooker at all times.
- For all baking on the WSM, get the cooker to 25°F over your baking temp before you load the pizza or bread. The temp will come down when you load the dough in the cooker.
- Load the pizza or bread quickly so the cooker doesn’t lose too much heat.
- Do not open the cooker until the pizza or bread is done. Use a flashlight to peek through the top vent to check for browning of breads and crusts.
- Practice makes perfect! Keep at it and you’ll be a WSM baking expert in no time.
More Resources
Here are links to help you find more baking recipes:
Again, I want to thank Dave for this “tour de force” on baking. His efforts are greatly appreciated!
Baking photos: 2001 by Dave Stamper.


