In This Topic
- Pork Butt Defined
- Other Names For Pork Butt
- Why Pork Butt Is Preferred For Barbecue
- Choosing A Pork Butt
- Prepping A Pork Butt
- Seasoning The Pork Butt
- Temperature Of Pork Butt Before Cooking
- Converting Collagen To Gelatin Is Key To Tender Pork Butt
- Internal Meat Temperatures
- Where To Measure Internal Temperature
- Temperature Plateau—The Stall
- Cooking Times
- Cook Fat-Side Up Or Fat-Side Down?
- Turning & Basting
- Foiling & Resting After Cooking
- Slicing, Pulling & Chopping Pork Butt
- “Mr. Brown” Or “Bark”
- Pork Butt Yield
- Pulled Pork Butt Servings Calculator
- Leftovers
- More Pork Butt Links On TVWB
Pork Butt Defined
 Despite the name, pork butt does not come from the rear end of the hog—it is cut from the shoulder. The term “butt” refers to the barrels or casks that cheap cuts of pork were packed into for storage or shipment in the 1700s.
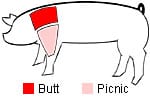
The pork shoulder weighs 12-18 pounds and consists of two portions: the butt, which is the upper portion of the shoulder, and the picnic, which is the lower portion.
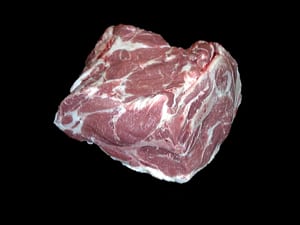
Whole pork butt
The whole pork butt is a rectangular roast weighing 6-10 pounds and containing a portion of the shoulder blade bone. It is sold bone-in or boneless; if boneless, a whole roast may be cut into half portions.
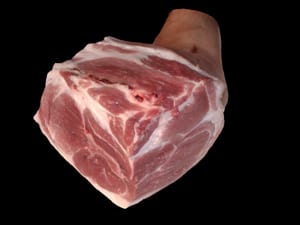
Whole pork picnic
The whole picnic weighs 6-9 pounds. It contains a portion of the foreleg and is usually sold with some skin attached. The picnic is sometimes cut into an upper arm portion (the meatier portion, usually sold skinless) and the lower foreleg portion (containing more bone, skin, and connective tissue).
Other Names For Pork Butt
Pork butt is also know by the following names, or some combination thereof:
- Boston shoulder roast
- Boston roast
- Boston butt
- Shoulder butt
- Shoulder blade roast
Why Pork Butt Is Preferred For Barbecue
You can make great-tasting barbecue with either pork butt or picnic. Both portions contain a lot of fat and connective tissue, which results in moist, succulent meat after many hours of “low and slow” cooking. However, most people use pork butt because it is more commonly available in stores (especially at wholesale warehouse stores) and because it has somewhat less waste than the picnic. Both portions, however, are fairly inexpensive.
Choosing A Pork Butt
There are several considerations when selecting pork butt for barbecuing:
Pork Quality Grades
Although all pork is inspected for wholesomeness by the USDA, it is not usually graded for quality. The USDA says this is because pork is “produced from young animals that have been bred and fed to produce more uniformly tender meat.”
When pork is graded for quality (which is voluntary and paid for by the pork producer), it is only graded into two levels: “Acceptable” and “Utility.” The USDA says that supermarkets only sell “Acceptable” pork; “Utility” pork is mainly reserved for processed foods.
So unlike beef, where you have to decide between quality grades of USDA Prime, USDA Choice, and USDA Select, each of different quality and price, you don’t have to worry about quality grades when shopping for pork butt.
Whole, Untrimmed Pork Butt In Cryovac
At the supermarket, whole or partial pork butts are sold individually, usually boneless and with much of the exterior fat removed.
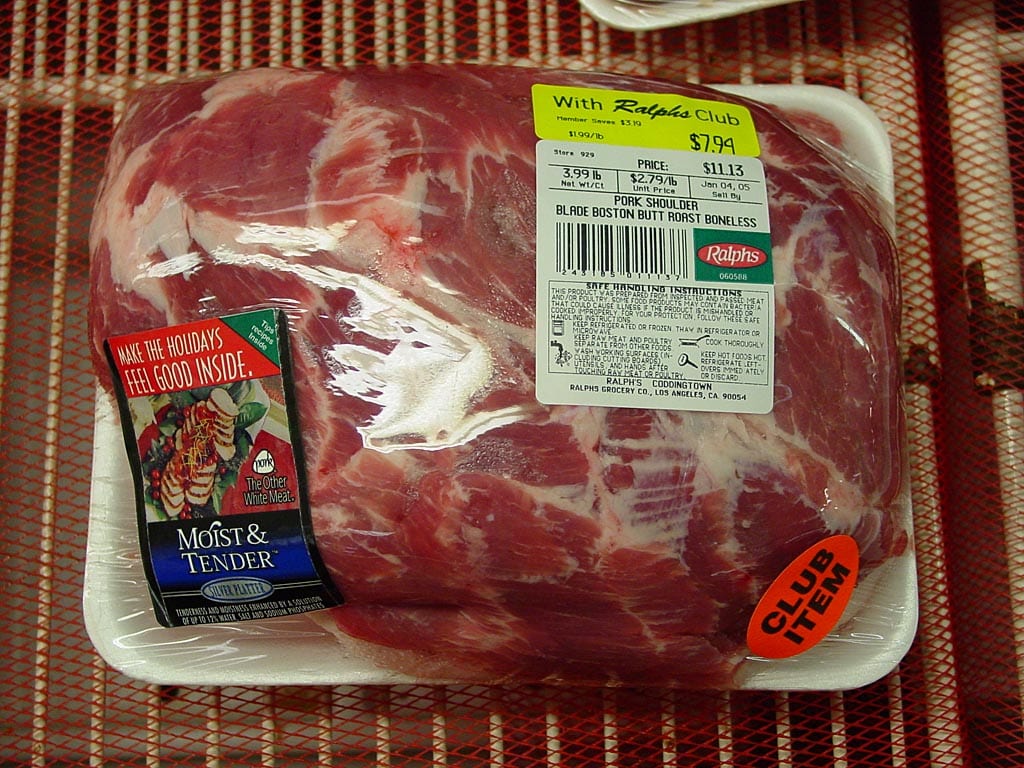
This photo shows a typical pork butt from a supermarket. The package contains one boneless roast weighing 3.99 pounds, probably a half portion of a whole butt. It is labeled, “Pork Shoulder – Blade Boston Butt Roast Boneless” and is priced at $2.79 per pound, or $1.99 per pound with the store’s club card.
At the wholesale warehouse store, whole pork butts are usually sold in Cryovac packaging, two to a package, with the exterior fat intact. In the past, warehouse stores typically carried bone-in butts, but boneless butts are becoming more common.
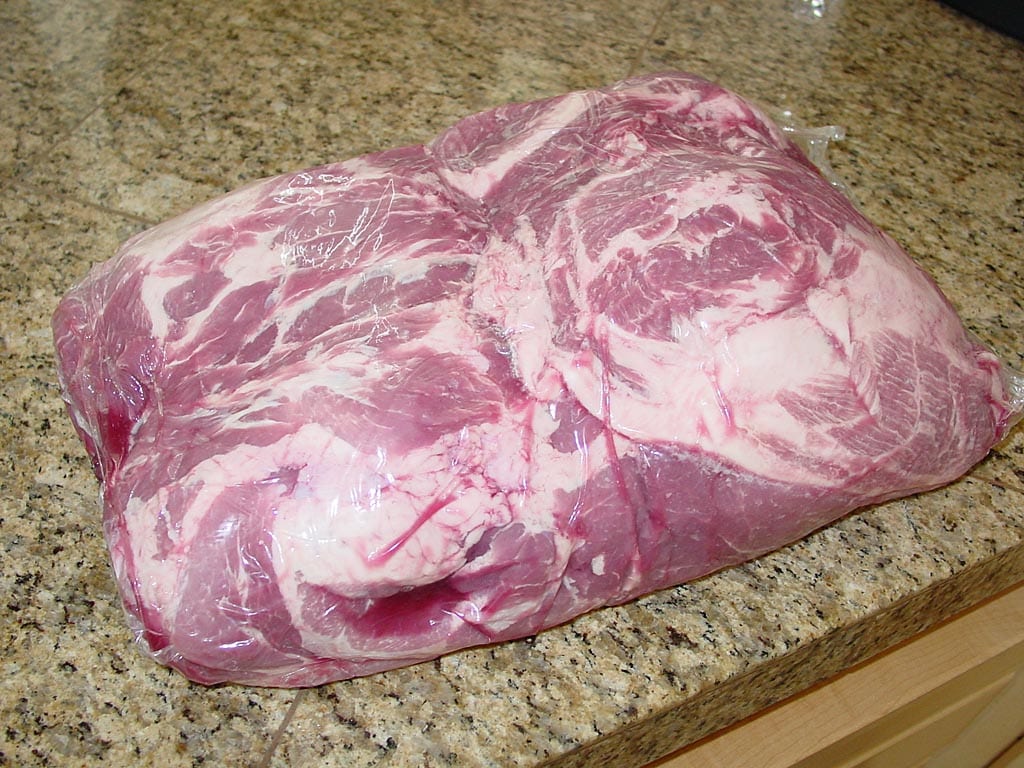
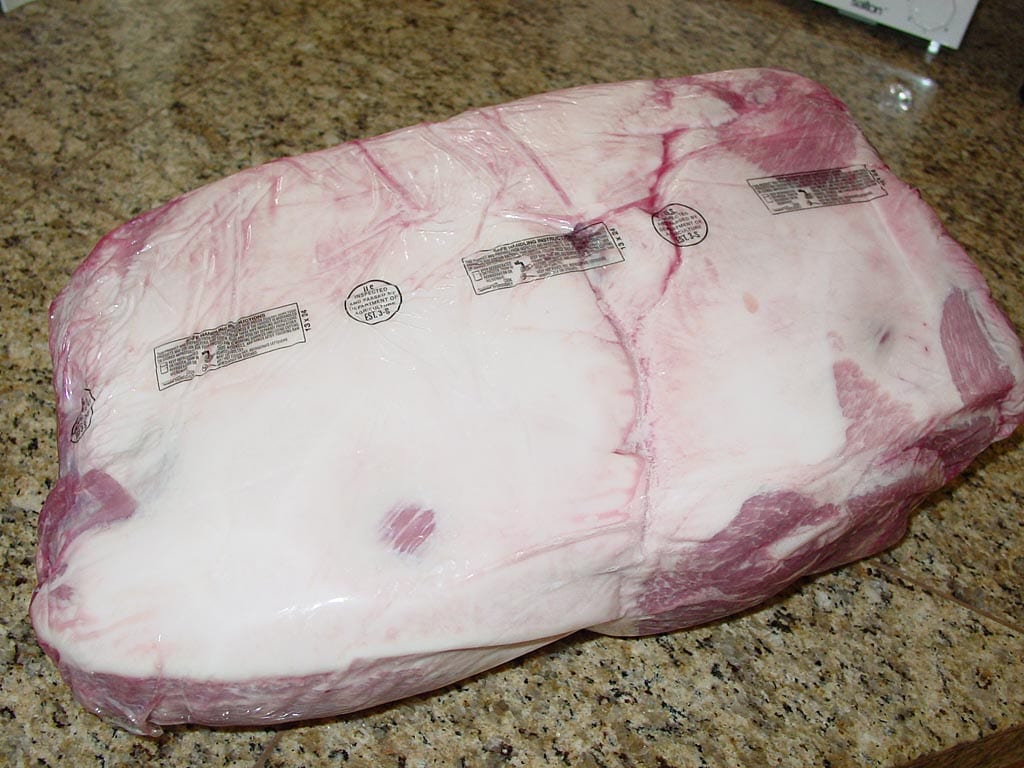 These two photos show a typical Cryovac package of pork butts from a warehouse store. It contains two boneless roasts weighing a total of 19.23 pounds. Each roast weighs over 9 pounds. It is labeled, “Boneless Pork Shoulder” and is priced at $1.35 per pound. After trimming a total of 4.5 pounds of fat, these roasts cost the equivalent of $1.75 per pound.
Since pork is a commodity, prices will fluctuate greatly over time. When prices are down, bone-in pork butt can be purchased at warehouse stores for at little as 89¢ per pound.
Most people will choose pork butts from warehouse stores because they cost less per pound and can be trimmed as desired because they are sold whole with the external fat intact. Also, as long as you’re firing up your cooker, you might as well cook two pork butts, so the two-to-the-package you get at the warehouse store fills the bill.
Looking at the two photos above, you can understand why first-timers might think they’re getting a single, humongous pork butt! In the Cryovac packaging, it’s hard to tell where one roast ends and the other begins. This presents a problem if you want to buy roasts of equal size…often you’ll open the package to find a 6-pound roast and an 8-pound roast, but you can’t tell this by looking at the package. This isn’t a big deal, but it does mean that the smaller roast will cook faster and must be removed from the cooker sooner than the larger one.
Weight
Most people choose whole, untrimmed pork butts weighing 6-8 pounds each. The pork butt articles featured in the Cooking Topics section of this website assume roasts in this weight range. However, roasts that are outside this range cook just fine. In fact, some competition barbecue teams like pork butts as large at 10 pounds each.
Meat Characteristics
Choose pork butt with a smooth, firm, white fat cap and a good amount of fat marbling within the meat itself. The meat should be red-pink in color with a coarse grain.
These characteristics can be difficult to assess when meat is sold in Cryovac. In fact, due to the lack of oxygen in the package, the meat may appear slightly purple, but after several minutes of exposure to the air, it will regain its normal red-pink color. You can see this difference in color in the photos above showing supermarket pork butt wrapped in plastic film and warehouse store pork butt in Cryovac packaging.
The good news is that warehouse stores usually sell high-quality meat having the characteristics described above. If you get the meat home and find otherwise, return it to the store for a refund.
Bone-In or Boneless
You’ll make great barbecue regardless of whether you use bone-in or boneless pork butts. Bone-in seems to be getting harder to find at some warehouse stores, so your only choice might be boneless, but that’s OK.
A pork butt consists of a collection of individual muscles that converge at the shoulder. These muscles are held together and attached to the shoulder blade by connective tissue. As a result, a bone-in pork butt is a very solid chunk of meat. When the bone is removed, a pork butt takes on a more “relaxed” shape and is not as solid as it was before. For this reason, boneless pork butts are sometimes tied with kitchen twine or netted by the butcher to give them a more compact shape and to make handling easier on and off the cooker.
People usually have two reasons for preferring bone-in pork butts. One is that it’s fun to remove the bone from a properly cooked roast, since it usually pulls out clean with no meat attached—in a sense, the bone is like a built-in doneness indicator. The other reason is that some people believe the meat near the bone tastes better. There may be some truth to this, since there is more fat and connective tissue near the bone that adds moisture and flavor to the meat during cooking. However, the effect is negligible once all the meat is pulled, seasoned, and mixed together for serving.
One thing that the bone does not do so well is transmit heat to the interior of the roast. According to Robert L. Wolke, author of What Einstein Told His Cook, bones do not conduct heat as well as the meat itself because they are porous and relatively dry. So don’t cook bone-in pork butts hoping that the bone helps cook the meat more evenly or quickly.
If you prefer a boneless pork butt but can only find bone-in, you can remove the bone yourself. Watch these videos to learn how (not) to do it!
Avoid Enhanced Meat

Lots of supermarket pork butts are injected with a solution of water, salt, sodium phosphate, and other ingredients to make the meat more moist. This is called enhanced meat and most barbecuers avoid it because they don’t like paying for water instead of meat, and because the meat can taste hammy or too salty.
Enhanced meat can be identified by reading the fine print on the product label. Look for a phrase indicating the percentage of solution added to the meat and the solution ingredients.
The photo above is an enlarged image of the fine print on the supermarket pork butt shown earlier in this article. It reads, “Tenderness and moistness enhanced by a solution of up to 12% water, salt and sodium phosphates.” Assuming this 3.99 pound roast contains 12% solution and is selling for $1.99 per pound, you’re paying 95¢ for 7.7 ounces of solution.
Marketing phrases like “always tender”, “moist and juicy”, “moist and tender”, “tender and juicy”, “guaranteed tender”, and “extra tender” are tip-offs that the meat has probably been enhanced.
Non-enhanced meat may say “all-natural” or “no added ingredients” on the label, or may say nothing at all. Most whole pork butts in Cryovac are not enhanced; if they are, the “solution added” text must be printed on the package.
But what if you buy meat from a butcher where the meat is not pre-packaged? Has that pork butt been enhanced or not? To find out, you’ll have to ask the butcher. He or she should be able to show you a case box or the original Cryovac packaging which will carry the “solution added” text if the meat has been enhanced.
If you have no choice but to use enhanced meat, you may wish to reduce the amount of salt in your rub, since the meat has been injected with a fair amount of salt.
You can learn more about this subject by reading the Enhanced Meat article.
Prepping A Pork Butt
The most basic way to prep a pork butt for barbecuing is to simply remove it from the Cryovac packaging, pat it dry with paper towels, and apply a heavy sprinkling of rub to all sides. Some people will cook untrimmed pork butts with the fat-side facing up, believing that the fat “bastes” the meat during cooking.
I subscribe to the preparation method I learned at the Paul Kirk Pitmaster Class in 1997, which is to remove the fat cap and any large areas or pockets of external fat that can be easily trimmed away, then apply the rub. The logic behind this method is that:
- Smoke and rub won’t penetrate the external fat.
- It takes more time and fuel to cook a pork butt with all the fat intact.
- Unlike a brisket flat, which is quite lean and benefits from the protection that a layer of fat offers, a pork butt contains a tremendous amount of intramuscular fat, so the roast essentially “self-bastes” from the inside out.
- After many hours of cooking, much of the external fat renders away, and you’re not going to eat the fat that’s left—you’re going to cut it away and discard it.
- Removing the external fat allows for the formation of more dark, flavorful outside meat that people enjoy so much.
You’ll need a sharp knife to trim a pork butt. Don’t try this with a paring knife, a utility knife or any knife that is dull. You may wish to invest in a butcher’s knife, but a large, very sharp chef’s knife will do.
Remove Pork Butts From The Cryovac
Remove the pork butts from the Cryovac packaging and pat dry with paper towels. This photo shows shows two untrimmed, boneless pork butts weighing over 9 pounds each, with the fat-side facing down.
Sometimes you will see recipes that call for rinsing pork butts under running water or with vinegar before cooking. Do you think barbecue restaurants rinse the thousands of pork butts they cook each year? No, they don’t, and you don’t need to, either.
You may notice a slight odor when opening the Cryovac packaging. This odor is normal and should dissipate after a few minutes. If the odor is a strong, putrid smell that lasts longer than 10 minutes, the meat is probably spoiled and should be returned to the store for a refund.
You may also notice some liquid in the bottom of the Cryovac packaging. This liquid is called “purge” in the meat industry. It is normal for meat to release a modest amount of liquid as it sits in the packaging. However, a large amount of liquid is an indication of excessive storage time, improper storage temperature, or previously frozen meat.
Video: How To Trim & Tie Boneless Pork Butt
This video demonstrates the steps described in the next few sections about how to trim and tie a boneless pork butt. My trimming in the video is somewhat more aggressive than what’s shown in the photos below. After watching the video and viewing my photos, do what makes the most sense to you with your particular pork butt.
Remove The Fat Cap And False Cap
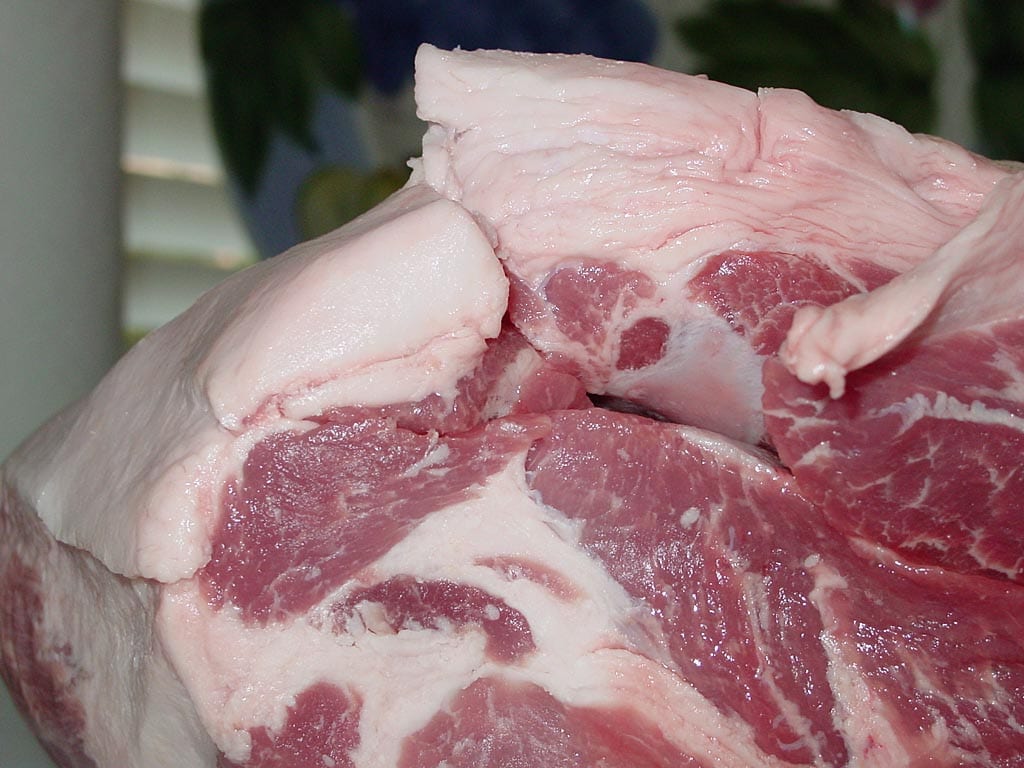
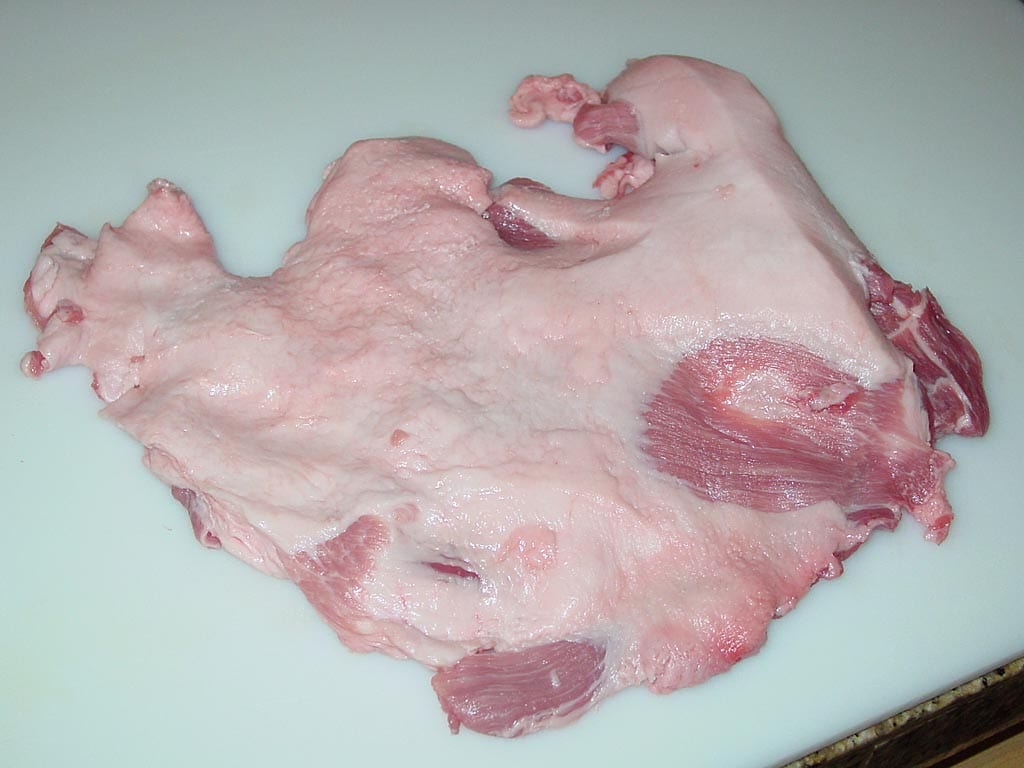
This photo shows a side view of one of these 9-pound untrimmed pork butts, with the fat cap on top of the roast. It’s 1/4″ to 1/2″ thick in most areas, but up to 3/4″ thick in a few spots. The thickness of the fat cap will vary from roast to roast, depending on the individual hog and how it was trimmed at the processing plant.
There are no style points when it comes to removing the fat cap, so trim it off in whatever way you feel most comfortable. However, here’s a method that works well for me.
Place the roast on a cutting board with the fat-side facing up. Turn the roast so that the narrow ends are on the left and right. Assuming you’re right-handed, start at the right end of the roast and cut between the fat cap and the meat, trying to remove as much fat and as little lean meat as possible. After cutting about 1″ down the length of the roast, grasp the fat cap with your left hand and lift up slightly so you can see what you’re cutting. Continue cutting between the fat and the lean down the entire length of the roast until the cap is removed.
This photo shows the fat cap after it has been removed. I like to remove it in a single piece, but you don’t have to do it this way.
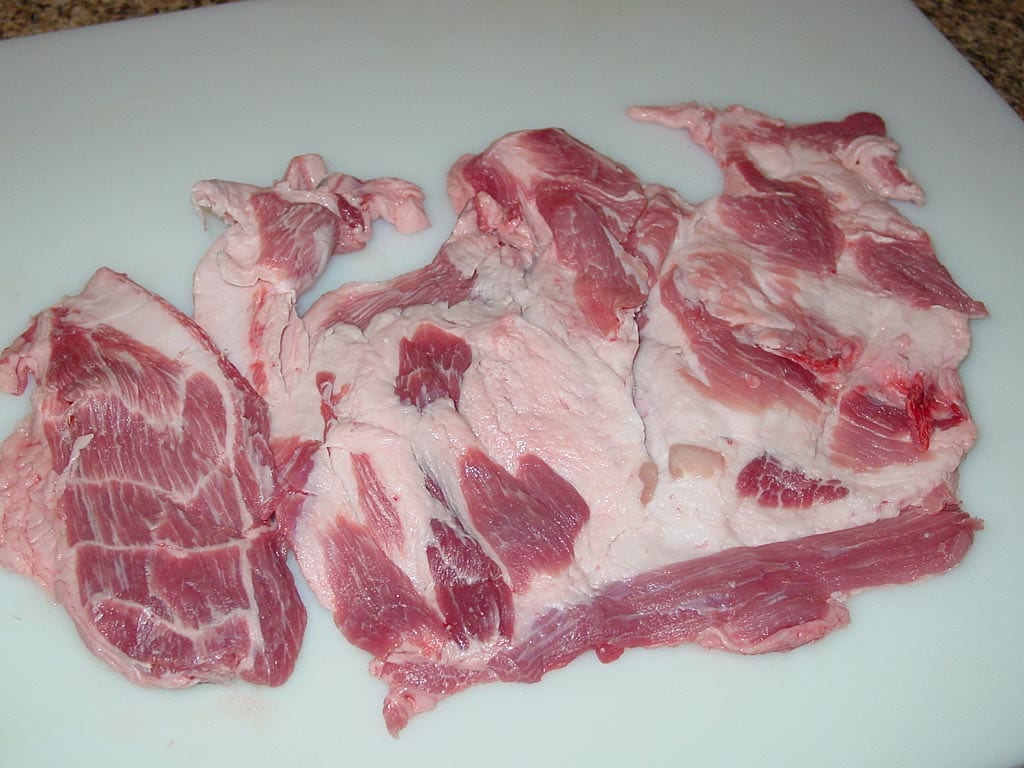
This photo shows the other side of the fat cap. Note that small amounts of lean meat were removed in the process, which is OK…you just want to minimize that.
After removing the fat cap, you may see areas that appear to be lean meat, but upon closer inspection reveal a thin layer of meat covering another thick layer of fat. This is called a “false cap” and should be trimmed down to the lean meat beneath.
Remove Other Areas Of External Fat
With the fat cap and false cap removed, turn your attention to other large areas of external fat. Trim patches of surface fat down to the lean meat. If you find pockets of fat where several muscles converge, just trim out whatever fat seems reasonable.
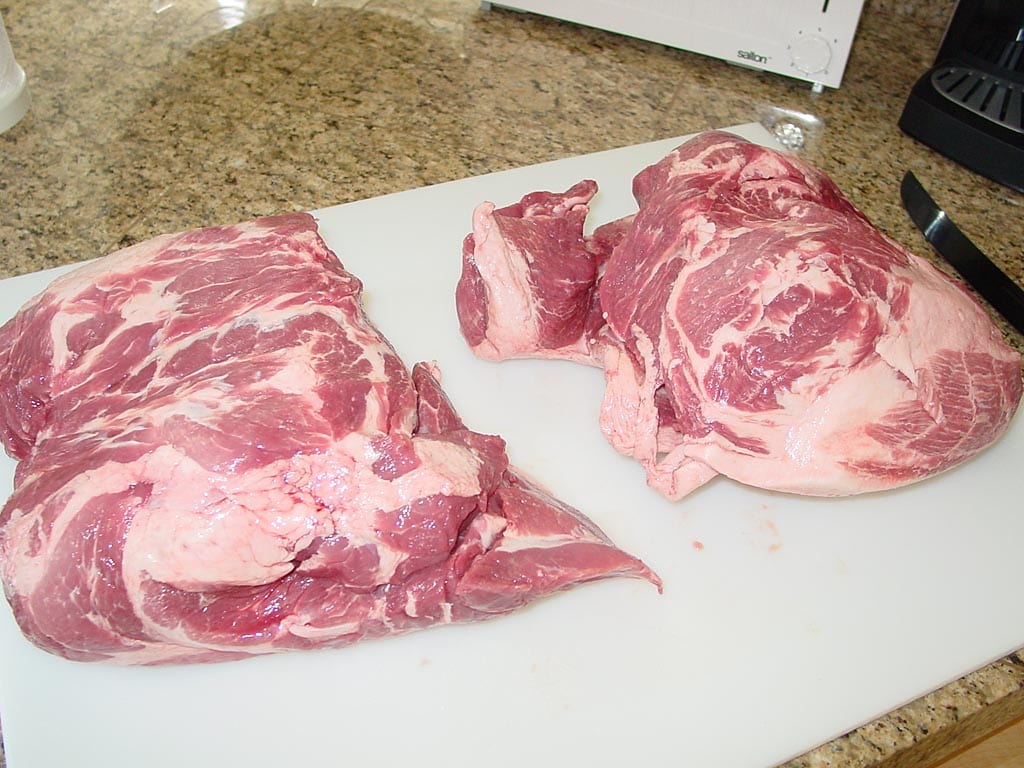
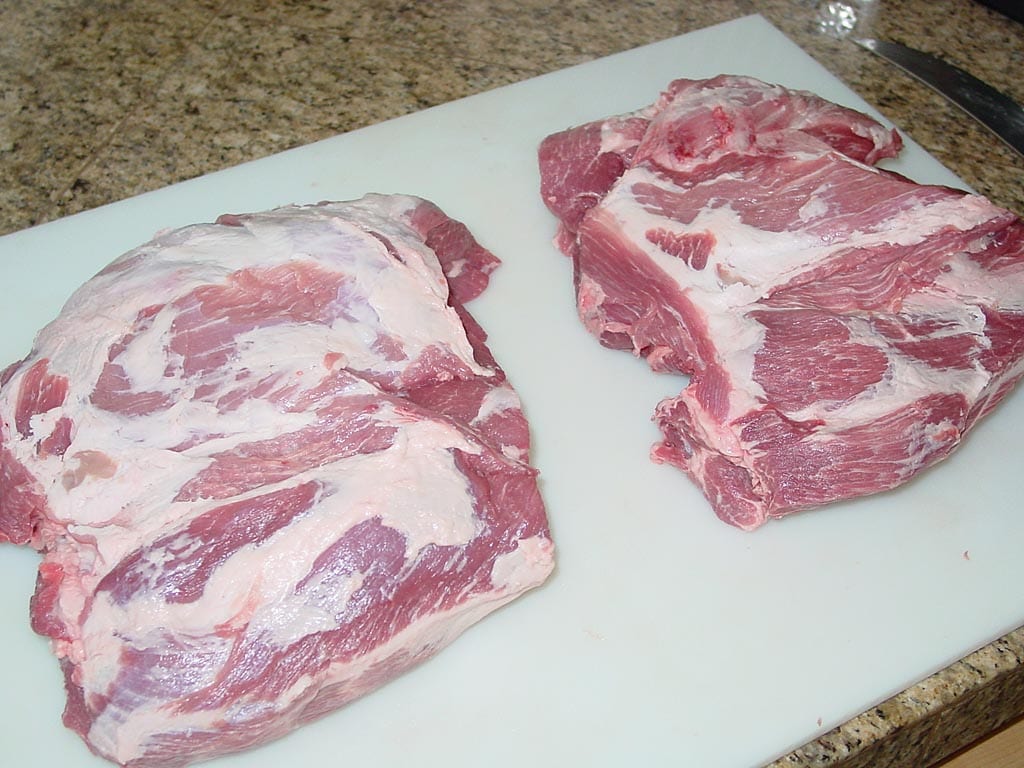
This photo shows the two pork butts after removing the fat caps, false caps, and most external fat. The roast on the left weighed 9 pounds, 10-1/2 ounces before trimming, and had 1 pound, 13-1/2 ounces of fat removed. The roast on the right weighed 9 pounds, 11-1/4 ounces before trimming, and had 2 pounds, 10-1/4 ounces of fat removed
There comes a point of diminishing returns when trimming fat from a pork butt. There’s no way and no reason to remove it all, so just remove the majority of fat that makes sense to you. It’s hard to remove too much fat from a pork butt, unless you trim so deeply between individual muscles that the roast starts to fall apart! Remember, the internal fat and connective tissue holds the roast together and provides great flavor and moisture during cooking, so don’t go trimming deep inside the roast.
Remove Unsightly Bits And Pieces
When trimming a large cut of meat like a pork butt, you may stumble across things like big veins, bloody spots, or even an occasional lymph node (sort of a cream-colored or light-brown circular mass extending an inch or more down into the meat, usually removed at the processing plant but sometimes missed). Just trim away these things if you find them. Remember, this hunk of meat used to be part of an animal, and these things are normal.
Tying A Boneless Roast
If your boneless pork butt seems kind of floppy and you want it to have a more compact shape, tie it in several locations with kitchen twine.
Place the roast with the narrow end facing you. Cut a length of kitchen twine, loop it around the roast, bringing the two ends to the top of the roast. Pull snug and tie with whatever kind of knot you like, then repeat in several locations. A surgeon’s knot works well and is easy to tie.
Watch the How To Trim & Tie Boneless Pork Butt video to see how it’s done.
Seasoning The Pork Butt
After trimming a pork butt, apply a generous amount of dry rub to the meat and cook immediately, or apply the rub, wrap the meat in plastic wrap, and refrigerate overnight. The rub does not penetrate the meat deeply during refrigeration, but some of the salt enters the meat to season it and the rub forms a moist layer that adheres well during cooking. You can also apply a bit more rub right before putting the meat in the cooker.
Another method, described in the Pork Butt – Slathered With Mustard & Rub article, is to apply a thin coat of mustard to the pork butt, followed by a generous sprinkling of rub, then either cook immediately or wrap and refrigerate overnight. The mustard helps the rub stick to the meat, and oddly enough, the meat does not taste like mustard after cooking.
The Pork Butt – Slathered With Mustard & Rub and Pork Butt – The Renowned Mr. Brown articles contain popular rub recipes for pork butt. You’ll also find more dry rub recipes and information on injecting flavorful liquids into pork butt on The Virtual Weber Bulletin Board.
Temperature Of Pork Butt Before Cooking
There are two schools of thought on this point. One school holds that you should allow a pork butt to sit at room temperature for up to two hours before cooking. This helps to minimize the difference in temperature between the meat and the cooker.
Why is this important? Some barbecue experts say that cold meat can be fouled by creosote that results from a poorly managed fire, especially in wood-burning cookers. The result is bitter tasting meat. This isn’t much of a concern in the WSM as long as the top vent is fully open at all times. And of course, the WSM is charcoal-fired, not wood-fired. Others say that a pork butt at room temperature takes less time and fuel to cook than a cold one, but I’m not sure this is much of an issue, either.
The other school of thought believes that it’s best to take meat straight from the refrigerator and put it into the cooker. Their theory is that the smoke ring, that pinkish/purple color that forms beneath the surface of the meat, is formed only while the meat is below 140-170°F. By starting with a cold piece of meat, it spends more time below 140-170°F in the cooker, resulting in a stronger smoke ring. You can read more about smoke ring formation in Smoke Ring Basics: What You Need To Know.
I’ve cooked pork butts both ways, and I’m not sure I can tell a difference either way. Lately, my habit has been to take the pork butt from the refrigerator and place it directly in the cooker. I’ve not gotten out a measuring tape to see what affect, if any, this has on the formation of the smoke ring, nor have I noticed any bitter flavor to the meat.
Frankly, I think meat temperature is more of an issue with grilled meats that cook quickly over high heat than it is for large cuts like pork butt that barbecue for 8-16 hours or more.
Converting Collagen To Gelatin Is Key To Tender Pork Butt
In his book On Food And Cooking, author Harold McGee says that meat is composed of three tissue types: muscle fiber, connective tissue, and fat. Connective tissue consists of the proteins collagen, elastin, and reticulin. Collectively, these proteins bind the muscle fibers together and help connect muscles to bone—McGee calls it “the physical harness of the muscles.”
Pork butt has an abundance of connective tissue, as do most muscles that work very hard. It’s this connective tissue that makes pork butt such a tough cut of meat. The good news is that muscles that work hard tend to be more flavorful than those that don’t work hard.
According to McGee, connective tissues made of elastin and reticulin don’t break down during cooking, but collagen turns into soft gelatin. It is this conversion from collagen to gelatin that renders the tough old pork butt into the tender barbecue we enjoy so much.
Internal Meat Temperatures
In the book How To Cook Meat, authors Chris Schlesinger and John Willoughby say that tough cuts of meat must be “cooked through doneness to tenderness.” In other words, don’t stop cooking a pork butt when it reaches the internal temperature we associate with tender cuts like pork loin or pork tenderloin. A pork butt is not edible if cooked to 140°F or even 170°F. It needs to be cooked to even higher temps to achieve tenderness.
In order to be tender, a pork butt must be cooked to an internal temperature of 180-205°. The reason for this, according to McGee, is that the conversion of collagen to gelatin doesn’t even begin until meat reaches an internal temperature of 140°F, and is most efficient as internal temps approach 212°F. “Low and slow” barbecuing at 225-250°F is ideal to facilitate this conversion, providing gentle heat over many hours, allowing the collagen to make its transition into gelatin. While some moisture will be driven out of the pork butt as it reaches these high internal temps, the gelatin makes up for it and keeps the meat moist.
- For sliced pork, cook to 180-185°.
- For pulled pork, cook to 190-205°.
Where To Measure Internal Temperature
A pork butt consists of seven different muscles that converge at the shoulder, and there is a lot of fat and connective tissue between these muscles. As a result, you will get different temperature readings between different muscles and between meat and fat or connective tissue.
I feel the best way to measure internal temperature is to use an instant-read thermometer to check in several locations and average the results. For example, if you’re shooting for 195°F and you get readings of 193°F, 195°F, 198°F, and 201°F in different locations, you’ve achieved your goal of 195°F. If you prefer to measure in just a single location, then measure in the thickest part of the meat.
Temperature Plateau—The Stall
It’s common for a pork butt to reach a temperature plateau during cooking known as the stall—a point at which the internal temperature stops rising and stalls, sometimes for several hours. It happens somewhere in the range of 150-170°F, when the meat fibers are contracting and squeezing moisture out to the surface of the pork butt. It takes quite a bit of time and heat energy to evaporate that moisture, and the internal meat temp will not move out of the stall until that moisture is evaporated
With some patience and a 225-250°F cooker temperature, the pork butt will eventually move beyond the plateau and the meat temperature shall rise again. If you want to shorten the length of the stall, just kick the cooker up to 275°F. Or if you’re really getting impatient, when the pork butt reaches 160-165°F, wrap it in foil and finish it in a 275°F cooker or oven.
Cooking Times
How long will it take to cook pork butt to 180-205°F? As a rough estimate, figure 1-1/2 to 2 hours per pound based on the trimmed weight of an individual roast. For example, when cooking two roasts weighing 8 pounds each after trimming, the total cooking time for both roasts should be 12-16 hours.
Remember, this is only an estimate—it may take more or less time, depending on the thickness of the pork butt, the amount of connective tissue that needs to be converted to gelatin, the temperature of the cooker, weather conditions, and the number of times you open the cooker for turning and basting.
While it may not take much more time to cook multiple pork butts that it does to cook just one, it will require more fuel. Make sure to use more charcoal in the cooker when barbecuing multiple pork butts.
Cook Fat-Side Up Or Fat-Side Down?
If you choose to cook a whole pork butt with the fat cap intact, should you cook it fat-side up or fat-side down? Some people believe that cooking fat-side up helps “baste” the meat during cooking, while others believe this is nonsense—that pork butt is laced with so much intramuscular fat that it doesn’t matter whether the pork butt is cooked fat-side up, down, or sideways.
You’ll have to decide this for yourself, since I recommend that you trim off much of the external fat as described earlier in this article.
Turning & Basting
Turning meat over and end-for-end several times during barbecuing helps to promote even cooking. Basting helps keep the meat moist, adds a little flavor to the surface of the meat, and may help promote the formation of a smoke ring. Turning and basting is not as important with pork butt as with other cuts of meat, so you can decide for yourself whether you want to go to the effort. I will often baste pork butts, but not bother to turn them during cooking.
Using 1-1/2 to 2 hours per pound as a guideline, calculate how long it will take to cook the pork butt. For example, two 8-pound pork butts will take 12-16 hours to cook, so take the shorter time of 12 hours and divide it in half. The first time to turn and baste the meat is at this halfway point: 6 hours. If you baste sooner than the halfway point, the rub won’t have a chance to set up on the surface of the meat and you’ll end up washing away much of it.
Baste one side of the pork butt, then turn it over and end-for-end and baste the other side. You can baste with any flavorful liquid you like. It might be apple juice applied using a spray bottle—I like Martinelli’s Premium Apple Juice—or a complex concoction applied with a basting mop, a turkey baster, or a basting brush. You’ll find lots of ideas in the Recipe Forums on The Virtual Weber Bulletin Board. The Pork Butt – The Renowned Mr. Brown article features a recipe for a cider vinegar baste.
Now, divide the remaining cooking time in half. In our example, the next time to turn and baste the meat will be in 3 hours. Repeat this process until about the last hour of cooking, then stop turning and basting.
Remember, every time the cooker is opened, it loses temperature, so be quick and efficient when turning and basting.
Foiling & Resting After Cooking
As with any large roast, it’s important to let pork butt rest for at least 30 minutes before slicing or pulling so the juices inside the meat have a chance to redistribute. You can read more about the science behind this in Letting Meat Rest After Cooking.
At a minimum, place the pork butt on a rimmed baking sheet pan, cover loosely with foil, and let rest 30 minutes before slicing or pulling.
For even better results, wrap the pork butt tightly with aluminum foil, place in an empty cooler, and hold until ready to serve. The meat will continue to cook for a little while because of carry-over heat, making the meat even more tender. More importantly, the extended rest results in moister meat, and the collected juices inside the foil will soften any tough crust on the exterior of the meat. The meat will remain safely above 140°F for 2-4 hours. See Holding, Storing & Reheating Barbecued Meats for more details.
Slicing, Pulling & Chopping Pork Butt
Here’s how to slice, pull, and chop pork butt for serving on a plate or in a sandwich:
Slicing Pork Butt
After cooking the pork butt to 180-185°F and letting it rest for at least 30 minutes, remove the bone (if any) and slice the meat across the grain. The grain can be difficult to determine, since the pork butt consists of a number of muscles that converge at the shoulder from different directions. Just do your best to find a direction that yields attractive slices cut across the grain. If you don’t like what you see after a few slices, turn the roast a different direction and try again.
Sliced pork butt is usually served on a plate, not in a sandwich.
I’m not a big fan of sliced pork butt, so I don’t have any photos to share with you. I prefer pulled pork as described below.
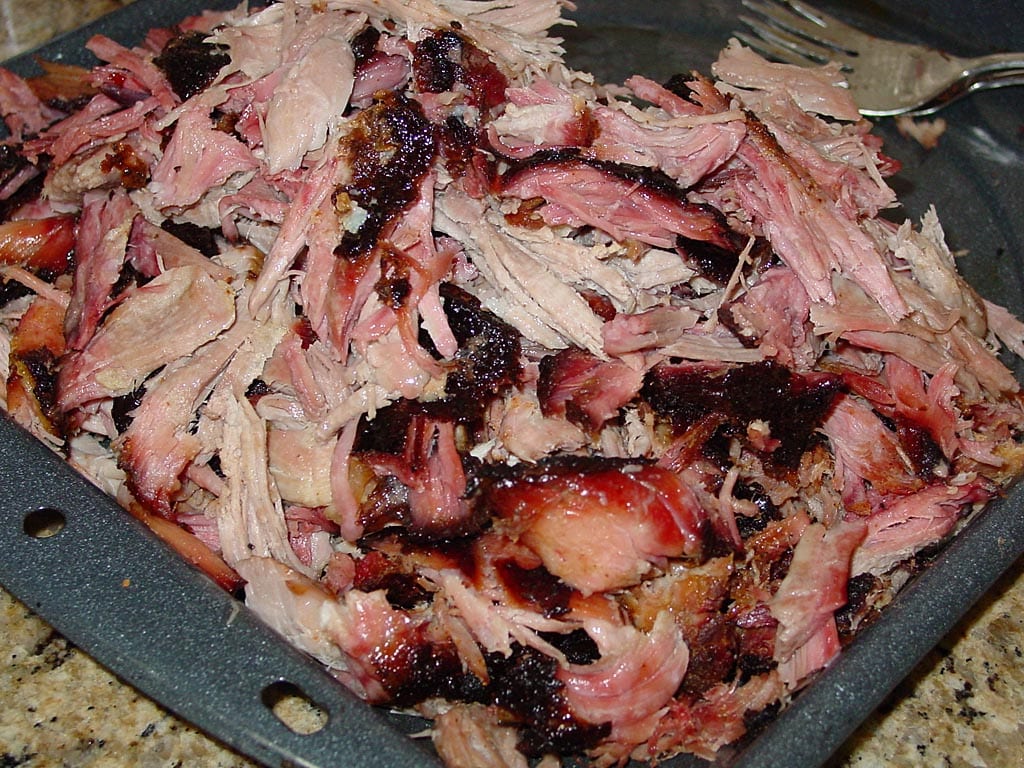
Pulling Pork Butt
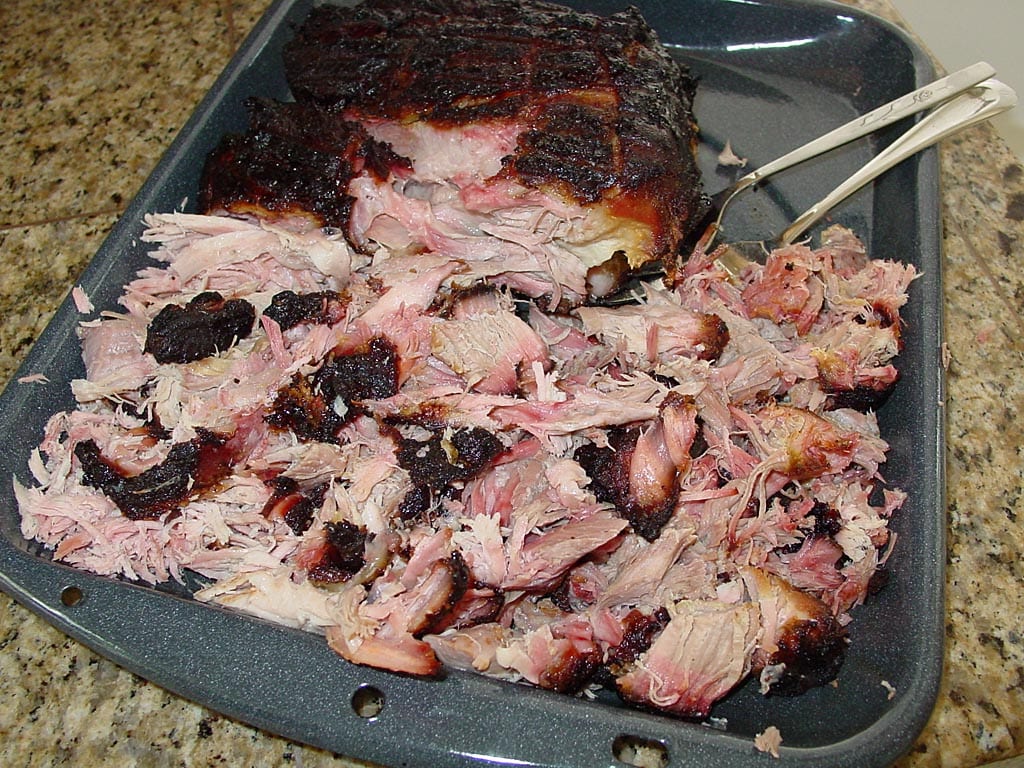
When pulling hot pork butt, protect your hands by wearing heat-resistant gloves or lightweight knit cotton gloves (from the hardware store) covered with disposable nitrile gloves.
After cooking the pork butt to 195-205°F and letting it rest for at least 30 minutes, remove the bone (if any) and pull the meat into thumb-sized pieces or smaller.
The two most common ways of pulling pork are by hand or with large serving forks.
To pull the meat by hand, separate the roast into chunks along the natural seams between muscles. Remove any areas of fat or connective tissue by hand or by scraping with a knife, then tear the chunks into small pieces.
To pull the meat using serving forks, just plunge two forks into the meat side-by-side and pull the meat apart. Use the forks to break large pieces down into small, bite-sized ones. Remove any areas of fat or connective tissue by hand.
There are also some nifty gadgets you can use to shred pork, including Bear Paws shredder claws and the Pro Pork Puller.
Many people enhance the flavor of pulled pork by mixing in leftover rub, or by mixing in a thin, vinegar-based (or even a tomato-based) sauce.
Pulled pork butt can be served on a plate or in a sandwich. It’s common for a pulled pork sandwich to be served on a bun with a drizzling of vinegar-based sauce and a scoop of coleslaw.
Chopping Pork Butt
Chopped pork butt is prepared by chopping the meat finely on a large cutting board with meat cleavers (if you have them) or with a chef’s knife. Chop the meat as finely as you like, then flavor with rub or sauce as with pulled pork.
And believe it or not, you can chop pork butt by using a stand mixer:
Chopped pork butt is usually served in a sandwich, topped with barbecue sauce and a scoop of coleslaw.
More Unsightly Bits And Pieces
As you pull pork, you will undoubtedly find large pockets of fat, connective tissue, large veins, and other unsavory bits and pieces. Just remove these things by hand or by scraping or cutting them away with a sharp knife.
“Mr. Brown” Or “Bark”
The terms “Mr. Brown” or “bark” describe the dark brown outside meat of barbecued pork butt that is so flavorful. Make sure that each of your guests gets some of this meat in their serving of pulled pork.
Pork Butt Yield
When you take into account trimming the fat before cooking, the shrinkage that occurs during cooking, and some waste when pulling the meat, you’ll end up with about a 70% yield of edible meat from a pork butt. For example, an 8-pound untrimmed pork butt will yield between 5-6 pounds of edible meat after trimming and cooking.
If you’re cooking pork butt for a group, figure 4-6 ounces of meat per sandwich. Assuming a 70% yield, an 8-pound untrimmed pork butt will yield 22 4-ounce sandwiches or 15 6-ounce sandwiches.
Pulled Pork Butt Servings Calculator
This calculator estimates pounds of pork butt to purchase based on number of servings, yield after shrinkage/waste, and portion size.
Leftovers
There’s a good chance you’ll end up with some leftover pork butt. See Holding, Storing & Reheating Barbecued Meats for tips on how to freeze and reheat the leftovers. If you don’t have one, consider buying a FoodSaver vacuum sealer to portion and freeze leftovers without freezer burn.
More Pork Butt Links On TVWB
- Pork Butt – Smoke & Spice The Renowned Mr. Brown
- Pork Butt – Slathered With Mustard & Rub
- Pork Butt – Chris Lilly Big Bob Gibson Championship Injection
- Pork Butt – Harry Soo Slap Yo’ Daddy Injection
- Pork Butt – Untrimmed Direct Heat
- Pork Butt – Buckboard Bacon
- Pork Butts In Foil Pans
- Pulled Pork Butt Servings Calculator


